Build Your Own ASP.NET 3.5 Website Using C# & VB (88 page)
Read Build Your Own ASP.NET 3.5 Website Using C# & VB Online
Authors: Cristian Darie,Zak Ruvalcaba,Wyatt Barnett
Tags: #C♯ (Computer program language), #Active server pages, #Programming Languages, #C#, #Web Page Design, #Computers, #Web site development, #internet programming, #General, #C? (Computer program language), #Internet, #Visual BASIC, #Microsoft Visual BASIC, #Application Development, #Microsoft .NET Framework

protected void employeeDetails_ItemUpdated(object sender,
DetailsViewUpdatedEventArgs e)
{
grid.DataBind();
}
protected void employeeDetails_ItemDeleted(object sender,
DetailsViewDeletedEventArgs e)
{
grid.DataBind();
}
protected void employeeDetails_ItemInserted(object sender,
DetailsViewInsertedEventArgs e)
{
grid.DataBind();
}
Now your GridView and DetailsView controls will be synchronized permanently.
The last improvement we’ll make is to add an
Add New Employee
button to the
page—
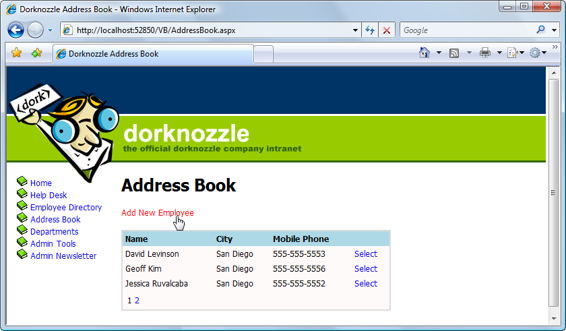
you can see how it will look in Figure 12.17. Right now
, we can only add new employees if we select an employee from the GridView, but this isn’t exactly
an intuitive way to work. Let’s add a button that will make the DetailsView control
display in insert mode when it’s clicked by a user.
Licensed to [email protected]

508
Build Your Own ASP.NET 3.5 Web Site Using C# & VB
Figure 12.17. The
Add New Employee
button
Add the new button above the grid like this:
Dorknozzle\VB\10_AddressBook.aspx
(excerpt)
Address Book
Text="Add New Employee" />
⋮
Double-click the button in
Design
view, and fill in its Click event handler like this:
Visual Basic
Dorknozzle\VB\11_AddressBook.aspx.vb
(excerpt)
Protected Sub addEmployeeButton_Click(ByVal sender As Object,
➥ ByVal e As System.EventArgs) Handles addEmployeeButton.Click
employeeDetails.ChangeMode(DetailsViewMode.Insert)
End Sub
Licensed to [email protected]
Advanced Data Access
509
C#
Dorknozzle\CS\11_AddressBook.aspx.cs
(excerpt)
protected void addEmployeeButton_Click(object sender, EventArgs e)
{
employeeDetails.ChangeMode(DetailsViewMode.Insert);
}
Our new button will cause the DetailsView to display in insert mode when clicked.
Your Address Book is now fully featured, and ready for production!
What’s really interesting about the code that was generated for us in this section is
the definition of the employeeDataSource. Since this data source needs to store the
details of selecting, deleting, updating, and inserting rows, it looks significantly
bigger than the employeesDataSource:
Dorknozzle\VB\10_AddressBook.aspx
(excerpt)
ConnectionString="<%$ ConnectionStrings:Dorknozzle %>"
DeleteCommand="DELETE FROM [Employees]
WHERE [EmployeeID] = @EmployeeID"
InsertCommand="INSERT INTO [Employees] ([DepartmentID], [Name],
[Username], [Password], [Address], [City], [MobilePhone],
[State], [Zip], [HomePhone], [Extension])
VALUES (@DepartmentID, @Name, @Username, @Password,
@Address, @City, @MobilePhone, @State, @Zip, @HomePhone,
@Extension)"
SelectCommand="SELECT [EmployeeID], [DepartmentID], [Name],
[Username], [Password], [Address], [City], [MobilePhone],
[State], [Zip], [HomePhone], [Extension] FROM [Employees]
WHERE ([EmployeeID] = @EmployeeID)"
UpdateCommand="UPDATE [Employees]
SET [DepartmentID] = @DepartmentID, [Name] = @Name,
[Username] = @Username, [Password] = @Password,
[Address] = @Address, [City] = @City,
[MobilePhone] = @MobilePhone, [State] = @State,
[Zip] = @Zip, [HomePhone] = @HomePhone,
[Extension] = @Extension
WHERE [EmployeeID] = @EmployeeID">
PropertyName="SelectedValue" Type="Int32" />
Licensed to [email protected]
510
Build Your Own ASP.NET 3.5 Web Site Using C# & VB
As you can see, the SqlDataSource contains the UPDATE, DELETE, and INSERT queries
it needs to execute when the user performs these actions on the DetailsView. These
are parameterized queries, and a data type is specified for each of the parameters,
which, as you already know, is good programming practice. You might also notice
that the names of the fields and tables are surrounded by square brackets ([ and ]).
These square brackets allow us to include spaces and other special characters in
table names. Since none of our field or table names contain spaces, we haven’t had
to worry about this issue so far, but obviously it’s a good idea to facilitate the inclusion of spaces. Licensed to [email protected]

Advanced Data Access
511
The SqlDataSource is the perfect tool when you need to create fully featured forms
such as the address book quickly and easily for smaller projects like the Dorknozzle
intranet. As the DetailsView and GridView controls are tightly integrated with the
data source controls, they allow us to implement a lot of functionality without
writing any code.
Displaying Lists in DetailsView
We want to improve on our DetailsView by making it show a list of department
names instead of department IDs. This makes sense, as it’s much easier for users to
select the name of a department than a department ID when they’re updating or
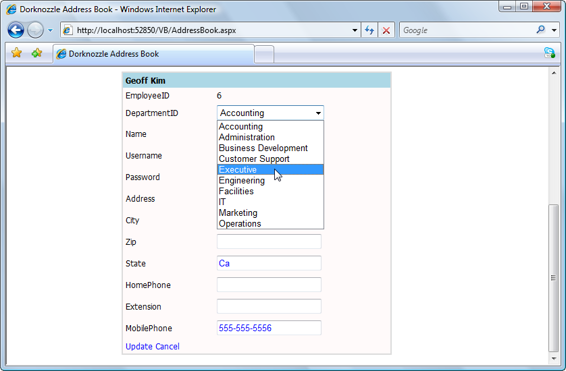
inserting the details of an employee. Figure 12.18 shows how the page will look
once we’ve created this functionality.
Figure 12.18. Viewing the
Department
drop-down list in Details view
Start by adding a new SqlDataSource control beside the two existing data source
controls in
AddressBook.aspx
. Name the control departmentsDataSource, click its
smart tag, and select
Configure Data Source
. In the first screen, select the
Dorknozzle
connection, then click
Next
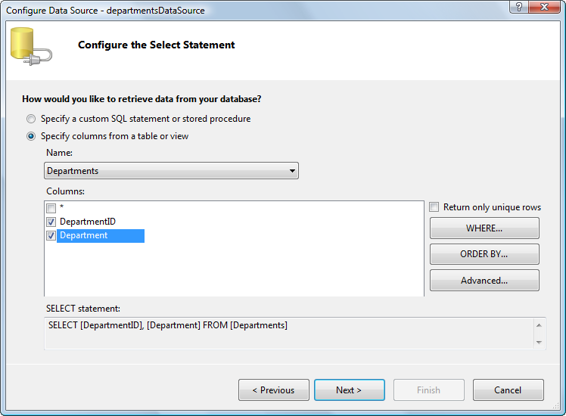
. Specify the Departments table and select both of its
columns, as shown in
Figure 12.19.
Licensed to [email protected]

512
Build Your Own ASP.NET 3.5 Web Site Using C# & VB
Figure 12.19. Selecting the columns from the Departments table
Click
Next
, then
Finish
to save the data source configuration. The definition of your new data source control will look like this:
Dorknozzle\VB\12_AddressBook.aspx
(excerpt)
ConnectionString="<%$ ConnectionStrings:Dorknozzle %>"
SelectCommand="SELECT [DepartmentID], [Department]
FROM [Departments]">
Now, with
AddressBook.aspx
open in
Design
view, click the DetailsView control’s smart tag, select
Edit Fields
, and transform the Department ID BoundField into a
TemplateField (you learned how to do this back in
Chapter 11). Now
, switch to Source view, and locate the Department ID TemplateField that you just generated.
It should look something like this:
SortExpression="DepartmentID">
Licensed to [email protected]
Advanced Data Access
513
Text='<%# Bind("DepartmentID") %>'>
Text='<%# Bind("DepartmentID") %>'>
Text='<%# Bind("DepartmentID") %>'>
Modify this generated template as highlighted below:
Dorknozzle\VB\13_AddressBook.aspx
(excerpt)
SortExpression="DepartmentID">
DataSourceID="departmentsDataSource"
DataTextField="Department" DataValueField="DepartmentID"
SelectedValue='<%# Bind("DepartmentID") %>' />
DataSourceID="departmentsDataSource"
DataTextField="Department"
DataValueField="DepartmentID"
SelectedValue='<%# Bind("DepartmentID") %>' />
DataSourceID="departmentsDataSource"
DataTextField="Department"
DataValueField="DepartmentID"
SelectedValue='<%# Bind("DepartmentID") %>'
Enabled="False" />
Licensed to [email protected]
514
Build Your Own ASP.NET 3.5 Web Site Using C# & VB
When you reload your address book now, you’ll see that the departments are displayed in a drop-down list. You can use that list when you’re inserting and editing employee data—a feature that the intranet’s users are sure to find very helpful!
