Build Your Own ASP.NET 3.5 Website Using C# & VB (32 page)
Read Build Your Own ASP.NET 3.5 Website Using C# & VB Online
Authors: Cristian Darie,Zak Ruvalcaba,Wyatt Barnett
Tags: #C♯ (Computer program language), #Active server pages, #Programming Languages, #C#, #Web Page Design, #Computers, #Web site development, #internet programming, #General, #C? (Computer program language), #Internet, #Visual BASIC, #Microsoft Visual BASIC, #Application Development, #Microsoft .NET Framework

168
Build Your Own ASP.NET 3.5 Web Site Using C# & VB
Figure 5.10. The Toolbox
the Properties window. If it’s not visible, you can make it appear by selecting
View
>
Properties Window
.
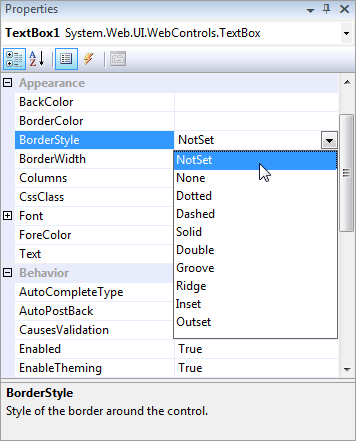
The Properties window doesn’t just allow you to see the properties—it also lets you
set them. Many properties—such as the colors that can be chosen from a palette—can
be set visually, but in other cases, complex dialogs are available to help you establish
the value of a property. In
Figure 5.12
, the properties of the TextBox are displayed in the
Properties
window, and the BorderStyle property is being altered.
By default, the control’s properties are listed by category, but you can order them
alphabetically by clicking the
A-Z
button. Other buttons in the window allow you
to switch between Properties view and Events view.
Licensed to [email protected]

Building Web Applications
169
Figure 5.12. Setting a border style using the Properties window
Executing Your Project
As you already know, every time you pressed
F5
or selected
Debug
>
Start Debugging
to load a web page, the page was executed through Visual Web Developer’s integrated
web server, also known as
Cassini
. The debugging features of Visual Web Developer
enable you to find and fix errors in your code, execute a block of code line by line,
inspect the values of the variables while the code runs, and much more—you’ll
learn more about these features later in this chapter. When you don’t need to use
the debugging features, you can execute a page by selecting
Debug
>
Start Without
Debugging
, or using the keyboard shortcut
Ctrl
+
F5
.
To run an ASP.NET project with debugging enabled, you’ll need to enable that
feature in the project’s
Web.config
file. This is why the first time you try to debug
the project in Visual Web Developer, it will offer to alter
Web.config
for you.
When you execute a project through Cassini, it will automatically start on a random
port. When you ran the examples in the previous chapters, you may have noticed
that the URL looked something like this:
http://localhost:52481/CS/Default.aspx
. You
can see that the integrated web server was running with the host name localhost
on port 52481. The last part of the URL (
/CS/Default.aspx
) includes a reference to
the folder in which the application file is located—either
CS
or
VB
for the examples Licensed to [email protected]


170
Build Your Own ASP.NET 3.5 Web Site Using C# & VB
in this book. Visual Web Developer’s web server displays one small icon in the
Windows system tray for each web server instance that’s running. If you run multiple
projects at the same time, one web server instance will be created for each project
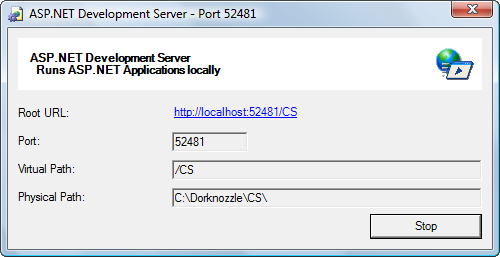
and more icons will appear. If you double-click on any of those icons, you’ll be
presented with a dialog that contains the web server details, and looks very much
like the window shown in Figure 5.13.
Figure 5.13. Visual Web Developer’s web server in action
As it executes the project, Visual Web Developer will launch your system’s default
web browser, but you can make it use another browser if you wish (we showed you
how to do that in
the section called “Writing Your First ASP.NET Page” in Chapter 1
). For the purpose of running and debugging your ASP.NET web applications, you
might find it easier to use Internet Explorer as your default browser—it works a
little better with Visual Web Developer than do other browsers. For example, if you
close the Internet Explorer window while your project runs in debug mode, Visual
Web Developer will stop the application automatically. Otherwise, you’d need to
stop it manually by selecting
Debug
>
Stop Debugging
, or clicking the
Stop
button
Figure 5.14. Stopping debug mode
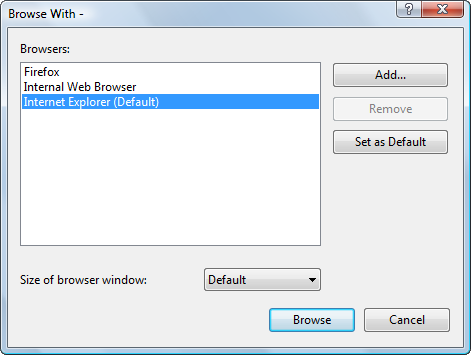
To change the browser that’s used to execute your web applications, first make sure
that none of your projects are running. Then, right-click the root node in
Solution
Explorer
, and select
Browse With
to display the dialog shown in Figure 5.15. Select
Internet Explorer
, click
Set as Default
, and click
Browse
.
Licensed to [email protected]


Building Web Applications
171
Figure 5.15. Setting the default browser in Visual Web Developer
By default, when you press
F5
or
Ctrl
+
F5
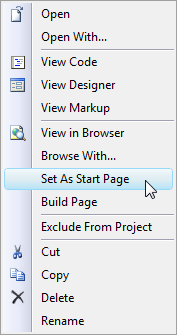
, Visual Web Developer will execute the page you’re currently editing. Frequently, though, you’ll have a single start page
that you want loaded when you’re executing the project. You can set the default
page by right-clicking a web form in
Solution Explorer
, and selecting
Set As Start Page
. Figure 5.16. Setting the start page of the project
Core Web Application Features
Let’s continue our exploration of the key topics related to developing ASP.NET web
applications. We’ll put them into practice as we move through the book, but in this
quick introduction, we’ll discuss:
Licensed to [email protected]
172
Build Your Own ASP.NET 3.5 Web Site Using C# & VB
■
Web.config
■
Global.asax
■ user sessions
■ caching
■ cookies
Web.config
Almost every ASP.NET web application contains a file named
Web.config
, which
stores various application settings. By default, all ASP.NET web applications are
configured in the
Machine.config
file, which contains machine-wide settings, and
lives in the
C:\WINDOWS\Microsoft.NET\Framework\
version
\CONFIG
directory. For the most part, you won’t want to make any modifications to this file. However,
you can override certain settings of the
Machine.config
file by adding a
Web.config
file to the root directory of your application. You should have this file in your project
because Visual Web Developer automatically creates it for you, but if you don’t,
you can add one by accessing
Website
>
Add New Item…
, then selecting
Web Config-
uration File
from the dialog that appears.
The
Web.config
file is an XML file that can hold configuration settings for the application in which the file resides. One of the most useful settings that
Web.config
controls is ASP.NET’s debug mode. If Visual Web Developer hasn’t enabled debug mode for you, you can do it yourself by opening
Web.config
and editing the compilation
element, which looks like this:
Dorknozzle\VB\01_web.config
(excerpt)
strict="false" explicit="true" /> Licensed to [email protected]
Building Web Applications
173
Enabling debug mode is as simple as changing the value of the debug attribute to
true. The other attributes listed here were added by Visual Web Developer to offer
a helping hand to VB developers migrating from older versions. For example,
strict="false" makes the compiler forgive some of the mistakes we might make,
such as using the wrong case in variable names. They don’t appear if your project
uses C#.
Web.config
can also be used to store custom information for your application in a
central location that’s accessible from all the pages of your site. For example, if you
want to store the email address of someone in your technical support team so that
it can be changed easily, you might take the approach shown here:
This way, whenever you need to display or use an email address for technical
support within the site, you can simply read the SupportEmail key using the
WebConfigurationManager class. And, if you wanted to change the email address
you used for technical support, you’d just need to change this setting in
Web.config
.
