101 Excel 2013 Tips, Tricks and Timesavers (4 page)
Read 101 Excel 2013 Tips, Tricks and Timesavers Online
Authors: John Walkenbach

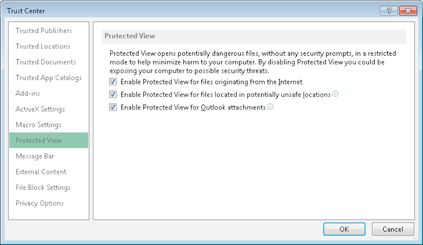
Figure 4-2:
Change the Protected View settings in the Trust Center dialog box.
If you want to explicitly open a file in Protected View, choose File⇒Open to display the Open dialog box. Select your file and then click the arrow to the right of the Open button. One of the options displayed is Open in Protected View.
If you enable editing in a workbook that opened in Protected View and then save the workbook, it will no longer open in Protected View.
Printing and copying
In some situations, you don’t care about working with the document. You just want to print it. Unfortunately, it’s not even possible to print a workbook unless you exit Protected View. Choose File⇒Print and then click the Enable Printing button to exit Protected View.
Note that you can
copy
worksheet data from a Protected View document and paste it to another workbook. Formulas are not copied, but the current formula results are.
Forcing a file to open in Normal view
If you download a workbook and you’re absolutely certain that it’s safe, you can force it to open in Normal view. After downloading the workbook:
1.
Right-click the workbook name (or icon) and choose Properties from the shortcut menu.
The Properties dialog box appears.
2.
Click the General tab (see Figure 4-3).
3.
Click the Unblock button.
4.
Click OK to close the Properties dialog box.
After performing these steps, the workbook will open in Excel in Normal view (not Protected View).
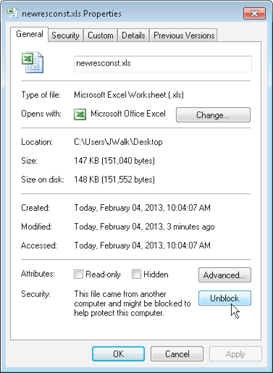
Figure 4-3:
Forcing a workbook to open in Normal view.
Tip 5: Understanding AutoRecover
If you’ve used computers for any length of time, you’ve probably lost some work. You forgot to save a file, or maybe the power went out and your unsaved work was lost. Or maybe you were working on something and didn’t think it was important, so you closed it without saving — and later realized that it
was
important. The AutoRecover
feature in Excel can make these types of “doh!” moments less frequent.
As you work in Excel, your work is periodically saved, automatically. It happens in the background, so you don’t even know that it’s happening. You have the ability to access these autosaved versions of your work — even workbooks that you never explicitly saved.
This feature consists of two components:
→ Versions of a workbook are saved automatically, and you can view them.
→ Workbooks that you close without saving are saved as draft versions.
Recovering versions of the current workbook
To see whether any previous versions of the current workbook are available, choose File⇒Info. The section labeled Versions lists the available old versions (if any) of the current workbook. Figure 5-1 shows that two autosaved versions of the active workbook are available.
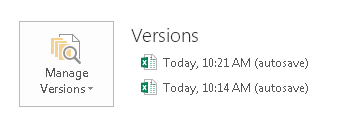
Figure 5-1:
Two autosaved versions of this workbook are available.
You can open an autosaved version by clicking its name. Remember that opening an autosaved version
won’t
automatically replace the current version of your workbook. Therefore, you can decide whether the autosaved version is preferable to the current version. Or you can just copy some information that may have been accidentally deleted and paste it into your current workbook.
When you close the workbook, the autosaved versions are deleted.
Recovering unsaved work
When you close a workbook without saving your changes, Excel asks whether you want to save your changes. If that unsaved workbook has an autosaved version, the dialog box informs you of that fact, as shown in Figure 5-2.

Figure 5-2:
If you close a workbook without saving, Excel tells you whether an autosaved version will be available.
To recover a workbook that you closed without saving, choose File⇒Info⇒Manage Versions and choose Recover Unsaved Workbooks. You see a list of all unsaved versions of your workbooks. You can open them and (hopefully) recover something that you needed. These drafts are also listed in the recent file list, which displays when you choose File⇒Recent.
Draft versions of unsaved workbooks are deleted after four days or until you edit the file.
 You can choose how AutoRecover works in the Save tab of the Excel Options dialog box. For example, you can change the autosave time interval (the default is 10 minutes), turn off autosave for a particular workbook, or disable this feature for all workbooks.
Tip 6: Using a Workbook in a Browser
Microsoft’s Office Web Apps enable you to create, view, and edit workbooks directly in a browser. The experience isn’t exactly the same as using the desktop version of Excel, but it’s very similar. A key advantage is that you can access your workbooks from any location, and Excel need not be installed on the computer you use.
 This tip assumes that you have a Microsoft SkyDrive account (free) and are logged in. You can also use SharePoint.
After creating a workbook, choose File⇒Save As and choose a location on your SkyDrive. This action saves your workbook on the cloud, and also saves a copy in your local SkyDrive folder. The two versions are synched.
Open your web browser and navigate to skydrive.com. Locate the workbook and click it. The workbook appears in the Excel Web App. Figure 6-1 shows a workbook displayed in the Google Chrome browser. As you can see, it’s remarkably similar to the desktop version of Excel.
The Excel Web App is lacking some features, compared to the desktop version. For example, the following are not supported by the Excel Web App:
→ Macros
→ Add-ins
→ Data validation
→ Comments
→ Shapes and other inserted objects
Some features, such as worksheet protection, prevent the workbook from being opened.
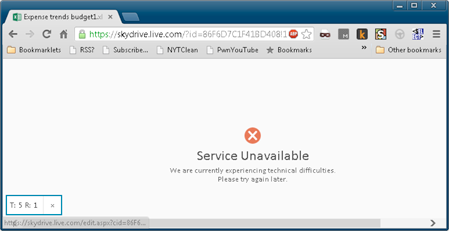
Cloud computing is a great idea, and it could be a significant part of the future of computing. But it can also be frustrating because you’re at the mercy of your Internet provider and Microsoft. What if you need to get some work done, and the file you need is on the cloud? The message shown in Figure 6-2 could be frustrating.
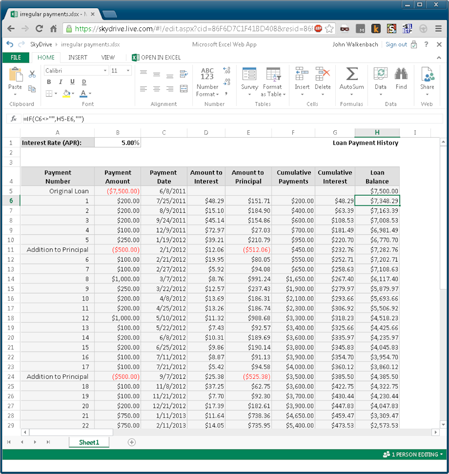
Figure 6-1:
Viewing a workbook in a web browser.
