Read Microsoft Visual C# 2005 Express Edition: Build a Program Now! Online
Authors: Patrice Pelland
Tags: #General, #Computers, #C♯ (Computer program language), #Programming Languages, #C#, #Microsoft .NET Framework, #Computer Books: Languages, #Computer Graphics, #Application software, #C# (Computer program language), #Programming, #Microsoft Visual C# .NET, #Microsoft Visual C♯ .NET, #Electronic books, #Game Programming & Design, #Computing: Professional & Programming, #C (Computer program language), #Computers - Languages, #Programming Languages - C#, #Programming & scripting languages: general
Microsoft Visual C# 2005 Express Edition: Build a Program Now! (35 page)

The application configuration is stored in an XML file named using the application’s executable name and adding
.
config at the end of the executable filename. In our application, the file is named CarTracker.exe.config, although you only see app.config while working in Visual Studio. If you want to save the connection string, you are also asked to provide a variable name under which it will be saved in the file. 4 Make sure the
Yes, Save The Connection As
check box is selected and then click
Next
. In the next screen, you’ll select all the tables from the database that will be in your dataset and name 5 your dataset. In your case, you will need all of the tables, so expand the Tables node and select all tables. Leave the DataSet Name set to CarTrackerDataSet and then click
Finish
. The result of your dataset configuration is an .xsd file or a XML Schema Document, and it will define the internal structure of your dataset. Remember that a dataset is an in-memory representation of one or more tables from your database. ADO.NET will use this schema file when working with your application. When running the application, the user will be able to add, delete, or modify rows in the dataset (in the computer’s memory). The changes will remain in memory until the user commits the changes back to the database, which in our example is the CarTracker.mdf file. In the Solution Explorer, double-click the .xsd file named
CarTrackerDataSet.xsd
. As shown in Figure 6 8-17, the result of the dataset creation is similar to the database diagram you created earlier. Your diagram might be different depending on your screen resolution and how you customized your IDE.
Chapter 8: Managing the Data
151
C08622299.indd 151
C08622299.indd 151
10/24/05 4:02:44 PM
10/24/05 4:02:44 PM
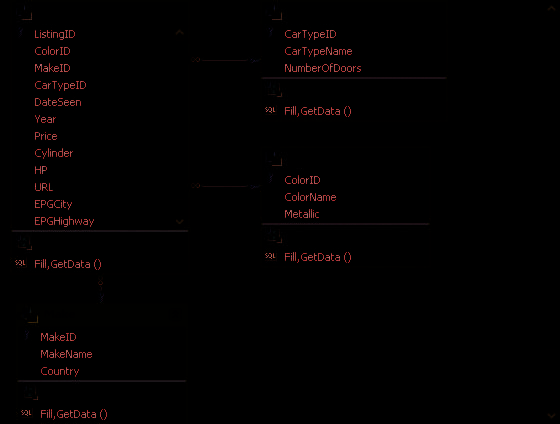
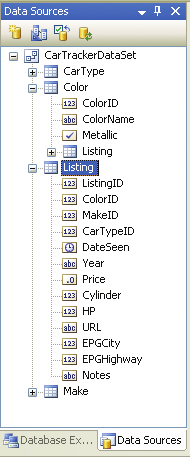
Figure 8-17
Graphical representation of
the CarTracker dataset
There are some notable differences, however. You’ll see the same columns that you have created in your physical database, but in the bottom of each table, you will see methods: Fill, GetData(). These methods are particular to the dataset, and the ADO.NET-generated code by Visual Studio will use them to databind data to your Windows Form controls—controls that do not exist yet!
Return to the Data Sources window and expand the dataset tables. You’ll see the in-memory repre7 sentation of your tables, and you’ll also see that each column has a small icon that gives you its type. These icons may look familiar to you because they are similar to the controls in the toolbox. Refer to Figure 8-18 for a quick glance at the Color and Listing dataset tables and their column types. Close the graphical representation of your dataset by clicking the
X
in the corner of the designer 8 surface.
9 In the Solution Explorer, double-click your
Form1.cs
file to open the designer surface for Form1.
Figure 8-18
View of the Color and Listing
dataset tables from within
the Data Sources window
152
Microsoft Visual C# 2005 Express Edition: Build a Program Now!
C08622299.indd 152
C08622299.indd 152
10/24/05 4:02:44 PM
10/24/05 4:02:44 PM

10 In the Data Sources window, select the
Listing
node in your dataset and click on the drop-down arrow point that’s next to the word
Listing
. You will be presented with two choices: DataGridView or Details. DataGridView brings all of the dataset fields into a table or grid format with multiple rows, while Details brings the dataset fields in one row at a time with all fields as individual controls. For our example, select
Details
.
You’ll also see that each member of the dataset has the same drop-down arrow, which allows you to change which controls will be dropped onto the form when it is dragged. Allowing you to choose controls prior to dragging the dataset table onto the form prevents you from having to lay out the UI yourself piece by piece.
11 Change the ColorID, MakeID, and CarTypeID to the ComboBox type by clicking on the drop-down arrow next to each column and selecting
ComboBox
.
12 Select the
Listing
node by clicking on it, and then drag and drop it onto the designer surface on Form1.
13 You’ll now modify the form size like you did in previous chapters by modifying the form’s Size property. Change the form size so that its
Width
is
450
pixels and its
Height
is
550
pixels.
14 Move all of the controls so that the first label is almost in the top-left corner just beneath the tool strip. See Figure 8-19 to determine how the controls should approximately be placed.
You may need to scroll to see all
of the controls depending on your
screen resolution.
Figure 8-19
Resized Car Tracker form after moving
all of the controls
Chapter 8: Managing the Data
153
C08622299.indd 153
C08622299.indd 153
10/24/05 4:02:45 PM
10/24/05 4:02:45 PM
As you can see, many things have just happened. Let’s start by looking
When working with local database files, it is necessary to understand that
at the designer surface. All of the fields from the dataset have been
they are treated like any other content file. For desktop projects, it means
added as controls, and labels were also added based on the name of
that, by default, the database file will be copied to the output folder (i.e.,
the field in the dataset. This feature is called smart caption. Visual
bin) each time the project is built. After pressing F5, here’s what it would
Studio uses Pascal or Camel casing as a mechanism to insert a space
look like on disk:
CarTracker\CarTracker.mdf
in labels when using smart captions. When you drop the dataset fields
CarTracker\Form1.cs
onto the form, smart caption looks at each field’s casing. When it finds
CarTracker\Bin\Debug\CarTracker.mdf
an uppercase letter or an underscore character (i.e., _) following a low
CarTracker\Bin\Debug\CarTracker.exe
ercase letter, it inserts or replaces the _ with a space. An exception to
At design time, CarTracker\CarTracker.mdf is used by the data tools and wiz-
this rule can be seen in the EPGCity and EPGHighway fields. When you
ards. At run time, the application will use the database under the bin\debug
folder. As a result of the copy, many people have the impression that the
use uppercase letters for an acronym Visual Studio cannot distinguish
application did not save the data to the database file. This assumption occurs
that these are two words and therefore doesn’t split them apart. You’ll
because there are two copies of the data file involved. This also happens
have to split these two fields manually.
when looking at schema/data through the Database Explorer. The tools are
using the copy in the project folder and not the file in the bin\debug folder.
You will also notice that a tool strip has been added that contains
The following are a few ways to work around this copy behavior:
1. If you select your database file in the Solution Explorer window, you will
almost the same buttons you used while working with the database
see a property called Copy To Output Directory in the Properties window.
table designer.
By default, it is set to Copy Always, which means that data files in the
project folder will be copied to the bin\debug folder on each build, thus
overwriting the existing data files if any. You can set this property to Do
15 Read the blue Important sidebar to the left. With this copy
behavior in mind, I suggest that you use Approach #1, even though
Not Copy and then manually place a copy of the data file in the bin\debug
folder. In this way, on subsequent builds, the project system will leave the
you’ll have to perform some manual steps. If you want to debug your
database file in the bin\debug folder and not try to overwrite it with the
application from within Visual Studio, it’s preferable to use this solution or
one from the project. The downside to this method is that you will still
you will not be able to see the changes applied to your database file. The
have two copies. Therefore, after you modify the database file using the
database file will always come back to the initial one from your project,
application, if you want to make those same changes within the project,
which is similar to resetting the whole database to what it is inside Visual
you will need to copy the changes to the project manually and vice-versa.
2. You can leave the data file outside the project and create a connection to
Studio.
it in Database Explorer. When the IDE asks you to bring the file into the
project, simply say no. In this way, both the design time and run time will
be using the same data file. The downside to this method is that the path
16 Select the
CarTracker.mdf
database file in the Solution Explorer
in the connection string will be hard coded, and it will therefore be harder
and change the Copy to Output Directory property to
Do Not
to share the project and deploy the application. Before deploying the
Copy
in the Properties window.
application, make sure to replace the full path in the settings with a rela-
tive path. If you want to read more about the relative path versus the full
path (plus a bit more about this copy behavior), read the following article:
http://blogs.msdn.com/smartclientdata/archive/2005/08/26/456886.aspx
. You’ll
17 Press
F5
to build and run your application. You’ll get an excep
see that I took portions of that article and modified them so that they fit
tion message because the file won’t be copied in the bin\debug
our application.
directory. Also, on the form load event when your code tries to fill the dataset, it won’t find the database at the place specified by the connection string. Therefore, you get an SQLException stating that it’s not able to attach to the database. Click the
Stop Debugging
button or press
Shift+F5
to stop debugging.
154
Microsoft Visual C# 2005 Express Edition: Build a Program Now!
C08622299.indd 154
C08622299.indd 154
10/24/05 4:02:46 PM
10/24/05 4:02:46 PM

