Read Microsoft Visual C# 2005 Express Edition: Build a Program Now! Online
Authors: Patrice Pelland
Tags: #General, #Computers, #C♯ (Computer program language), #Programming Languages, #C#, #Microsoft .NET Framework, #Computer Books: Languages, #Computer Graphics, #Application software, #C# (Computer program language), #Programming, #Microsoft Visual C# .NET, #Microsoft Visual C♯ .NET, #Electronic books, #Game Programming & Design, #Computing: Professional & Programming, #C (Computer program language), #Computers - Languages, #Programming Languages - C#, #Programming & scripting languages: general
Microsoft Visual C# 2005 Express Edition: Build a Program Now! (16 page)

you can add code snippets in two ways: you can insert them or, using an existing block of code, you can surround that block of code with a code snippet. Let’s look at the first way. At any point in your source code you can right-click and select Insert Snippet… and then select the code snippet that best fits the context. The second way needs a bit more explanation. Let’s say you have an existing block of code that reads a line of text in a file and then parses some data. In the process of developing your application you realize that you need the code to read the whole file and not only one line. This means you need to add a looping construct. With Surround With… it’s quite easy to add the block of code to do the looping. You just have to select the block of code you want to loop, right-click, and select Surround With… Then you need to select the instruction you want to surround your block of code with. In our example, you would surround the code with a
while
statement. Then you just have to double-click on the
while
statement and your code will be automatically embedded in the
while
block. Figure 5-8 shows a glimpse of the code snippets first-level menu choices. All code snippets are made with customizable fields, which means that they contain fields that are replaceable with code elements from your own applications. Going forward, you will be able to download additional code snippets from various sources such as Microsoft MSDN® Web site, online communities, and other .NET vendors. You will also be able to add your own code snippets to the code snippets library to fulfill your needs in other projects.
M O R E I N F O
See the “Additional Information”
section at the end of this chapter
for more information on code
snippets.
Figure 5-8
IntelliSense code snippets menus
Chapter 5: Creating Your First Full Windows Application
63
C05.indd 63
C05.indd 63
10/24/05 3:15:43 PM
10/24/05 3:15:43 PM
How to Invoke Code Snippets
You can invoke the code snippets in the code editor two different ways: by right-clicking and choosing Insert Snippet or Surround With and also by selecting Edit, then IntelliSense and then Insert Snippet... or Surround With... Each way has its own keyboard shortcut: CTRL+K, X
for Insert Snippet and CTRL+K, S for Surround With.
TO USE CODE SNIPPETS
Using the previous test project, go back to the code editor in the
Button1_Click
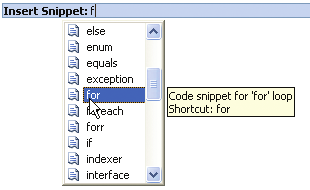
event and call up the 1
IntelliSense Snippet
menu, using either method described above. On the menu, scroll down to the
for
statement. Look at Figure 5-9 to get a feel for which menu 2 choices you should have on your screen. Double-click the
for
statement to insert the code in the code editor.
Figure 5-9
Code snippets within the Visual C#
language menus
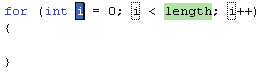
Once you select the
for
statement, a generic template for that language construct appears. Refer to 3 Figure 5-10. The green fields in the “before” screenshot are replacement fields pre-populated with some default values that you can modify. Before you go to the next step, edit the code to match the “after”
screenshot.
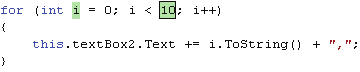
Figure 5-10
Before (left) and after (right) look for
the for statement code snippets
64
Microsoft Visual C# 2005 Express Edition: Build a Program Now!
C05.indd 64
C05.indd 64
10/24/05 3:15:43 PM
10/24/05 3:15:43 PM
Build and execute your application by pressing F5, then click the button on the displayed form to exe4 cute the code snippet you’ve just inserted. In the second text box, you should see the numbers 1
through 10 separated by commas. This output is the result of the
for
statement looping 10 times, adding the index value string representation and a comma to the text box with each loop. In this sample, the index is “i”.
5 Just below the right curly brace (}) of the
for
statement, type the following line of code: this.textBox2.Text += i.ToString() + “,”;
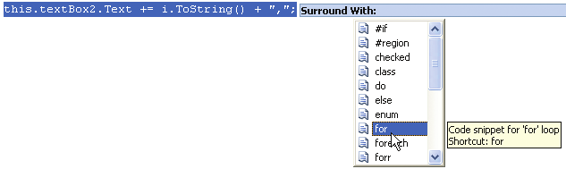
Select the line of code you just typed, then right-click and select Surround With… You should see a list 6 of items similar to the Insert Snippet… choices. Double-click the
for
statement from that list. You should have the same type of
for
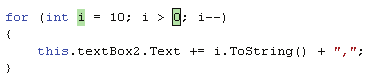
statement with your line of code embedded in it. Now start your index i at 10 and instead of 1 and instead of increasing, decrease the index by doing 7
i--
. Look at Figure 5-11 to see the before and after the Surround With…
Figure 5-11
Before (left) adding the code snip-
pet using Surround With and after
(right)
Now build and execute by hitting F5 and when you click the button you should see the suite of 1 to 9
8 and then 10 to 1 in textBox2. You might need to resize textBox2 to be large enough to hold the suite of numbers.
Chapter 5: Creating Your First Full Windows Application
65
C05.indd 65
C05.indd 65
10/24/05 3:15:44 PM
10/24/05 3:15:44 PM

IntelliSense Auto-Using Statements
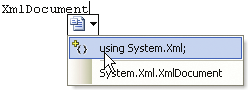
The final IntelliSense feature is auto-using statements. Let’s say you want to work with an XML file and you want to load it in memory. The XmlDocument class is in the System.Xml namespace and for IntelliSense to see it, you need a directive on top of your file. The autousing statements help you continue to type your code without leaving the place where you need the new class. For instance, below the right curly brace (}) of the second
for
loop statement, type the following code: XmlDocument
A red smart tag will appear. If you click on it and then click on the drop-down list, you’ll see that the first choice you’ll have will suggest inserting the using System.Xml directives on top of the file. This will be done automatically without you having to type a single line of code. Great productivity! After the using directives are added, your XmlDocument will change from black to cyan indicating that IntelliSense picked up the using directive and it’s a recognized class. Look at Figure 5-12 for the before and after. When you’re done experimenting, delete the line of code--you won’t need it anymore.
Figure 5-12
Using the auto-using statement and
the using directive added on top of
the file
Renaming and Refactoring
Visual C# 2005 Express Edition has added a great support for refactoring. Refactoring helps developers to automate many common tasks when they restructure their code. In Visual C#
2005 Express Edition it enables you to do two of those restructuring tasks: rename symbols and extracting method. Let’s look at them.
66
Microsoft Visual C# 2005 Express Edition: Build a Program Now!
C05.indd 66
C05.indd 66
10/24/05 3:15:45 PM
10/24/05 3:15:45 PM
The rename feature found in Visual C# 2005 is quite useful. It provides you, the programmer, with an easy, automatic, and effective way of changing source elements in a selective way, but the symbol is referenced in the code. The variables, controls, comments, strings,
