Read Microsoft Visual C# 2005 Express Edition: Build a Program Now! Online
Authors: Patrice Pelland
Tags: #General, #Computers, #C♯ (Computer program language), #Programming Languages, #C#, #Microsoft .NET Framework, #Computer Books: Languages, #Computer Graphics, #Application software, #C# (Computer program language), #Programming, #Microsoft Visual C# .NET, #Microsoft Visual C♯ .NET, #Electronic books, #Game Programming & Design, #Computing: Professional & Programming, #C (Computer program language), #Computers - Languages, #Programming Languages - C#, #Programming & scripting languages: general
Microsoft Visual C# 2005 Express Edition: Build a Program Now! (38 page)

Add validations for user input, such as making
Add more information in the listing, such as consure the year of the car is not greater than the tact information
current year + 2
Make the URL clickable
Add pictures in the databases and on the form
Save an ad as a text file
Add a sold check mark
Add three forms to add data in the domain
tables (CarType, Make, Color)
In Summary…
That was a big chapter with a lot of material! Let’s review what you’ve learned. You were first introduced to databases and database concepts. You learned what constituted a database and what you usually find within a database. You learned about data integrity and how it is related to the primary key and the foreign key.
You then used Visual C# 2005 Express Edition to create a database and tables and then populated them with some initial data using various tools in Visual C# 2005 Express Edition. You implemented all of the foreign key relationships without leaving Visual Studio and validated them as well.
After entering your data manually, you learned how to allow a user to enter data more easily by developing a sample Car Tracker application that uses ADO.NET and databinding. Lastly, you learned about the new components of ADO.NET 2.0 and how, with little or no code, you can develop a fully working data-centric application. You’ve only been introduced to a brief part of ADO.NET, for it’s a vast subject. If you want to learn more, try looking at some code or samples on MSDN. A good place to begin is the 101 samples for Visual Studio 2005. Pay particular attention to the data access and Windows Forms samples. Here’s the link:
http://go.microsoft.com/fwlink/?linkid=51659.
In the next chapter, you will develop the final application of this book—the Weather Tracker application. You’ll learn new concepts such as deployment, consuming Web services, user settings, and much more in a complete application with all of the necessary validations.
Chapter 8: Managing the Data
163
C08622299.indd 163
C08622299.indd 163
10/24/05 4:02:54 PM
10/24/05 4:02:54 PM
C08622299.indd 164
C08622299.indd 164
10/24/05 4:02:55 PM
10/24/05 4:02:55 PM

Build Your Own
Weather Tracker
Application Now!
Features of the Weather
You have now reached the last chapter of the book and have learned quite
Tracker Application, 166
a few new concepts along the way. In this chapter, you’ll dot the i’s and cross the t’s by developing a full application. You will be working with new pro
Creating the Application
cesses in this chapter, but you will also need to draw on what you’ve learned
User Interface, 168
in previous chapters to create the final product. You’ve been developing other applications throughout the book, but you may not have performed
Using Web Services, 181
all of the validations based on the steps or on my recommendation. You will CSX_Chapter
9
And Now, Just
put it all together with this application.
ClickOnce!, 204
This chapter uses a United States weather Web service. I
expect that this Web service will be available and func-
tion as described in this chapter. However, since this
Web service is on the Internet, it is possible that this
Web service might change or might not be available. If
you don’t have an Internet connection or if the weather
Web service is not available, the application will let you
know by displaying a message. If there are any changes
or corrections for this chapter (or in the book), they will
be collected and added to a Microsoft Knowledge Base
article. To view the list of known corrections for this
book, visit the following article:
http://support.microsoft.com/kb/905040/
165
9.indd 165
CSX_Chapter 9.indd 165
10/24/05 6:59:10 PM
10/24/05 6:59:10 PM
Features of the Weather Tracker Application
In this section, you’ll become acquainted with the features used to create version 1.0 of the Weather Tracker application. This application contains the following features
in version 1.0:
■ Starts and resides as an icon in the notification area of the Windows Taskbar
■ Configures optional user settings from the notification area icon in the context menu
■ Refreshes all weather data on demand from the context menu in the notification area
■ Uses a Web service for the data (weather)
■ Stores and persists user settings using XML
■ The application will minimize and not close when the user clicks the Close button in the title bar. The application will only close when the user selects Exit on the context menu.
■ Contains a splash screen on startup
■ Contains an About box from the context menu
■ Displays the current temperature using the weather icon as follows: a temperature above 100
degrees is displayed in red; any negative temperature is displayed in blue; normal temperature is displayed in black
The application will not contain the following features in version 1.0:
■ Will not work for more than one city at a time
■ No graphical gauge controls for wind, pressure, temperature, and so forth
■ Conversions between metric units and English units
166
Microsoft Visual C# 2005 Express Edition: Build a Program Now!
CSX_Chapter 9.indd 166
CSX_Chapter 9.indd 166
10/24/05 6:59:16 PM
10/24/05 6:59:16 PM
The High-Level Plan
For the Weather Tracker application, the user will briefly see the splash screen and then it will go directly to the notification area in the Windows Taskbar and display the current temperature. If the temperature is above 100 degrees F, the temperature will be displayed in red starting at 00. If the temperature is below 0 degrees F (negative degrees), the temperature will be displayed in blue. Otherwise, the temperature will be displayed in black. If a problem occurs, a red NA will show up in place of the temperature reading.
If the user right-clicks the icon in the notification area, it will open a context menu with choices to open the Main form and retrieve the current weather. The current weather will have an icon and provide all of the weather data that the Web service can provide. If the user selects Refresh Weather Info from the context menu from the notification area icon, it will automatically trigger a call to the weather Web service to update both types of weather data. This will be done asynchronously and will start by updating the current weather. If the user select Options from the context menu, an Options dialog box will be displayed. The user will be able to change the ZIP code where weather data should be retrieved. If the user selects About from the context menu, it will display an About dialog box.
In this chapter, I will use a different approach than used in previous chapters. As long as you are using the same components that I specify, you may personalize your application as far as size, color, and other attributes are concerned. I’ll also present my solution as well at different steps along the development; therefore, if you like what you’re seeing, you may proceed with your application from the companion content provided. I will also post a great deal of code and explain the sections that are linked to the features described above. To produce the application in this chapter, an incremental approach will be used in which you will implement one feature, integrate it with the rest of the application, and then test it. You will then move to the next feature until completion.
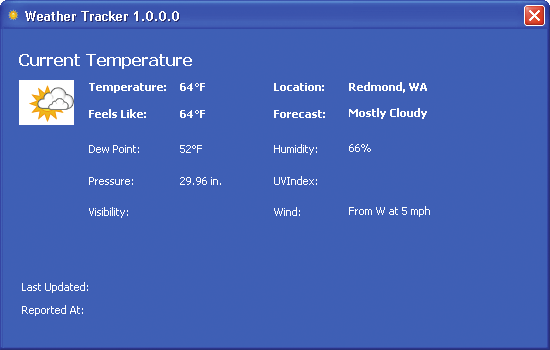
The Main form user interface (UI) will contain all of the weather information that you’ll display to the user. Refer to Figure 9-1 to see what the Main form will look like when finished.
Chapter 9: Build Your Own Weather Tracker Application Now!
167
CSX_Chapter 9.indd 167
CSX_Chapter 9.indd 167
10/24/05 6:59:16 PM
10/24/05 6:59:16 PM
Creating the Application User Interface
The Main form user interface (UI) will contain all of the weather information that you’ll display to the user. Refer to Figure 9-1 to see what the Main form will look like when finished. At the moment, the form does not have any controls to display the weather information. As you learned in the last chapter, you will use databinding to bind the controls to the weather data. You’ll recall that when creating the data source, you had a choice of Database, Web Service, and Objects. In this application, you will use a Web service as a data source, and the fields you will display on the form will be data-bound to the Web service dataset.
Figure 9-1
View of the Main form in the Weather
Tracker application
TO CREATE A DATA SOURCE FOR A MAIN FORM CONTROL
Start Visual C# 2005 Express Edition and create a new Windows Application project. Name the appli1 cation
Weather Tracker
. In the Solution Explorer, rename Form1.cs to
Main.cs
. When you do this, Visual C# will ask you if you 2 want to perform a rename of all references to Form1 in the project. Click
Yes
to accept.
3 Using the Properties window, change the properties for the Main form using the following table:
168
Microsoft Visual C# 2005 Express Edition: Build a Program Now!
CSX_Chapter 9.indd 168
CSX_Chapter 9.indd 168
10/24/05 6:59:17 PM
10/24/05 6:59:17 PM
NOTE
Property
Value
All icons or image files in this chap-
ter will be located in a folder
Size:Width
550
named Images under the Chapter9
folder where you installed the com-
Size:Height
350
panion content. The default loca-
tion is \My Documents\Microsoft
BackColor
System:MenuHighlight
Press\VCS 2005 Express\.
ForeColor
Web:White
Font
Tahoma 8 Bold
Icon
Sun.ico
MinimizeBox
False
DoubleBuffered helps to reduce
MaximizeBox
False
or prevent flickering when the
form is redrawn. The form control
StartPosition
CenterScreen
is using a secondary buffer to
update the form’s graphics data,
FormBorderStyle
FixedDialog
whereby a quick write to the dis-
played surface memory is then
performed, reducing the chances
ShowInTaskBar
False
of flickering. If DoubleBuffered
is not enabled, then progressive
DoubleBuffered
True
redrawing of parts of the dis-
played form occurs, creating the
WindowState
Minimized
flickering.
Adding Notification Area Capabilities
Now that you have established the Main form, you’ll add the notification area capabilities. Let’s talk about terminology. If an application uses an icon located in the notification area (the area on the Windows Taskbar where the clock normally appears), this icon is called a notify icon and is implemented with a NotifyIcon control. The icon can have a context menu with different actions. Your icon will have a context menu with the following choices: About, Refresh Weather Info, Options, Open, and Exit.
Chapter 9: Build Your Own Weather Tracker Application Now!
