Windows Server 2008 R2 Unleashed (56 page)
Read Windows Server 2008 R2 Unleashed Online
Authors: Noel Morimoto

Solaris, Red Hat Linux, HP-UX, IBM AIX, and Apple OS X. It actually performs quite well
in various other similar versions and implementations of UNIX, Linux, and Mac OS X.
Installing Services for Network File System (NFS)
The installation of Windows Server 2008 R2 UNIX Integration for Windows Server 2008
R2 is as simple as adding specific server roles to a server using the Add Roles Wizard. The
individual components can be installed as part of different roles added to the server. For
example, to add the Services for NFS role, simply add the File Services role to a server via
the following process:
1. Open Server Manager (Start, All Programs, Administrative Tools, Server Manager).
2. Click on the Roles node in the tasks pane, and then click the Add Roles link.
3. On the Add Roles Wizard welcome page, click Next to continue.
4. From the list of roles to install, check the box for File Services, and click Next to
continue.
5. On the Introduction to File Services page, click Next to continue.
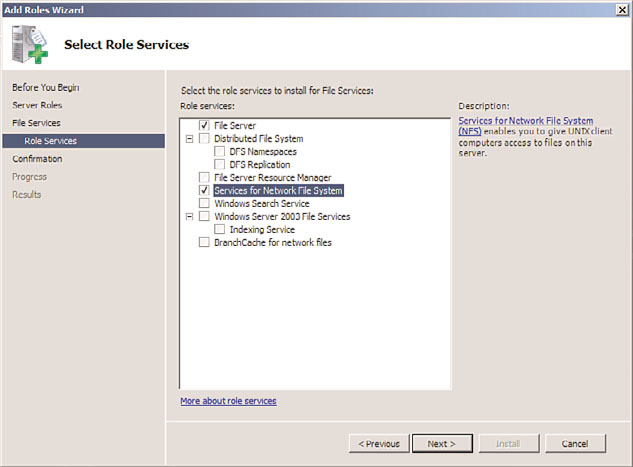
6. On the Select Role Services page, shown in Figure 9.1, keep the File Server box checked
and check the box for Services for Network File System. Click Next to continue.

Understanding and Using Windows Server 2008 R2 UNIX Integration Components
249
FIGURE 9.1
Installing Services for NFS.
ptg
7. On the Confirmation page, review the settings and click the Install button.
8. Click Close when the wizard completes.
NOTE
If the File Services role has already been installed, you can add the Services for Network
File System by right-clicking the File Services role and selecting Add Role Services.
Services for NFS streamlines the sharing of information between UNIX and Windows
Server 2008 R2, allowing users from both environments to seamlessly access data from
each separate environment, without the need for specialized client software. Utilizing the
9
Services for NFS and NFS Client allows for this level of functionality and provides for a
more integrated environment.
Using and Administering Services for NFS
The Services for NFS component acts as a UNIX-standard NFS server by providing disk
space from any Windows-based computer on a network to NFS clients, translating their
NFS requests to Windows SMB-based requests. No additional client software is necessary,
and the Windows Server 2008 R2 server acts and functions like a normal NFS-based UNIX
server for these clients. This is a great way to bring a standardized share format to a
250
CHAPTER 9
Integrating Active Directory in a UNIX Environment
heterogeneous network as UNIX and Apple clients might have difficulties using standard
Windows file protocols such as Common Internet File System (CIFS).
After installing Services for NFS, several tasks need to be performed before accepting UNIX
clients to the Windows file shares. These tasks include the following, covered in more
detail in the following sections of this book:
. Configure AD DS lookup for UNIX GID and UID
. Configure the Server for NFS and Client for NFS components
. Create NFS shared network resources
Configuring Active Directory Lookup for UNIX GID and UID
Information
So that NTFS permissions can be properly mapped to UNIX user accounts, integration
with Active Directory Domain Services (AD DS) must be set up between AD DS and UNIX.
This requires the proper schema extensions to be enabled in the domain. By default,
Windows Server 2008 R2 AD DS includes these schema extensions. If installing Services
for NFS into a down-level schema version of AD, such as with Windows Server 2003, the
ptg
schema must be extended first to Windows Server 2008 R2 levels.
To enable AD DS lookup for Services for NFS, do the following:
1. Open the Services for Network File System MMC (Start, All Programs, Administrative
Tools, Services for Network File System).
2. Right-click on the Services for NFS node in the node pane, and choose Properties.
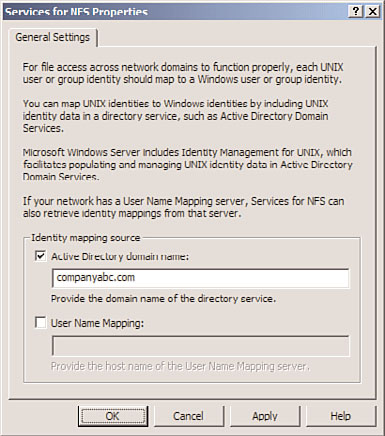
3. In the Identity Mapping Source section, check the Active Directory domain name
check box, and enter the name of the domain in which identity mapping will be
enabled, as shown in Figure 9.2.
4. Click OK to save the changes.
NOTE
Windows Server 2008 R2 Services for NFS still supports the legacy User Name
Mapping service, although installation of the User Name Mapping service itself cannot
be done on a Windows Server 2008 R2 server. It is preferable to use the AD DS inte-
gration, however, rather than the User Name Mapping service.
Configuring Client for NFS and Server for NFS Settings
After enabling the lookup method used for Services for NFS, you can configure the indi-
vidual Server for NFS and Client for NFS settings by right-clicking the individual nodes
and choosing Properties. This allows you to change default file permissions levels, TCP


Understanding and Using Windows Server 2008 R2 UNIX Integration Components
251
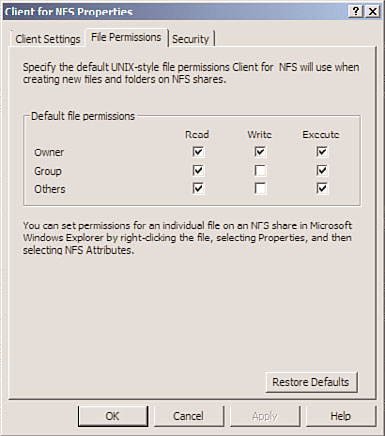
and UDP settings, mount types, new Windows Server 2008 R2 Kerberos settings, and file-
name support levels. For example, in Figure 9.3, the screen for customizing Client for NFS
settings is displayed.
ptg
FIGURE 9.2
Enabling AD DS mapping for Services for NFS.
9
FIGURE 9.3
Customizing Client for NFS settings.

252
CHAPTER 9
Integrating Active Directory in a UNIX Environment
Creating NFS Shared Network Resources
Configuring a shared resource with Server for NFS requires opening the Command Prompt
window with elevated privileges (Start, All Programs, Accessories, right-click Command
Prompt, Run As Administrator) and then creating the share using the nfsshare command-
line utility. Type nfsshare /? for the exact syntax.
To create an NFS shared network resource using the GUI interface, perform the following
tasks:
1. From Windows Explorer on the server, navigate to the folder that will be shared,
right-click it, and choose Properties.
2. Select the NFS Sharing tab.
3. Click the Manage NFS Sharing button.
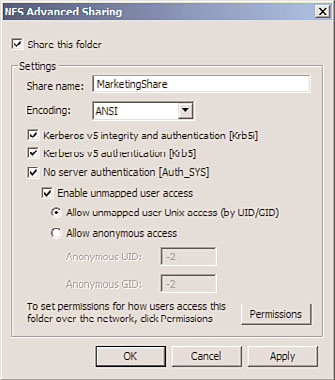
4. Check the Share This Folder check box, as shown in Figure 9.4. Configure if anony-
mous access will be allowed (not normally recommended) or configure any special
permissions by clicking Permissions.
ptg
FIGURE 9.4
Creating a shared resource for NFS.
5. Click OK and then click Close to save the changes.
Reviewing the Subsystem for UNIX-Based
The Subsystem for UNIX-based Applications (SUA), previously referred to as Interix, fills
the gap between development on UNIX platforms and development in Windows. It was
written to allow programmers familiar with UNIX to continue to use the most familiar
Understanding the Identity Management for UNIX Components
253
programming tools and scripts, such as grep, tar, cut, awk, vi, and many others. In addi-
tion, with limited reprogramming efforts, applications that run on UNIX-based systems
can be ported over to the Wintel platform, building on the low cost of ownership of
Windows while retaining software investments from UNIX.
Windows Server 2008 R2 UNIX Integration further enhances the capabilities of the UNIX
subsystem. Performance increases for file I/O, pipe bandwidth, and overall response time
have been noticeable, in some cases doubling in speed.
Installing the Subsystem for UNIX-Based Applications
The SUA component is available as a feature on Windows Server 2008 R2. It can be
installed via the following process:
1. Open Server Manager (Start, All Programs, Administrative Tools, Server Manager).
2. Click on the Features node in the tasks pane, and then click the Add Features link.
3. On the Add Roles Wizard welcome page, click Next to continue.
4. Check the Subsystem for UNIX-based Applications check box, and click Next to
continue.
5. Click Install.
ptg
6. Click Close when the install wizard completes. Click Yes to reboot the server if
prompted.
Subsystem for UNIX-Based Applications Scripting
Administrators familiar with UNIX environments will feel at home working with Interix as
both the Korn and C shells are available, and both behave exactly as they would in UNIX.
Windows Server 2008 R2 UNIX Integration also supports the single-rooted file system
through these shells, which negates the need to convert scripts to support drive letters.
The single-rooted file system allows for a great deal of functionality, allowing scripts
written for UNIX to more natively port over to a Windows environment.
Subsystem for UNIX-Based Application Tools and Programming
Languages
9
SUA supports all common UNIX tools and utilities, with all the familiar commands such as
grep, man, env, pr, nice, ps, kill, and many others. Each tool was built to respond exactly
the way it is expected to behave in UNIX, and SUA users can build or import their own
customizable tools using the same procedures that they would in a UNIX environment.
Understanding the Identity Management for UNIX
The goal of Single Sign-On (SSO), in which users on a network log on once and then have
access to multiple resources and environments, is still a long way off. It is common for a
regular user to maintain and use three or more separate usernames and associated sets of
254
CHAPTER 9
Integrating Active Directory in a UNIX Environment
passwords. Windows Server 2008 R2 UNIX Integration goes a long way toward making
