Windows Server 2008 R2 Unleashed (52 page)
Read Windows Server 2008 R2 Unleashed Online
Authors: Noel Morimoto

within applications, but many organizations deployed
multiple Active Directory forests for security reasons.
228
CHAPTER 8
Creating Federated Forests and Lightweight Directories
As Active Directory matured, Microsoft saw a need to tie these directories together into a
single, federated metadirectory. In addition, they also saw an opportunity to supply appli-
cations with their own directories that were based on the AD model.
This chapter covers these technologies, covering how multiple AD DS forests can be
unified into a single federated forest, and how that structure can be synchronized with
other foreign directory platforms. Microsoft’s Forefront Identity Manager, which provides
for these capabilities, is covered in detail. In addition, Active Directory Lightweight
Directory Services (AD LDS) and Active Directory Federation Services (AD FS) is explained.
Active Directory Lightweight Directory Services
A feature of the Active Directory technologies in Windows Server 2008 R2 is the Active
Directory Lightweight Directory Services (AD LDS). AD LDS, previously known as Active
Directory in Application Mode (ADAM), is a directory technology that is very similar to
the full Active Directory Domain Services (AD DS), but has the capability to run separate
instances of itself as unique services. AD LDS allows specialized applications to utilize AD
LDS as their own directory service, negating the need for a new form of directory service
for every critical application within an organization.
AD LDS uses the same replication engine as AD DS, follows the same X.500 structure, and
ptg
is close enough to real AD DS functionality to allow it to be installed as a test bed for
developers who design AD DS applications. Despite the similarities, however, AD LDS runs
as a separate service from the operating system, with its own schema and structure.
The real value to an AD LDS implementation comes from its capability to utilize the secu-
rity structure of the production domain(s), while maintaining its own directory structure.
Understanding the Need for AD LDS
AD LDS functionality was developed in direct response to one of the main limitations in
using Microsoft’s AD DS: the fact that the directory was so intrinsically tied to the NOS
that applications that did not require the extra NOS-related functionality of AD DS were
restricted in their particular directory needs. AD LDS allows each application to have its
own separate AD DS directory forest and allows for personalized modification of the direc-
tory, such as schema extensions, tailored replication (or lack of replication) needs, and
other key directory needs.
One of the major advantages to AD LDS also lies in the fact that multiple instances of AD
LDS can run on a single machine, each with its own unique name, port number, and sepa-
rate binaries. In addition, AD LDS can run on any version of Windows Server 2008 R2 or
even on Windows 7 or Vista Professional for development purposes. Each instance of AD
LDS can utilize a separate, tailored schema.
AD LDS is virtually indistinguishable from a normal NOS instance of AD DS and conse-
quently can be administered using the standard tools used for AD, such as ADSIEdit,
LDP.exe, and the Microsoft Management Console (MMC) tools. In addition, user accounts
can be created, unique replication topologies can be created, and all normal AD DS func-
tionality can be performed on a tailored copy of an AD LDS forest.
Keeping a Distributed Environment in Sync
229
In short, AD LDS provides applications with the advantages of the AD DS environment,
but without the NOS limitations that previously forced the implementation of multiple,
cost-ineffective directories. Developers now can exploit the full functionality of Windows
Server 2008 R2 AD DS without limitation, while at the same time assuming the numerous
advantages of integration into a common security structure.
Outlining the Features of AD LDS
The following key points about AD LDS should be understood before installing it into an
organization:
. Unlike AD DS, AD LDS does not support global catalogs, Group Policy, domains,
forests, or domain trusts.
. AD LDS does not need to be installed on domain controllers. In fact, it’s completely
independent of the operating system, and more than one AD LDS entity can exist
on each server.
. Management of AD LDS cannot be performed using the familiar AD DS tools such as
Active Directory Users and Computers. Tools such as ADSIEdit or LDP.exe or a cus-
tom front end need to be used instead.
Installing AD LDS
ptg
Multiple AD LDS instances can be installed on the same server, or a single AD LDS
instance can be replicated to multiple servers for redundancy. If installing the first AD LDS
instance, follow these steps:
1. From the server, open the Server Manager application (Start, All Programs,
Administrative Tools, Server Manager).
2. Navigate to the Roles node, and then click the link for Add Roles.
3. On the Before You Begin page, review the notes provided, and click Next to continue.
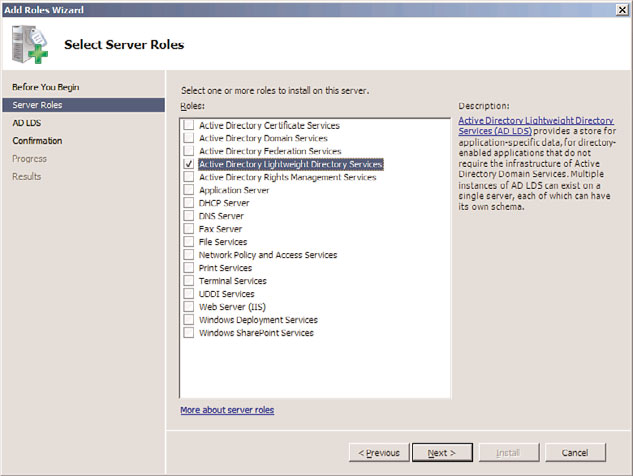
4. From the list of server roles, shown in Figure 8.1, choose Active Directory Lightweight
8
Directory Services by checking the box next to it. Click Next to continue.
5. On the Introduction to Active Directory Lightweight Directory Services page, review
the information provided, and click Next to continue.
6. Note the additional informational messages about needing to run the setup wizard
and click the Install button.
7. Click Close when the Add Roles Wizard is complete.
8. Launch the Active Directory Lightweight Directory Services Setup Wizard from the
Administrative Tools menu.
9. Click Next at the Welcome screen.
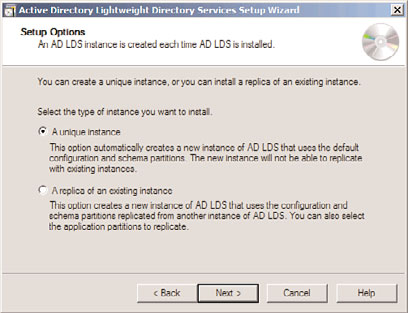
10. From the dialog box shown in Figure 8.2, choose whether to create a new unique
instance or a replica of an existing instance. In this example, we are creating a new
instance from scratch. Click Next to continue.
11. Type a name for the instance. This name should reflect what the AD LDS instance
will be used for. Click Next to continue.
230
CHAPTER 8
Creating Federated Forests and Lightweight Directories
ptg
FIGURE 8.1
Installing the AD LDS role on a server.
FIGURE 8.2
Installing AD LDS.
12. Enter the LDAP and LDAP port that will be used for this instance. If the default
LDAP port of 389 or LDAP port of 636 is already in use (for example, if the server is
already running AD DS or if another instance of AD LDS is running), choose a
unique port. In this example, we choose port 50000 for LDAP and 50001 for LDAPS.
Click Next to continue.
13. On the Application Directory Partition page, shown in Figure 8.3, choose whether to
create an application directory partition. If the application you will be installing
creates its own partition, leave it as No. If it does not, and you need to create a parti-
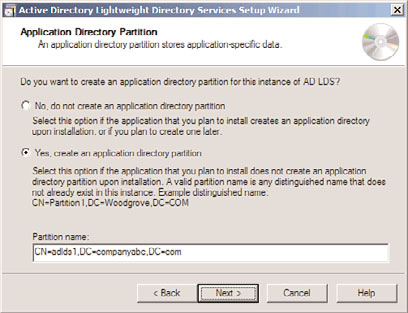
Keeping a Distributed Environment in Sync
231
tion manually to store objects in, enter it in distinguished name format (that is,
CN=PartitionName,DC=domain,DC=com). Click Next to continue.
FIGURE 8.3
Configuring the application directory partition for AD LDS.
14. Select where to store the data and data recovery files for AD LDS on the File
ptg
Locations page, and click Next.
15. On the Service Account Selection page, select whether to use the network service
account (the default) as the service account for this instance of AD LDS. Click Next
to continue.
16. The subsequent page allows for a specific user or group to be defined as administra-
tors for the AD LDS instance. A group account is recommended. After choosing This
Account and adding the group, click Next to continue.
17. The Importing LDIF Files page, shown in Figure 8.4, allows for custom LDIF files to
be imported. These LDIF files were created for specific scenarios that required AD
LDS, such as when users will be created in AD LDS. In this example, we import the
8
MS-User.LDF file, so we can create user class objects in the AD LDS instance. Check
the boxes required and click Next to continue.
18. On the summary page, review the selections and click Next to start the creation of
the AD LDS instance.
19. Click Finish when the wizard is complete.
After being created, the AD LDS instance can be administered using ADSIEdit, a low-level
directory tool available in the Administrative Tools menu. From ADSIEdit, choose Action,
Connect To, and enter a name for the connection (in this example, ADLDS1). Then enter
the naming context for the connection point that was created for the instance during the
wizard (in our example, CN=adlds1,DC=companyabc,DC=com) and the local server name
and custom port created for the computer (in this example, dc2:50000), as shown in
Figure 8.5.
Although it is a much cruder tool to use than the full AD Users and Computers tool,
ADSIEdit is very powerful, and full administration of the naming context for the AD LDS

