Windows Server 2008 R2 Unleashed (29 page)
Read Windows Server 2008 R2 Unleashed Online
Authors: Noel Morimoto

102
CHAPTER 3
Installing Windows Server 2008 R2 and Server Core
FIGURE 3.9
Selecting the Upgrade option.
8. The Compatibility Report page is invoked. This screen includes a warning that it is a
best practice to visit the following Microsoft link,
ptg
http://go.microsoft.com/fwlink/?LinkID=85172, to ensure all programs are supported
and can remain installed during the installation. It is recommended to uninstall any
applications that are not supported. Click Next to continue.
9. The upgrade process commences and the Upgrading Windows page displays status
on the following items: Copying Windows Files, Gathering Files, Expanding Files,
Installing Features and Updates, and Completing the Upgrade.
NOTE
During this process, Windows will automatically reboot the machine a few times, com-
plete the installation process, and prepare the server for its first use.
The process for completing the installation and conducting postinstallation tasks is the
same for both an upgrade and initial installation except that some settings may have been
preserved during the upgrade process. In addition, after the upgrade is complete, it is a
best practice to open Server Manager and verify events, determine if system services are
operational, and ensure the upgraded server roles were, in fact, installed and configured
correctly. In addition, review the Resources and Support section in Server Manager for
recommended configurations, tasks, and best practices.
NOTE
After the Windows Server 2008 R2 upgrade is complete, the Windows Firewall included
with the operating system is enabled by default. It is a best practice to review and
change firewall rules and settings to ensure server functionality.
Understanding Server Core Installation
103
Understanding Server Core Installation
Windows Server Core, an installation option, was one of the most innovative and antici-
pated features of Windows Server 2008. The Windows Server Core installation provides a
minimal environment for running a specific server role, including, but not limited to, a
domain controller, web server, or DHCP server. In this situation, only a subset of the
Windows Server 2008 R2 binaries is utilized. The Server Core installation is so stripped
that traditional installation components, such as a desktop shell, graphical user interface,
Windows Explorer, Microsoft Internet Explorer, and the MMC, are not included.
Therefore, the server must be fully managed and configured via the command prompt or
3
by using remote administration tools from another server.
By maintaining a minimized installation footprint by only stripping out the typical
components and only supporting specific roles, the Server Core installation reduces main-
tenance, attack surface, management, and disk space required to support the installation.
Another great feature, particularly for administrators who do not understand scripting
commands and who heavily rely on the GUI tools to manage a server, is the ability to
remotely manage the Server Core installation through MMC.
Windows Server 2008 R2 includes the following new features and functionality for
Server Core:
ptg
.
.NET Framework—
A highly desired feature to be supported on Windows Server
2008 R2 was the .NET Framework. Versions 2.0, 3.0, 3.5.1, and 4.0 are now
supported on a Server Core R2 installation.
.
ASP.NET—
Because the .NET Framework is now supported, ASP.NET can now be
enabled on Server Core R2.
.
PowerShell—
Another highly desired feature to be supported on Server Core R2 is
PowerShell. Administrators can use a wide range of PowerShell cmdlets on Server
Core R2.
.
Active Directory Certificate Services—
The Active Directory Certificate Services
role can be installed on a Server Core R2 system.
.
SCONFIG—
By typing SCONFIG at the command prompt, administrators can easily
configure Server Core deployments. Some of the simplified tasks include Domain
Join, Rename Computer, Configure Remote Management, Network Settings, and
Download and Install Updates.
Performing a Server Core Installation
When installing Windows Server 2008 R2 Server Core, the actual installation process is
very similar to a regular server install, which was conducted in the earlier sections of this
chapter. To recap, an administrator agrees to the licensing terms, supplies configuration
responses, and the Windows Server 2008 R2 Install Windows Wizard copies the files and
configures the server. However, unlike a traditional installation of Windows, when the

104
CHAPTER 3
Installing Windows Server 2008 R2 and Server Core
installation is complete and you log on, there isn’t a GUI to configure the server. The
server can only be configured and managed via the command prompt.
The Server Core installation will reboot your machine or virtual server a couple of times
when device detection and the installation takes place. Eventually, you’ll be presented
with the logon screen.
Follow these steps to conduct a Windows Server 2008 R2 Server Core installation:
1. Insert the Windows Server 2008 R2 media. The Install Windows page will automati-
cally be launched; otherwise, click on Setup.exe.
2. Specify the Language to Install, Time and Currency Format, and Keyboard or Input
Method, and then click Next.
3. Click Install Now to begin the installation process.
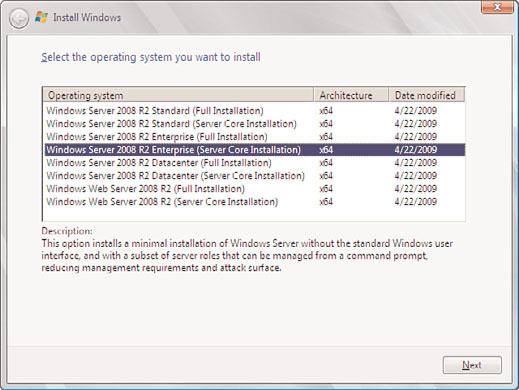
4. On the Select the Operating System You Want to Install page, select the Windows
Server 2008 R2 Server Core, as shown in Figure 3.10. Click Next to continue.
ptg
FIGURE 3.10
Selecting the Server Core installation.
5. Review the license terms and select the I Accept the License Terms option, and then
click Next.
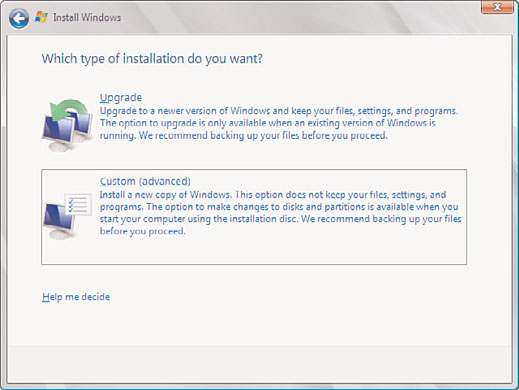
6. On the Which Type of Installation Do You Want page, select Custom (Advanced), as
shown in Figure 3.11. Because you cannot upgrade a legacy Windows operating
system to Server Core, the Upgrade option will not work.
7. On the Where Do You Want to Install Windows page, select the disk where you plan
to install the Windows system files. Alternatively, you can click on the Drive
(Options) to create, delete, extend, or format partitions. In addition, click Load
Driver to install drivers for the Windows Server 2008 R2 installation that are not
available on the media.

Managing and Configuring a Server Core Installation
105
3
FIGURE 3.11
Selecting a custom installation.
NOTE
ptg
If the only drive available is Unallocated Space, Windows Server 2008 R2 will automati-
cally create a partition based on the largest size and format the partition with NTFS.
The installation process will commence by copying the files, installing the Windows oper-
ating system, and configuring features. After this process is complete, the server will auto-
matically reboot itself and require the installer to change the administrator password for
the system. Enter and confirm the administrator password to change the password and log
on. You will now be presented with a Command Prompt window, the only GUI available
in Server Core.
Managing and Configuring a Server Core
The following sections cover general tasks associated with managing and configuring a
Server Core system after the installation is complete via the command prompt. As an
alternative, an administrator can use the SCONFIG utility to configure general settings.
Launching the Command Prompt in a Server Core Installation
Remember, the Start menu does not exist. Because of this, one of the most important tasks
an administrator must understand when managing a Server Core installation is how to
launch the command prompt. The following steps will assist you:
106
CHAPTER 3
Installing Windows Server 2008 R2 and Server Core
1. Press Ctrl+Alt+Delete.
2. Select Start Task Manager.
3. On the Windows Task Manager screen, select File, then New Task (Run).
4. In the Create New Task dialog box, type cmd.exe, and then click OK.
Changing the Server Core Administrator’s Password
After the initial password has been set, the syntax to change the administrator password is:
Net user administrator *
After the command has been executed, you will be prompted to type a password for the
user. Enter the password and then retype it for the confirmation process. It is a best prac-
tice to use a complex password when assigning passwords to the administrator account.
Changing the Server Core Machine Name
After the Server Core installation is complete, another common task is to change the
machine name of the server. By default, Windows automatically generates and assigns a
server name starting with WIN and followed by a string of characters. The syntax to
ptg
change the Server Core machine name follows:
netdom renamecomputer
When manipulating this syntax, replace the
existing hostname (which can be found using the hostname command) and the
tion. Changing the server name from Win-123 to “ServerCore” is depicted in the follow-
ing example:
netdom renamecomputer Win-123 /newname:ServerCore
Assigning a Static IPV4 IP Address and DNS Settings
Another common Server Core management task is assigning an IP address, including the
primary and secondary DNS settings. Before this task can be executed, you must run the
following command to obtain and identify the names of the network interfaces installed
on the server. This includes capturing the unique ID associated with each network inter-
face. To display a list of network interfaces, including their respective unique IDs, run the
following command:
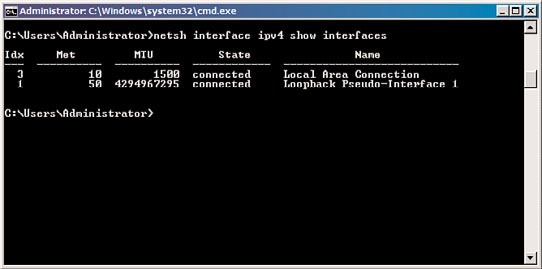
netsh interface ipv4 show interfaces
The next step is to make a note of the network interface name and unique ID that you
must change. The ID is located in the leftmost column and is referred to as Idx. This is
depicted in the output of the netsh interface ipv4 show interfaces command, as displayed
in Figure 3.12.

Managing and Configuring a Server Core Installation
107
3
FIGURE 3.12
Reviewing the Idx ID for a network interface.
