Windows Server 2008 R2 Unleashed (28 page)
Read Windows Server 2008 R2 Unleashed Online
Authors: Noel Morimoto

and general tasks performed by a user as well as any problems encountered when
using the Microsoft product.
Downloading and Installing Updates
3
Even though you might have selected the option in the previous steps to automatically
configure server updates, it is still possible to download and install updates manually by
selecting the Download and Install Updates link in the Update This Server section of the
Initial Configuration Tasks Wizard. When selected, the server will connect to the
Microsoft Windows Update site. Before configuring roles or features or making your server
available to users on the network, it is a best practice to install the latest updates and
patches from Microsoft. If your environment uses an automated tool such as WSUS, tested
and approved patches might already be installed by your update and patching infrastruc-
ture if the system was joined to the domain and is configured to do so.
ptg
NOTE
When selecting the Download and Install Updates link for the very first time, if updates
are not being installed automatically, you will be prompted with the option to turn on
automatic updates. In addition, it is possible to select the Find Out More link to obtain
updates for other Microsoft products installed on the server.
The final section on the Initial Configuration Tasks Wizard is called Customize This Server.
The options are covered in the following sections.
Adding Roles
Using the Add Roles link on the Initial Configuration Tasks Wizard, you can quickly install
server roles, such as Active Directory Domain Services, Active Directory Rights Management
Services, DNS Server, and much more to your server. The process also adds dependent
services and components as needed (alerting you along the way). This ensures that as you
are setting up your system, all the necessary components are installed—alleviating the need
to use multiple tools to install, secure, and manage a given server role—and that the roles
are set up securely. Although it’s critical to understand dependencies for whatever role or
function the server might hold, getting the system set up quickly, efficiently, and accurately
is always paramount, and these setup tools help accomplish just that.
Adding Features
You can use the Add Features link to help configure useful tools and system features
installed on the server. Features such as RPC over HTTP Proxy for Exchange, Remote
Assistance, .NET Framework 3.0 Features, Background Intelligent Transfer Service (BITS),
98
CHAPTER 3
Installing Windows Server 2008 R2 and Server Core
and SMTP Server can be installed and configured. Backup and other management tools
can also be installed using this tool.
Enabling Remote Desktop
By enabling Remote Desktop, you can connect to either a remote console or an RDP
session while not physically at the server. Using Remote Desktop to manage systems
greatly eases administration of servers but does open another door into each system;
therefore, you should consider restricting access via Remote Desktop to users who have a
need to access those systems. The two options for allowing Remote Desktop access include
Allow Connections From Computers Running Any Version of Remote Desktop (Less
Secure) and Allow Connections From Computers Running Remote Desktop with Network
Level Authentication (More Secure).
Configuring Windows Firewall
By default, Windows Firewall is turned on when the base OS is first installed. Although
the firewall only protects the server from inbound and outbound access (as opposed to
compromises from within the OS, such as a virus or other malware), this is typically
adequate protection on a newly built machine until the system is patched and loaded
with antivirus software or any other protective systems. Unless you configure exceptions
to the firewall, users will not be able to access resources or services on the server.
ptg
Exceptions to this are services or resources that are made available using the Initial
Configuration Tasks Wizard or other GUI-based tools, such as Server Manager, that auto-
matically create the exceptions, enabling you to leave the firewall on while enabling
access to specific functions on the server, if desired. With Windows Server 2008 R2, it is
possible to configure incoming and outgoing firewall rules on each network connection.
Upgrading to Windows Server 2008 R2
When upgrading an existing server to Windows Server 2008 R2, all configuration settings,
files, and programs are retained from the previous installation. However, there are still
several important prerequisite tasks that you perform before the upgrade, as discussed in
the following sections.
NOTE
When upgrading a system to Windows Server 2008 R2, you need to have at least
834MB of free space on the system partition; otherwise, the upgrade will come to a halt.
Backing Up the Server
When making a major change on a server, something could go wrong. A complete backup
of your operating system and data, including the System State, can make the difference
between confidently telling the boss you had a setback so you conducted a rollback or
quivering while you try to find a way to tell your boss a complete disaster has taken place.
Upgrading to Windows Server 2008 R2
99
Verifying System Compatibility
In the past, you could check system compatibility before starting an upgrade. Now, it is a
best practice to use the Microsoft Application Compatibility Toolkit to verify Windows
Server 2008 R2 compatibility before an installation. The tool can be accessed from the
following Microsoft link: http://technet.microsoft.com/en-us/windows/aa905066.aspx.
Running the Windows Memory Diagnostics Tool
As a prerequisite task, it is also beneficial to test the physical memory in the server before
conducting the upgrade. Do the test by running the Windows Memory Diagnostics tool.
3
The tool can be obtained from the following Microsoft link:
http://go.microsoft.com/fwlink/?LinkId=50362.
Ensuring the Drivers Are Digitally Signed
Microsoft started certifying drivers for plug-and-play devices during the release of
Windows 2000 Server to stabilize the operating system. When installing drivers, an
administrator had the opportunity to choose from digitally signed drivers or unsigned
drivers. Digitally signed drivers ensure stability; however, it was also possible to install
ptg
unsigned drivers. The unsigned drivers were not blessed or certified by Microsoft.
When upgrading to Windows Server 2008 R2, an error message is displayed when
unsigned drivers are detected. In addition, the unsigned driver will not be loaded when
the operating system is upgraded and finally rebooted. Based on these issues, it is a best
practice to obtain only digitally signed drivers, upgrade unsigned drivers, or disable the
signature requirement for a driver if you cannot boot your computer after the upgrade.
The following procedures should be used to disable the signature requirement on
Windows Server 2008 R2:
1. Reboot the server and press F8 during startup.
2. Select Advanced Boot Options.
3. Select Disable Driver Signature Enforcement.
4. Boot into Windows.
5. Uninstall the unsigned driver.
Performing Additional Tasks
It is also beneficial to perform the following additional tasks before proceeding with the
installation upgrade. Disconnect UPS devices as they negatively affect installation when
detecting devices on serial ports, disable antivirus software as it might affect this installa-
tion process, and obtain drivers for the mass storage devices from the manufacturers.
100
CHAPTER 3
Installing Windows Server 2008 R2 and Server Core
CAUTION
It is worth noting when upgrading to Windows Server 2008 R2, the Windows Firewall
will be automatically enabled once the upgrade is complete. Therefore, you will have to
either disable the firewall or configure the appropriate inbound and outbound firewall
rules after the upgrade is complete.
Performing the Upgrade
At this point, your data is backed up, you have verified compatibility with the new operat-
ing system, and you have read the release notes. It’s time to upgrade, so conduct the
following steps:
1. Log on to the server and insert the Windows Server 2008 R2 media. The Install
Windows page should automatically launch; otherwise, click on Setup.exe.
2. Click Install Now to begin the upgrade process.
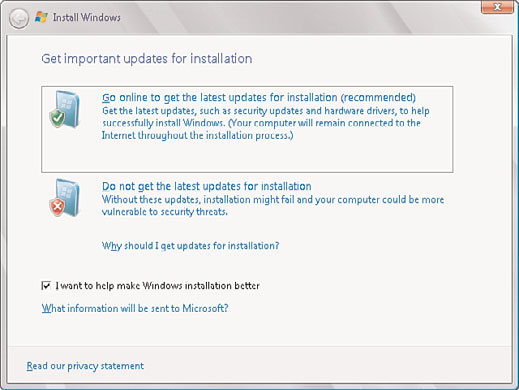
3. On the Get Important Updates for Installation page, first select the I Want to Help
Make Windows Installation Better option. By doing this, you will participate in the
Windows Installation Customer Experience Improvement Program that allows
ptg
Microsoft to collect information about the hardware configuration, installation
settings, and errors received. This information helps Microsoft determine if updates
are needed and identify areas of improvement.
4. On the same page, select either Go Online to Get the Latest Updates for Installation
or Do Not Get the Latest Updates for Installation, as shown in Figure 3.7.
FIGURE 3.7
Getting important updates for the Windows Server 2008 R2 installation.
Upgrading to Windows Server 2008 R2
101
NOTE
If the server is connected to the Internet, it is a best practice to select the first option.
Obtaining the latest updates ensures a successful installation as the latest hardware
drivers and Windows code are utilized.
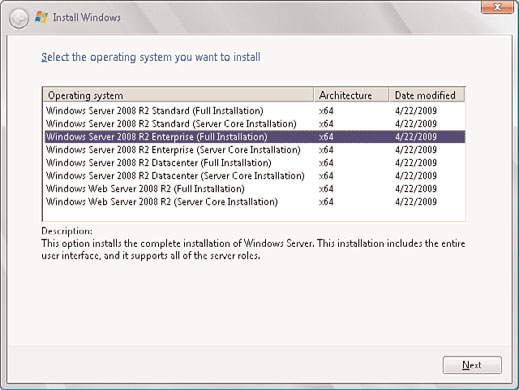
5. On the Select the Operating System You Want to Install page, select the desired oper-
ating system, such as Windows Server 2008 R2 Enterprise (Full Installation). Click
Next to continue, as illustrated in Figure 3.8.
3
ptg
FIGURE 3.8
Selecting the operating system to install.
NOTE
Just as a reminder, as stated earlier in this chapter, you cannot upgrade a Windows
Server 2003 system or Windows Server 2008 full installation to Server 2008 R2
Server Core. If Server Core is selected, the compatibility check on the subsequent
page will produce an error and require a different edition to be selected.
6. Review the license terms and select the I Accept the License Terms option, and then
click Next.
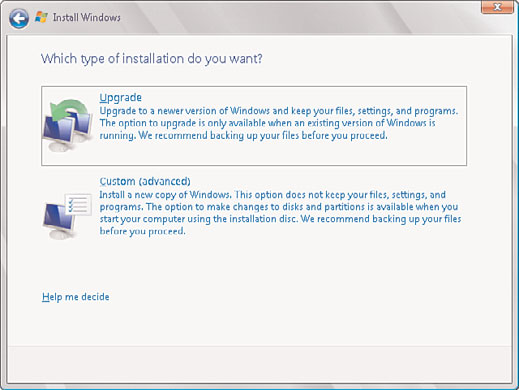
7. On the Which Type of Installation Do You Want page, select the Upgrade option, as
illustrated in Figure 3.9. Upgrading the system will maintain existing files, settings,
and programs.