The Washington Manual Internship Survival Guide (44 page)
Read The Washington Manual Internship Survival Guide Online
Authors: Thomas M. de Fer,Eric Knoche,Gina Larossa,Heather Sateia
Tags: #Medical, #Internal Medicine

BOOK: The Washington Manual Internship Survival Guide
10.08Mb size Format: txt, pdf, ePub
• Appropriate materials to cleanse the skin (if not included in the kit)
• Sterile gloves
• Mask and goggles
Procedure
1. Obtain informed consent.
2. Enlist someone else to be your nonsterile assistant (not always necessary but nice to have around).
3. Place the patient in the lateral decubitus position with his or her back close to the edge of the bed or table. The patient should bring the knees up to the abdomen and flex the head to the chest as much as possible. The patient may need assistance holding this position (an assistant is very handy for this purpose). The procedure may also be done with the patient sitting and leaning forward. Obesity, osteoarthritis, and prior lumbar spine surgery may make positioning, identification of landmarks, and successful completion of the procedure very difficult.
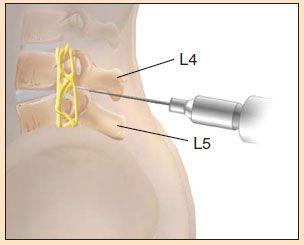
4. Palpate the area of the intercristal line. Locate and mark the L4/L5 interspace.
5. Put on sterile gloves.
6. Cleanse the area and drape the patient.
7. Anesthetize the skin and the deeper structures with a 22-gauge needle.
8. Puncture the skin with spinal needle (stylet in place), bevel towards the head (parallel to the body’s long axis). Carefully advance the needle between the vertebrae, aiming the tip cephalad at approximately 15–30 degrees (towards the navel), parallel to the floor. A “pop” will often be felt when the subarachnoid space is entered. Remove the stylet and observe for the flow of CSF. It may help to rotate the needle slightly. If there is none, replace the stylet (always be sure to do this) and advance a bit further. Remove the stylet again and so forth. If bone is encountered, pull back 1–2 cm and redirect.
9. When CSF flow is established, attach a manometer and stopcock. Measure the opening pressure (normal 70–180 mm). Collect approximately 3–4 cc of CSF in each tube. If cytology or other studies are to be done, more can be collected.
10. Replace the stylet and withdraw the needle.
11. Place a bandage over the site.
12. Write a procedure note, whether or not you were successful.
13. Instruct the patient to remain recumbent for 4–6 hours.
14. Send the tubes as follows: (1) Gram’s stain, culture, AFB, fungal stain and culture; (2) glucose and protein; (3) CBC with differential; and (4) special studies as indicated. Refer to Table 1 for interpretation of CSF studies.
THORACENTESIS
Anatomy
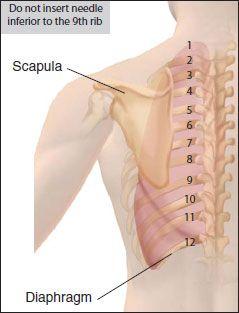
At least 250–300 cc of pleural fluid will be evident as blunting of the costophrenic angle on CXR. Pleural fluid may be loculated, and a decubitus film should be done to determine if the effusion is free flowing and large enough to attempt thoracentesis (usually >1 cm on lateral film). The intercostal vein, artery, and nerve travel in a groove along the inferior margin of the rib. Therefore, the entry site should be at the superior aspect of the rib.
Equipment
• Sterile thoracentesis kit and sterile gloves
• Extra small gauge needles, syringes, and local anesthetic (just in case)
• Appropriate materials to cleanse the skin (if not included in the kit)
• Mask and goggles
Procedure
1. Obtain informed consent.
2. Enlist someone else to be your nonsterile assistant (not always necessary but nice to have around).
3. Have the patient sit on the edge of the bed leaning forward slightly on a bedside table. Percuss the location of the effusion and mark where the procedure will be attempted on the posterolateral chest.
4. Put on sterile gloves.
5. Cleanse the area and drape the patient.
6. Anesthetize the skin with a 25-gauge needle. Anesthetize to deeper structures including the rib periosteum with a 22-gauge needle.
7. Carefully advance the needle over the superior aspect of the rib. Continue to advance slowly until pleural fluid is aspirated.
8. Note the depth and trajectory. Remove the needle.
9. Make a small superficial nick in the skin at the needle entry site (to facilitate easy entry of the catheter/needle assembly).
10. Follow the same path with the catheter/needle assembly (attached to a syringe), aspirating all the way. Be sure to step over the rib.
11. When pleural fluid is obtained, slide the catheter into the pleural space and withdraw the needle. Place a finger over the opening of the catheter. Never advance the needle back into the catheter.
12. Attach a 30- to 50-cc syringe with a three-way stopcock to the catheter.
13. Attach connecting tubing to the sidearm of the stopcock. This may be connected to vacuum bottles or a collection bag. Pump out or allow the vacuum to remove up to 1.5 L of pleural fluid. Do not collect more than 1.5 L as this increases the risk of re-expansion pulmonary edema.
14. When finished collecting pleural fluid, have the patient hum or Valsalva and remove the catheter.
15. Bandage the site.
16. Write a procedure note, whether or not you were successful.
17. Obtain a CXR to rule out pneumothorax.
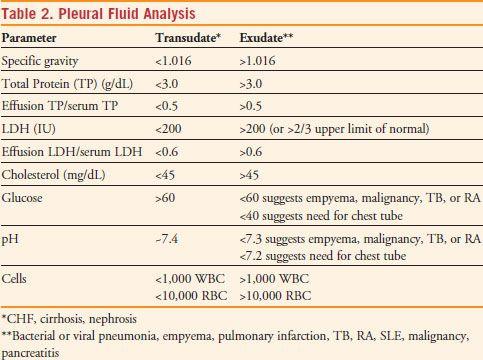
18. Send pleural fluid for cell count and differential, Gram’s stain, routine culture, fungal stain and culture, specific gravity, protein, LDH, and glucose. If pH will be ordered, the sample must be fresh, in a heparinized syringe, on ice, and taken directly to the lab. Other tests may be done depending on the clinical situation. Refer to Table 2 regarding the interpretation of pleural fluid studies.
PARACENTESIS
Equipment
• Paracentesis kit that contains a catheter/needle assembly, three-way stopcock, collection tubing, etc. A thoracentesis kit with the same equipment will also work fine.
• Extra small gauge needles, syringes, and local anesthetic (just in case)
• Appropriate materials to cleanse the skin (if not included in the kit)
• Sterile gloves
• Mask and goggles
Procedure
1. Obtain informed consent.
2. Enlist someone else to be your nonsterile assistant (not always necessary but nice to have around).
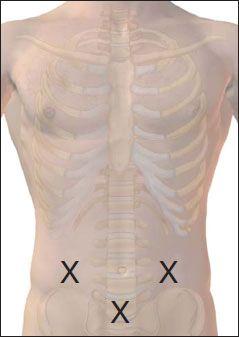
3. Have the patient lie supine with the head of the bed slightly elevated. Percuss the abdomen to help determine the site for needle entry. Possible entry sites include the midline 3–4 cm below the umbilicus or the right or left lower quadrants midway between the umbilicus and the anterior superior iliac spine (lateral to the rectus abdominus sheath). Avoid old surgical incisions and areas of skin infection.
4. Put on sterile gloves.
5. Cleanse the area and drape the patient.
6. Anesthetize the skin and the abdominal wall to the peritoneum with a 22-gauge needle. A 20-gauge spinal needle may be used in very obese patients.
7. Advance the catheter/needle assembly (attached to a syringe) through the skin and abdominal wall aspirating along the way, either at an oblique angle or in a “Z-track” fashion (once the skin is penetrated, the catheter/needle is moved 1 to 2 cm then advanced further). A small pop may be felt as the needle advances through the fascia.
8. When peritoneal fluid is obtained, slide the catheter into the peritoneal cavity and withdraw the needle.
Never advance the needle back into the catheter.
9. Attach a 30- to 50-cc syringe with a three-way stopcock to the catheter. If the paracentesis is being done for diagnostic purposes, aspirate the necessary quantity of fluid.
10. If the paracentesis is being done for therapeutic purposes, attach connecting tubing to the sidearm of the stopcock. This may be connected to vacuum bottles or a collection bag. If the flow of fluid stops, gently manipulate the catheter or reposition the patient. More fluid may be removed from patients with cirrhosis and peripheral edema.
Other books
Death By Derby 8 (Josiah Reynolds Mysteries) by Abigail Keam
The Playboy Bear's Baby: BBW Paranormal Shape Shifter Romance by Marlie Monroe
Dance of Death by Dale Hudson
Fifteen Lanes by S.J. Laidlaw
The Catherine Kimbridge Chronicles #4, Retribution by Andrew Beery
Belmary House Book One by Cassidy Cayman
Some Like it Wicked by Stacey Kennedy
Flamethrower by Maggie Estep


