The Washington Manual Internship Survival Guide (42 page)
Read The Washington Manual Internship Survival Guide Online
Authors: Thomas M. de Fer,Eric Knoche,Gina Larossa,Heather Sateia
Tags: #Medical, #Internal Medicine

BOOK: The Washington Manual Internship Survival Guide
5.06Mb size Format: txt, pdf, ePub
Vitamin K,
135
for GI,
75
for retroperitoneal bleeding,
198
Vocal cord paralysis,
178
Vomiting,
47
metabolic alkalosis from,
95
with small bowel obstruction,
194
with vertigo,
183
Von Willebrand’s disease,
181
Voriconazole,
71
VT.
See
Ventricular tachycardia
Wallenberg’s syndrome,
183
Water deficit,
86
Water loss,
86
Wenckebach block.
See
Second-degree AV block, Mobitz type
1
Wide-complex tachycardias,
103
–
105
Withdrawal
from alcohol,
2
,
56
–
58
,
186
,
190
–
192
benzodiazepines for,
58
from cocaine,
191
from opioids,
191
Withdrawal of support, end-of-life and,
24
t
ARTERIAL LINE PLACEMENT
Equipment
• Sterile gloves
• Chlorhexadine applicator
• Gown, mask, goggles
• Sterile drapes
• Gauze sponges
• Arm board and tape (radial artery only)
• Pressure infusion bag, pressure tubing, dilute heparin flush, appropriate transducer, and monitor (the ICU nurse will know exactly what this entails and set up for you in advance so be sure to let him/her know that you plan to place an arterial line)
• Local anesthetic and small needles and syringes for administration
• 20-gauge 11/2–2-inch Angiocath or quick catheter (radial artery) or 18-gauge introducer needle, guidewire, and 16-gauge, 6-inch arterial catheter (femoral artery).
• Suture
• Sterile occlusive dressing
Procedure
Radial Artery
1. Obtain informed consent.
2. Enlist someone else to be your nonsterile assistant (the ICU nurse is a good idea, as he or she will need to connect the line to the transducer and the transducer to the monitor).
3. Perform the Allen’s test on the proposed side. Proceed only if there is good collateral flow.
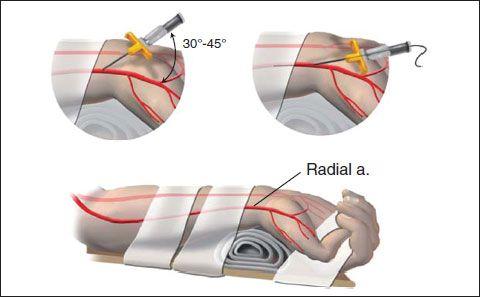
4. Dorsiflex the patient’s wrist and place a towel or gauze roll on the dorsal side of the wrist. Secure the palm and forearm to an arm board.
5. Don goggles, mask, gown, and gloves.
6. Cleanse the site.
7. Drape the field.
8. Carefully palpate the radial artery. Administer local anesthetic to the skin and subcutaneous tissue in this area. Be sure to aspirate before and injecting and do not aim directly for the artery.
9. Puncture the skin at a 45-degree angle with the 20-gauge Angiocath, pointing cephalad, bevel up. Slowly and smoothly advance the catheter and needle. When the artery is punctured, there will be a flash of bright red blood into the hub. If there is no flash, withdraw slowly and continue to watch for the flash. If there is still no flash, redirect toward the point of maximal pulsation again and advance carefully at a slightly steeper angle.
10. Once the Angiocath is in the arterial lumen, reduce the angle to approximately 20–30 degrees and advance the needle and catheter slightly (1– 2 mm). Carefully slide the catheter off the needle into the lumen. If you are using a quick catheter, advance the guidewire into the artery and then pass the catheter over it. The catheter should pass without resistance. Remove the needle. Either occlude the artery proximally or be ready to put your finger over the catheter opening to prevent the forcible flow of arterial blood.
11. Immediately connect to the pressure tubing. There should be an arterial waveform on the monitor.
12. Suture the catheter in place.
13. Apply the dressing.
14. Write a procedure note, whether or not you were successful.
Femoral Artery
1. Follow steps 1 and 2 for radial artery cannulation.
2. Place the patient in the supine position with the ipsilateral leg slightly abducted and externally rotated.
3. Locate the point of maximal femoral artery pulsation below the inguinal ligament using the “NAVEL” mnemonic.
4. Follow steps 5, 6, and 7 for radial artery cannulation.
5. Anesthetize the skin and subcutaneous tissue over the femoral artery (aspirate before injecting).
6. Using the 18-gauge introducer needle bevel up, puncture the skin at a 45-degree angle over the femoral pulsations. Advance the needle cephalad while continually aspirating. When the femoral artery is entered, there should be rapid return of pulsatile bright red blood. If there is no arterial blood after 5 cm, slowly withdraw the needle while aspirating. If there is still no blood return, redirect the needle toward the maximal pulsations and advance again.
7. When the artery is entered, remove the syringe from the introducer needle (be careful to occlude the pulsatile flow of blood with your finger).
8. Advance the guidewire into the artery. It should pass without resistance.
9.
While holding the guidewire’s distal end
, remove the introducer needle from the patient. Now
hold the wire where it exits
the skin and slide the needle completely off the wire.
10. Make a small nick in the skin with a scalpel where the wire exits.
11. Thread the catheter onto the guidewire.
Do not pass the catheter into the artery until you have a firm hold on the distal end of the guidewire
. Pass the catheter into the artery while continuously holding the distal end of the guidewire.
12. Remove the guidewire and quickly place a finger over the open end of the catheter.
13. Follow steps 11 through 14 for radial artery cannulation.
PERIPHERAL IV
Equipment
• Tourniquet.
• Gloves.
• Alcohol prep swabs.
• Povidone iodine prep swabs.
• IV fluids (saline flush).
• IV tubing.
• Appropriate catheter. A large gauge catheter must be used for infusion of viscous solutions such as blood and blood components (20 gauge or larger). For standard IV solutions and short term infusions, a smaller catheter is acceptable (22 gauge). The smaller the catheter, the less the irritation to the vein.
• Occlusive dressing and tape.
Anatomy
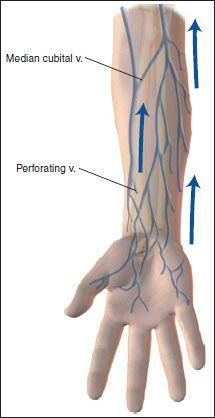
Potential areas of insertion include the forearm, the dorsum of the hand, and the antecubital fossa. The most common sites are the veins of the hand, wrist, and forearm. The antecubital fossa should be avoided as bending of the elbow will disturb, occlude, and possibly dislodge the catheter. Always start at the most distal point of the extremity (e.g., the hand) if veins are present. Save the forearm and upper arm for later sites if possible. The lower extremities should never be used for IV placement.
Procedure
1. Assemble the fluids and tubing. Run fluid through the line, flushing all air, and recap the tubing.
2. Apply the tourniquet 4–6 inches above the proposed insertion site. Venous blood flow may also be occluded with a blood pressure cuff, but it should not obstruct arterial flow.
3. Select the vein to be used. Palpation is more important than visualization. Be sure the segment is long enough for the entire catheter.
4. Using a vigorous circular motion, prep the skin with alcohol. Allow to dry.
5. Using a circular motion, work from the center of the insertion site outward with the povidone iodine swab. Allow to dry.
6. Hold the skin taut and anchor the vein with the thumb of the nondominant hand. Avoid recontamination of the insertion site.
7. Holding the catheter/needle assembly in the dominant hand, lower the hub of the needle close to the skin and align needle for insertion.
8. Insert the needle, bevel up, into the skin and subsequently into the vein. The skin may be punctured at the side of the vein or directly over it. In the side entry technique, the needle should puncture the skin on one side of the vein approximately 1/2–1 inch below where the needle will enter the vein. Pierce the skin at a 45 degree angle along the side of the vein. Once through the skin, reduce the angle to approximately 20 degrees and enter the vein nearly parallel to the vessel. If the needle is in the vein, blood return will be visible in the flashback chamber. Advance the needle a few more millimeters.
9. Release the tourniquet.
10. Carefully withdraw the needle approximately 1/2 inch while continuing to advance the catheter. Apply pressure to the vein just above the tip of the catheter to obstruct blood flow. Remove the needle. Never reinsert the needle or pull the catheter back over the needle as this can shear off the plastic tip.
Other books
Kentucky Traveler by Ricky Skaggs
PsyCop 2: Criss Cross by Jordan Castillo Price
Show Me by O'Brien, Elle
The River Queen by Mary Morris
The Spirit Who Loved Me: Spirit Whispers Book One by Stacey Virginia Longmuir
Wielder's Fate by T.B. Christensen
Death of a Policeman by M. C. Beaton
Star-Crossed by Jo Cotterill
The White Gallows by Rob Kitchin


