The Washington Manual Internship Survival Guide (43 page)
Read The Washington Manual Internship Survival Guide Online
Authors: Thomas M. de Fer,Eric Knoche,Gina Larossa,Heather Sateia
Tags: #Medical, #Internal Medicine

BOOK: The Washington Manual Internship Survival Guide
11.7Mb size Format: txt, pdf, ePub
11. Connect the IV tubing to the catheter. To be certain the catheter is in the vein, lower the infusion bag below the level of the insertion site or gently aspirate with a 10 cc syringe filled with saline flush. Blood should appear in the tubing.
12. Cover the insertion site with a transparent occlusive dressing and tape securely.
CENTRAL VENOUS ACCESS
Equipment
• Sterile gloves.
• Appropriate materials to cleanse the skin (if not included in the kit).
• Gown, mask, goggles.
• Sterile drapes (if not included in the kit or if you want extra, which is always a good idea).
• Extra syringes, local anesthetic, and saline flush (just in case).
• Small syringes with normal saline to flush the catheter lumens after insertion.
• Triple lumen catheter kit.
Anatomy
• The internal jugular vein runs medial to the upper portion of the sternocleidomastoid muscle, deep to the triangle formed by the two heads of the mid-portion of the muscle, and then joins with the subclavian vein. The carotid artery is medial to the internal jugular vein.
• The subclavian vein travels under the clavicle near apex of the lung. The subclavian artery is above and behind the vein.
Procedure
Internal Jugular Vein
1. Obtain informed consent.

2. Enlist someone else to be your nonsterile assistant.
3. Place the patient in the Trendelenburg position. Have the patient turn his/her head to the left approximately 45 degrees.
4. Don goggles, mask, gown, and gloves.
5. Cleanse the site.
6. Drape the field.
7. Identify the apex of the triangle formed by the heads of the sternocleidomastoid muscle and also the carotid artery. In addition to physical examination, portable ultrasound (e.g., Site Rite) should be used to localize the vein.
8. Anesthetize the area.
9. Using an introducer needle and syringe, bevel up, at about a 30- to 45-degree angle to the plane of the patient, directed to the ipsilateral nipple attempt to locate the vein. Use the ultrasound to identify the internal jugular vein. The vein is larger in diameter, more compressible, nonpulsatile, and thinly walled. The vein is usually encountered between 2–4 cm but can be more superficial. If unsuccessful, slowly withdraw the needle while aspirating. If there is still no venous blood return, redirect the needle slightly more laterally and then slightly more medially. If still unsuccessful, critically reassess the landmarks and patient positioning.
10. If the carotid artery is inadvertently entered (bright red pulsatile blood that fills the syringe without back pressure), remove the needle and apply direct pressure for 10–15 minutes.
11. When venous blood is obtained, securely hold the needle and remove the syringe. Always keep a finger over the open end of the needle to help reduce the risk of air embolization.
12. Gently pass the guidewire through the needle. It should advance easily without resistance. If resistance is met, remove the wire and check the needle placement again by replacing the syringe and withdrawing blood. Attempt to reintroduce the guidewire.
13. Leave enough of the guidewire outside the patient to accommodate the length of the catheter.
14. While holding the guidewire’s distal end, remove the introducer needle from the patient. Now hold the wire where it exits the skin and slide the needle completely off the wire.
15. Nick the skin with a scalpel to enlarge the puncture site.
16. Thread the dilator onto the guidewire and gently into the vein. Remove the dilator. Never lose hold of the guidewire.
17. Thread the catheter onto the guidewire. Do not pass the catheter into the vein until you have a firm hold on the distal end of the guidewire. Pass the catheter into the vein while continuously holding the distal end of the guidewire. Open the distal port to accommodate distal end of guidewire.
18. While holding the catheter in place, remove the guidewire.
19. Confirm placement by withdrawing venous blood from all ports. Flush the ports.
20. Securely suture the catheter in place.
21. Apply occlusive dressing.
22. Start IV fluids at a minimal rate.
23. Obtain a stat CXR to confirm the location of the catheter (tip should be in the SVC near the right atrium) and rule out pneumothorax.
24. Write a procedure note, whether or not you were successful.
Subclavian Vein
1. Follow steps 1 and 2 for internal jugular placement.
2. Patient positioning is especially important for successful subclavian placement. Place the patient in the Trendelenburg position. Place a towel roll between the scapulae and allow the shoulder to fall backwards. Both arms should be extended at the patient’s sides. If the catheter will be inserted on the left (preferred), turn the patient’s head to the right. If working on the right, turn the head to the left.
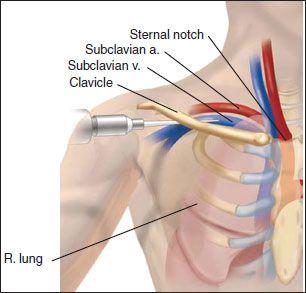
3. Follow steps 4, 5, and 6 for internal jugular placement
4. Place the index finger of the nondominant hand at the sternal notch. Place the thumb of the same hand at the point where the clavicle bends over the first rib (approximately the junction of the lateral one-third and the medial two-thirds of the length of the clavicle). The subclavian vein should traverse a line between the thumb and index finger.
5. With a small gauge needle, anesthetize the skin and subcutaneous tissue just below the clavicle and lateral to the thumb.
6. Enter the skin with the introducer needle with the bevel facing up, lateral to the thumb and just caudal to the clavicle. While aspirating, slowly advance the needle under the clavicle toward the index finger parallel to the floor at all times. You may need to depress the needle with your thumb to get under the clavicle. When the needle enters the vein, there should be free return of dark blood. If there is no blood return after 5 cm, slowly withdraw the needle while continuing to aspirate. If there is still no blood return, redirect the needle to slightly above the sternal notch. Multiple attempts to redirect the needle are inadvisable.
7. Once there is good venous return, rotate the syringe and needle so that the bevel is toward the feet.
8. Follow previous steps 11 through 24 for internal jugular placement. If there is resistance to guidewire passage after it has cleared the tip of the needle, it may be going upward into the internal jugular vein. Remove the guidewire. Reconfirm the location of the needle by replacing the syringe and withdrawing venous blood. Turn the patient’s head toward you and gently try to pass the guidewire again. Introduce the dilator only approximately 3–4 cm.
Femoral Vein
1. Obtain informed consent and enlist someone else to be your nonsterile assistant.
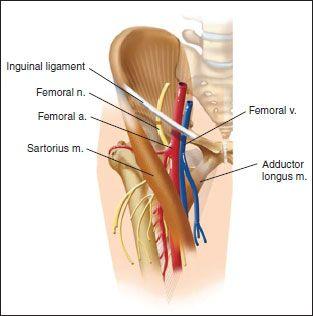
2. Place the patient in the supine position with the ipsilateral thigh slightly abducted and externally rotated.
3. Follow steps 4, 5, and 6 for internal jugular placement.
4. Determine the approximate location of the femoral vein by palpating the femoral pulse below the inguinal ligament, using the “NAVEL” mnemonic.
5. Anesthetize the area with a small gauge needle. Be sure to aspirate before injecting.
6. While palpating the femoral artery, enter the skin below the inguinal crease and approximately 1 cm medial to the pulse with the introducer needle attached to a syringe at an approximate 30- to 45- degree angle, directed cephalad, and bevel up. While applying back pressure, advance the needle slowly and smoothly until there is free return of venous blood. If there is no return after approximately 5 cm, slowly withdraw the needle while continuing to aspirate. If there is still no return, redirect the needle slightly more lateral. If there is return of arterial blood, withdraw the needle and hold firm pressure for approximately 10–15 minutes.
7. Follow steps 11 through 24 under internal jugular placement once there is good venous return.
8. Be very cautious about advancing the guidewire in patients with an IVC filter—the IVC filter can be dislodged by the guidewire.
LUMBAR PUNCTURE
Anatomy
In adults, the spinal cord usually terminates between L1 and L2. When a lumbar puncture is done, the goal is to obtain fluid from the lumbar cistern below this level. The puncture may be done at the L3/L4, L4/L5 (most common), or L5/S1 interspaces. The line connecting the posterior superior iliac crests (the intercristal line) intersects the spine at either the L4 spinous process or the L4/L5 interspace.
Equipment
• Sterile lumbar puncture kit
• Extra small gauge needles, syringes, and local anesthetic (just in case)
Other books
Riding Dirty by Jill Sorenson
A Study In Seduction by Nina Rowan
Bitter Creek by Peter Bowen
All the Lucky Ones Are Dead by Gar Anthony Haywood
Matt's Story by Lauren Gibaldi
A Texan’s Honor by Gray, Shelley
How To Rescue A Rake (Book Club Belles Society 3) by Jayne Fresina
Raising Faith by Melody Carlson
You Majored in What? by Katharine Brooks