The Cook's Illustrated Cookbook (357 page)
Read The Cook's Illustrated Cookbook Online
Authors: The Editors at America's Test Kitchen
Tags: #Cooking

SERVES 6 TO 8
If the dough becomes too warm and sticky to work with, cover with plastic wrap and let it chill in the refrigerator until firm. The Danish should be brushed with the glaze while hot, but drizzled with the icing after it has cooled.
1 | recipe |
1 | recipe |
GLAZE
1¹⁄ | cups (6 ounces) confectioners’ sugar |
5 | teaspoons milk |
1 | teaspoon lemon juice |
ICING
1 | cup (4 ounces) confectioners’ sugar |
1 | tablespoon milk |
1.
Adjust oven rack to middle position and heat oven to 400 degrees. Roll Danish dough into 14-inch square on large sheet of parchment paper. Spread cooled filling down center third of dough, leaving ¹⁄
2
-inch border at top and bottom edge.
2.
Using pizza wheel, cut dough on either side of filling into diagonal strips about ³⁄
4
inch wide (stop cuts ¹⁄
4
inch shy of filling). Discard top corner of dough on either side, then, starting at top of Danish, crisscross strips over filling to form braid. Slide Danish, still on parchment, onto baking sheet.
3.
Cover Danish loosely with greased plastic wrap and let rise at room temperature until puffy, about 30 minutes. Bake Danish until golden brown, 22 to 26 minutes, rotating baking sheet halfway through baking.
4. FOR THE GLAZE:
Transfer baked Danish to wire rack set over sheet of parchment (for easy cleanup). Whisk all ingredients together in bowl and brush it over hot Danish. Let glazed Danish cool completely on rack, about 1 hour.
5. FOR THE ICING:
Whisk all ingredients together in bowl. When Danish is completely cool, drizzle icing attractively over top. Let icing set for 20 minutes before serving.
MAKES 9 DANISH
If the dough becomes too warm and sticky to work with, cover it with plastic wrap and let it chill in the refrigerator until firm. The Danish should be brushed with the glaze while hot, but drizzled with the icing after they have cooled.
1 | recipe |
1 | recipe |
1 | large egg, lightly beaten |
GLAZE
1¹⁄ | cups (6 ounces) confectioners’ sugar |
5 | teaspoons milk |
1 | teaspoon lemon juice |
ICING
1 | cup (4 ounces) confectioners’ sugar |
1 | tablespoon milk |
1.
Adjust oven rack to middle position and heat oven to 400 degrees. Line baking sheet with parchment paper.
2.
Roll Danish dough into 15-inch square on lightly floured counter, dusting with extra flour as needed to prevent sticking. Cut dough into nine 5-inch squares. Place generous 1¹⁄
2
tablespoons cooled filling in center of each square and spread it into 2-inch circle with back of spoon.
3.
Fold 2 opposite corners of dough square over center of filling, brushing dough in center with beaten egg as needed to seal edges together. Lay Danish on prepared baking sheet, spaced about 1¹⁄
2
inches apart.
4.
Cover Danish loosely with greased plastic wrap and let rise at room temperature until puffy, about 30 minutes. Bake Danish until golden brown, 15 to 20 minutes, rotating baking sheet halfway through baking.
5. FOR THE GLAZE:
Transfer baked Danish to wire rack set over sheet of parchment (for easy cleanup). Whisk all ingredients together in bowl and brush it over hot Danish. Let glazed Danish cool completely on rack, about 1 hour.
6. FOR THE ICING:
Whisk all ingredients together in bowl. When Danish is completely cool, drizzle icing attractively over top. Let icing set for 20 minutes before serving.
MAKES
1¹⁄
2
CUPS; ENOUGH FOR 1
DANISH BRAID
OR 9
INDIVIDUAL DANISH
1 | cup dried apricots |
1 | cup (7 ounces) sugar |
³⁄ | cup water |
2 | tablespoons lemon juice |
Microwave apricots, sugar, and water together, stirring often, until apricots are softened and puffed, 7 to 10 minutes. Process warm mixture in food processor until smooth, about 15 seconds. Transfer puree to medium bowl and stir in lemon juice. Cover loosely with plastic wrap and refrigerate until filling has set, at least 1 hour or up to 2 days, before using.
MAKES
1¹⁄
2
CUPS; ENOUGH FOR 1
DANISH BRAID
OR 9
INDIVIDUAL DANISH
1 | cup pitted prunes |
1 | cup (7 ounces) sugar |
³⁄ | cup water |
¹⁄ | teaspoon vanilla extract |
Microwave prunes, sugar, and water together, stirring often, until prunes are softened and puffed, 7 to 10 minutes. Process warm mixture in food processor until smooth, about 15 seconds. Transfer puree to medium bowl and stir in vanilla. Cover loosely with plastic wrap and refrigerate until filling has set, at least 1 hour or up to 2 days, before using.
MAKES 1 CUP; ENOUGH FOR 1
DANISH BRAID
OR 9
INDIVIDUAL DANISH
8 | ounces cream cheese, softened |
¹⁄ | cup (1³⁄ |
¹⁄ | teaspoon grated lemon zest |
Whisk all ingredients together in medium bowl until combined. Cover with plastic wrap and refrigerate until stiff, at least 1 hour or up to 2 days, before using.
MAKES
1¹⁄
2
CUPS; ENOUGH FOR 1
DANISH BRAID
OR 9
INDIVIDUAL DANISH
You can substitute 2 cups fresh or thawed frozen raspberries for the cherries (eliminate the cornstarch).
2 | cups jarred sour cherries, drained |
1¹⁄ | cups (8³⁄ |
1 | tablespoon cornstarch |
8 | ounces cream cheese, softened |
¹⁄ | teaspoon grated lemon zest |
1.
Simmer cherries, 1 cup sugar, and cornstarch together in medium saucepan over low heat until sugar has melted and mixture thickens, about 10 minutes. Transfer mixture to bowl, cover with plastic wrap, and refrigerate until set, at least 1 hour or up to 2 days, before using.
2.
Whisk cream cheese, remaining ¹⁄
4
cup sugar, and lemon zest in medium bowl until combined. Cover with plastic wrap and refrigerate until stiff, at least 1 hour or up to 2 days, before using. Spoon cherry mixture on top of cheese filling when assembling Danish.

1.
Spread filling or jam onto center third of dough.
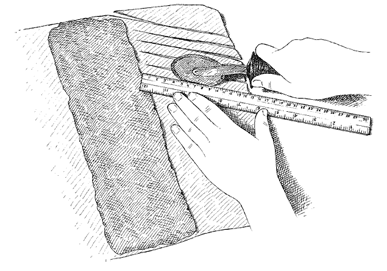
2.
Using pizza cutter or paring knife, cut outer thirds into ³⁄
4
-inch strips (so that cuts are at angle to filling). Stop cuts ¹⁄
4
inch shy of filling.
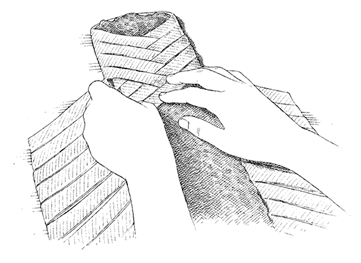
3.
Alternating sides, fold strips over filling, crisscrossing strips over center and pressing ends to seal, until entire Danish is braided.

1.
After cutting dough into 5-inch squares, spoon 1¹⁄
2
tablespoons filling into center of each square.

2.
Fold 2 opposite corners of dough over filling, gently pressing to seal.
![]() WHY THIS RECIPE WORKS
WHY THIS RECIPE WORKS
This yeast-raised French classic contains the best of both worlds: part pastry, part bread, it has a crisp, deeply golden crust wrapped around tender, pillow-soft, buttery layers—perfect for dipping into a cup of café au lait or hot chocolate. We wanted to create an approachable croissant recipe for home bakers—one that would deliver authentic flavor.
The layered structure that characterizes croissants is formed through a process called lamination. First, a basic dough of flour, water, yeast, sugar, salt, and a small amount of butter is made. Then a larger amount of butter is formed into a block and encased in the relatively lean dough. This dough and butter package is rolled out and folded multiple times (each is called a “turn”) to form paper-thin layers of dough separated by even thinner layers of butter. Once baked, it’s these layers that make croissants so flaky and decadent. To start, we found that more turns didn’t necessarily produce more layers—we stopped at three turns, as any more produced a homogeneous bready texture. As for the star ingredient, butter, we found that great croissants demanded higher fat European-style butter. And one essential tip we discovered during our recipe development was to give the dough a 30-minute super-chill in the freezer to firm it to the consistency of the butter, thus ensuring perfectly distinct layers. After letting the croissants rise until they were doubled in size, we brushed them with an egg wash and slid them into a very hot oven. When we removed the croissants from the oven, the layering that had been suggested in the raw dough had bloomed into crisp, delicate tiers of pastry that made every step of the process worth the effort.
See “MAKING A BUTTER BLOCK FOR CROISSANTS” illustrations that follow recipe.
See “LAMINATING THE DOUGH FOR CROISSANTS” illustrations that follow recipe.
See “SHAPING THE CROISSANTS” illustrations that follow recipe.