Teaching the Common Core Math Standards With Hands-On Activities, Grades 3-5 (93 page)
Read Teaching the Common Core Math Standards With Hands-On Activities, Grades 3-5 Online
Authors: Judith A. Muschla,Gary Robert Muschla,Erin Muschla-Berry
Tags: #Education, #Teaching Methods & Materials, #Mathematics, #General

Answers
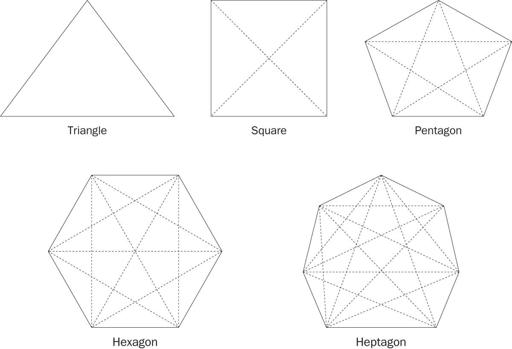
(1)
triangle: 3 sides, 0 diagonals; (3, 0)
(2)
square: 4 sides, 2 diagonals; (4, 2)
(3)
pentagon: 5 sides, 5 diagonals; (5, 5)
(4)
hexagon: 6 sides, 9 diagonals; (6, 9)
(5)
heptagon: 7 sides, 14 diagonals; (7, 14)
Figures and Diagonals
Geometry: 5.G.3
“Classify two-dimensional figures into categories based on their properties.”
3. “Understand that attributes belonging to a category of two-dimensional figures also belong to all subcategories of that category.”
Background
Students sometimes think of two-dimensional figures as fitting into distinct categories. They fail to realize that some figures belong to subcategories.
Quadrilaterals are four-sided figures. If a quadrilateral has two pairs of parallel sides, it is a parallelogram. If a parallelogram has four congruent sides, it is a rhombus. If a parallelogram has four right angles, it is a rectangle. If a parallelogram has four congruent sides and four right angles, it is a square. Or, if a rectangle has four congruent sides, it is a square. If a rhombus has four right angles, it is a square. However, if a quadrilateral has exactly one pair of parallel sides, it is a trapezoid. It requires clear thinking and understanding on the part of students to classify two-dimensional figures into categories according to properties.
To help students understand the specific qualities of each type of quadrilateral, explain to them that
parallelogram
serves both as an umbrella term over an entire category (as just described) and as a specific example within that category, namely, a quadrilateral with two pairs of parallel and congruent sides but no right angles. Likewise
rhombus
can refer either to a category of parallelogram that has four congruent sides that might or might not have right angles, or to a specific type of parallelogram with four congruent sides but no right angles.
Activity: Naming Quadrilaterals
Working in pairs or groups of three, students will categorize quadrilaterals so that all of the figures that have the same properties are placed together.
Materials
Scissors; glue sticks; rulers; reproducibles, “Organizing Quadrilaterals” and “Quadrilaterals,” for each pair or group of students.
Procedure
1.
Explain that quadrilaterals are two-dimensional figures that have four sides. The most common types of quadrilaterals are parallelograms, rectangles, rhombuses, squares, and trapezoids.
2.
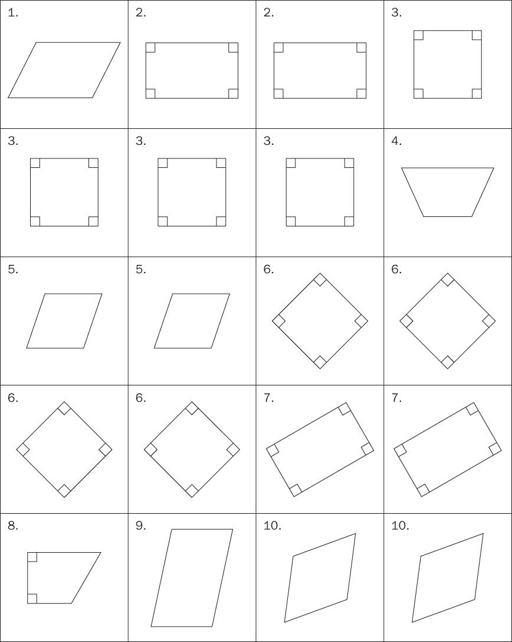
Hand out copies of the reproducibles. Explain that “Organizing Quadrilaterals” is divided into five sections: Parallelograms, Rectangles, Rhombuses, Squares, and Trapezoids. “Quadrilaterals” contains cards that show various quadrilaterals. Note that the cards are numbered from 1 to 10. Some cards, which will be used in more than one category, have the same number and figure.
3.
Explain that students are to cut out the quadrilateral cards and glue them in their correct section on the organizer. Note that some sections will contain more cards than others.
4.
Explain that because the figures on the cards are not named, students must pay close attention to their properties as shown on the card. Suggest that they use rulers to confirm congruent sides. Note that all right angles are shown with a box in the vertex.
Closure
Check your students' results. Discuss how many figures are a subcategory of another figure and the properties that make them so.
Answers
The card number is written after each figure. Parallelograms: 1, 2, 3, 5, 6, 7, 9, 10; Rectangles: 2, 3, 6, 7; Rhombuses: 3, 5, 6, 10; Squares: 3, 6; Trapezoids: 4, 8
Organizing Quadrilaterals
| Parallelograms |
| Rectangles |
| Rhombuses |
| Squares |
| Trapezoids |
Quadrilaterals
Geometry: 5.G.4
“Classify two-dimensional figures into categories based on their properties.”
4. “Classify two-dimensional figures in a hierarchy based on properties.”
Background
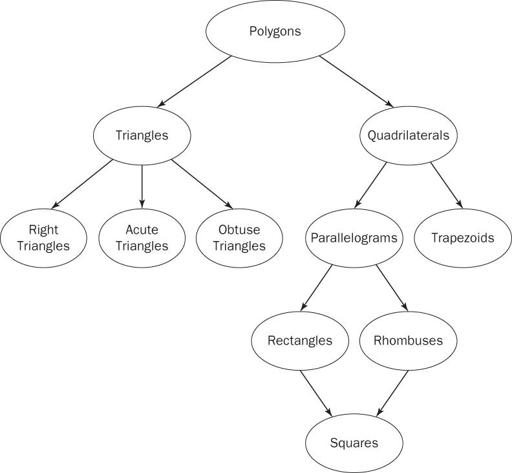
Many two-dimensional figures may be arranged in a hierarchy based on their properties. In a hierarchy of two-dimensional figures, a figure below another is a special type of the figure above it. For example, every square is a special type of rectangle, but not every rectangle is a square.
Activity: A Hierarchy of Two-Dimensional Figures
Working in small groups, students will create a poster showing a hierarchy of two-dimensional figures that includes quadrilaterals and triangles.
Materials
Scissors; glue sticks; rulers; protractors; markers; crayons; colored pencils; construction paper; poster paper; reproducibles, “Polygon Hierarchy Pattern” and “Polygons: Definitions and Properties,” for each group of students.
Procedure
1.
Explain that many two-dimensional figures share some properties. Offer the example of the square being a special type of rectangle, though not every rectangle is a square. A square has four right angles and four congruent sides; a rectangle has four right angles and two pairs of opposite, congruent sides. To help your students visualize these properties, show examples of squares and rectangles and discuss the properties of each.
2.
Explain that students will create a poster that shows how various figures are related by sharing some properties. Students will create a hierarchy of polygons in which the figure below another is a special type of the figure above it.
3.
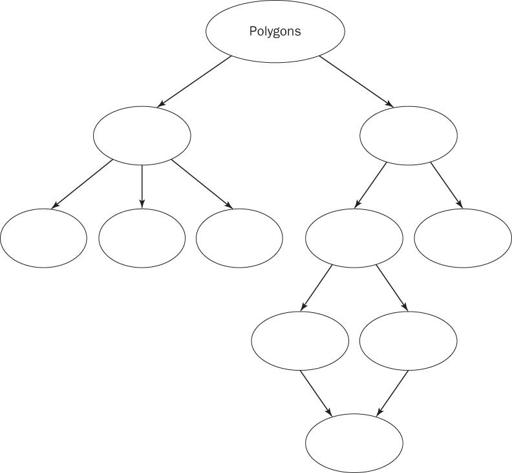
Hand out copies of the reproducibles. Explain that “Polygon Hierarchy Pattern” contains a pattern that students can follow as a type of blueprint when making a hierarchy of polygons on their posters. Each balloon should be replaced with a figure that is included on “Polygons: Definitions and Properties.” You might, however, suggest that students create their own patterns.
4.
Explain that students are to draw the figures that they will use to complete a hierarchy of polygons on construction paper, cut them out, and then glue them in a hierarchical pattern on their poster paper. They should use rulers and protractors to ensure the accuracy of their figures. They are to label each figure on their poster and write each figure's properties below it.
5.
Encourage your students to be creative with their hierarchical posters but also be mathematically accurate.
Closure
Have students share their posters with other groups. Discuss the hierarchical pattern of polygons and why a figure below another figure is a special type of that figure. What are their common properties? Display the posters.
Answers
Names instead of actual figures are provided.
Polygon Hierarchy Pattern
Polygons: Definitions and Properties
1. Acute triangle:
A triangle whose angles are each less than.


