Pro Puppet (42 page)
Authors: Jeffrey McCune James Turnbull

foreman_url=http://foreman:3000
 Tip
Tip
You can click on the YAML link in an individual host definition to see what the ENC output would be for that host. This is a good way of confirming your host is accurately configured.
Foreman has the capability to import and display your Puppet reports. Foreman uses a custom report on your Puppet master to send reports. To use this custom report, you need to ensure all clients have reporting enabled by setting thereportoption on each client:
[agent]
report = true
You then need to add your Foreman report to the master and configure it to send the report to the right location. The Foreman custom report is contained in/usr/share/foreman/extras/puppet/foreman.
/files/foreman-report.rb
Inside this file, find the line:
$foreman_url=http://foreman:3000
Ensure that this line points to the correct Foreman host and port for our environment. Then, copy this report into the Puppet reports directory on each of your Puppet masters; for example, on Red Hat it would look like this:
$ sudo cp /usr/share/foreman/extras/puppet/foreman/files/foreman-report.rb
 /usr/lib/ruby/1.8/puppet/reports/foreman.rb
Next, enable this report in the Puppet master'spuppet.conffile:
reports = log, foreman
Restart the Puppet master and reports should begin to flow to Foreman. You can review these reports via the Reports tab that you can see in
Figure 7-11
.
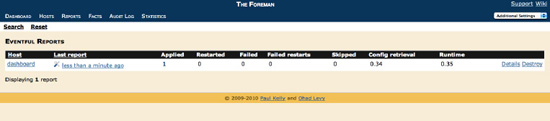
Figure 7-11.
Displaying reports in Foreman
If you have reports you'd like to purge from Foreman, both to improve performance and to remove aged data, you can run another Rake task to expire reports. You can remove reports via date and via their status. To expire all reports older than a particular period, use the following Rake task from the root directory of the Foreman application:
$ sudo RAILS_ENV="production" rake reports:expire days=7
This removes all reports older than 7 days.
We can also remove all reports, except those with errors or failed resources, for example:
$ sudo RAILS_ENV="production" rake reports:expire days=10 status=0
This task would remove all reports older than 10 days which were successful and contain no errors or failed resources.
In addition to acting as an ENC, you can also use Foreman to display data about your Puppet nodes. Foreman can take this data from two sources: your existing stored configuration database, or via a manual import of Puppet data.
If you're using the same database for Puppet's stored configuration as for Foreman, then this data will automatically be populated into Foreman and you can see it via the Facts tab, as shown in
Figure 7-12
, or using the individual Fact links for each host. If you are not using the stored configuration database, then you can use the tasks we described in the Configuring Foreman section to keep your Puppet data up to date.
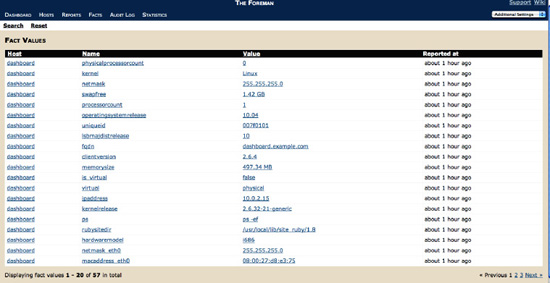
Figure 7-12.
Displaying Facts in Foreman
You can also use the Search functions to find a specific Fact value.
Note
The Foreman also has a REST API that you can interact with. It uses JSON and provides access to most of its capabilities via a web services interface. You can see full details on the API and how to interact with it athttp://theforeman.org/projects/foreman/wiki/API.
Lastly, you can also use Foreman to trigger Puppet runs using thepuppet kick(formerlypuppetrun) command Foreman will execute thepuppet kickcommand from the host running Foreman and trigger a Puppet run on a host. To use the capability you need to have Puppet installed on the Foreman host (which you should have in place anyway), and it will look for the puppetrun binary in/usr/bin. You also need the following enabled in the Foreman settings file,config/settings.yml:
:puppetrun: true
And we also need to allow Foreman to do somesudomagic to be able to use thepuppetruncommand and access your certificates. Add something like the following to yoursudoersfile on the Foreman host:
Defaults:foreman !requiretty foreman_user ALL = NOPASSWD: /usr/bin/puppetrun
Each client host you wish to trigger a Puppet run on needs to havelistenenabled, for example:
[agent]
listen = true
Note
We cover Puppet run/kick in
Chapter 8
.
You will also need to allow the connection in the/etc/puppet/auth.conf, for example (replacingforeman.example.comwith the hostname of your Foreman host):
path /run method save allow foreman.example.com
You'll also need to ensure port 8139 is open between the Foreman host and your Puppet clients.
With all this enabled, you should now see a new option in the Hosts display called Run Puppet. Click on this to perform a Puppet run.
Tip
The Foreman supports both authentication and encryption. You can read about how to integrate it with an LDAP directory athttp://theforeman.org/projects/foreman/wiki/LDAP_Authentication. You can also see how to force The Foreman to use SSL for all connections athttp://theforeman.org/projects/foreman/wiki/Force_SSL.
In this chapter, we've explored how you can use both the Puppet Dashboard and The Foreman as web-based front ends to your Puppet environment. We examined how to install, configure, use, and manage each tool, and we looked at their respective capabilities. Both offer powerful additional visualization and management capabilities that you'll find useful in managing your environment, and enable you to provide graphing to your team.
The following links will take you to documentation related to the Puppet Dashboard, The Foreman and related topics:
- The Puppet Dashboard
http://www.puppetlabs.com/puppet/related-projects/dashboard/ - The Foreman
http://theforeman.org/projects/foreman - The Foreman mailing list
http://groups.google.com/group/foreman-users - The Foreman IRC channel #theforeman on Freenode
- The Foreman Forums
http://theforeman.org/projects/foreman/boards - External nodes
http://docs.puppetlabs.com/guides/external_nodes.html - Puppet configuration reference
http://docs.puppetlabs.com/references/stable/configuration.html

Puppet, by itself, provides a large number of features and functionality. As you've learned so far in this book, Puppet enables you to manage the configuration state of a wide variety of resources. Files, users, groups, software packages and running services are prime examples. Configuration management is an extremely complex and multi-faceted problem, however, and as result we cannot expect Puppet alone to address every problem. In this chapter, we cover a number of additional tools that work extremely well with Puppet. These tools address many of the problems Puppet alone does not address.
The first problem is concerned with de-duplicating effort. The Puppet Forge provides a central place for members of the Puppet community to publish and download re-usable modules. The Puppet Module tool works with the Forge, providing a convenient command line interface, much like the yum and apt-get packaging commands provide. This chapter demonstrates how to download, install, and use modules from the forge.
In addition, you'll learn how puppet-module can be used to generate a skeleton module structure and package modules. Even if the modules will never be published outside of your organization, these features provide a way to track module versions and distribute them to other groups internally.
While not an external tool, the Ruby DSL in Puppet 2.6 provides an alternative to declaring configuration resources using the Puppet language. The declarative nature of the Puppet language is a great way to express configuration state, but you may run across a configuration that is awkward or impossible to express using the Puppet language itself. In these situations, Puppet allows you to declare classes and resources using the Ruby programming language, providing additional functionality. You'll see how the Example.com developer uses the Ruby DSL to transform data external to Puppet into resources and their parameter values in the configuration catalog. One example of a problem that's difficult to solve with the Puppet language is the management of login accounts. As people join and leave Example.com, the developer would have to add and remove resource declarations in the Puppet manifests. A more ideal solution would be if Puppet could automatically declare resources based on information from an outside data source like LDAP. The Ruby DSL is ideally suited to the task of iterating over an arbitrary amount of external data, then declaring resources using the data.
As Puppet configurations change, testing the change is always a good idea before pushing to the production infrastructure. Puppet is designed to model the desired state of a system, which is closely related to how that system behaves. With the idea of desired behavior in mind, the natural language specifications of Cucumber inspired Nikolay Sturm to develop cucumber-puppet. Cucumber-puppet allows you to describe the desired behavior of Puppet infrastructure and test the configuration model stored in the catalog.
The Puppet Forge, located athttp://forge.puppetlabs.com/, provides an online repository of Puppet modules. This service provides the means to publish and locate modules for commonly managed services like iptables, apache, and NTP. In addition, there are modules targeted for specific use cases, such as Hadoop.
If you find yourself needing to quickly deploy a complex infrastructure like Hadoop, the Puppet Forge will save you much time and effort. Modules on the Forge provide a reference configuration that may be easily modified if necessary. The Forge strives to become to Puppet what CPAN is to Perl hackers. Puppet modules may be manually downloaded from the Forge using a standard web browser, but the process is made much easier through the use of the Puppet Module tool, called puppet-module.
The puppet-module command provides an interface to the Forge API. This command line interface allows you to create skeleton Puppet Modules for your own work, search the forge for existing modules, and install them into your configuration. In this section, we cover the process of downloading an already-existing module and publishing a new module to the forge.
Unlike Puppet, which is distributed in many package repositories for various operating systems, the Puppet Module Tool is primarily distributed through the RubyGems package repository. This has the advantage of making installation straightforward and easy on all platforms with RubyGems installed.
Listing 8-1
shows how the Example.com operator installs the Puppet Module tool.
Listing 8-1.
Installing Puppet Module using Gems
$ gem install puppet-module
******************************************************************************
  Thank you for installing puppet-module from Puppet Labs!
  * Usage instructions: read "README.markdown" or run `puppet-module usage`
  * Changelog: read "CHANGES.markdown" or run `puppet-module changelog`
  * Puppet Forge: visit http://forge.puppetlabs.com/
******************************************************************************
Successfully installed puppet-module-0.3.2
1 gem installed
Installing ri documentation for puppet-module-0.3.2...
Installing RDoc documentation for puppet-module-0.3.2...
# puppet-module version
0.3.2
The operator first installs puppet-module using thegemcommand, then he checks to make sure the command is executable and at the correct version.
Note
The Puppet Module tool project page and source code are hosted on GitHub athttps://github.com/puppetlabs/puppet-module-tool. An alternative to installing the software using RubyGems is to clone a copy of the source and use the install.rb script included in the source. This also gives you the ability to easily modify and contribute to the project.
The first step to download and install a Puppet module is to search for the name of a module providing the configuration you're looking for. A common service managed on many systems is the iptables host-based firewall. Whether you need to configure Apache, MySQL, or some other network-based service, the host-based firewall will need to be managed to grant access to the service. Before setting out to write his own Puppet module to accomplish this task, in
Listing 8-2
the operator uses thepuppet-module searchcommand to see if one has been published to the Forge already.
Listing 8-2.
Searching for modules using puppet-module
$ puppet-module search iptables
=====================================
Searching http://forge.puppetlabs.com
-------------------------------------
1 found.
--------
bobsh/iptables (1.2.0)
The operator notices there is already a module to manage the iptables firewall, published by bobsh (Ken Barber). To automatically download and install the module, the operator uses the install action in
Listing 8-3
. The module will be installed into the current working directory, so it's a good idea to change directories to somewhere located in the Puppet module search path.
Listing 8-3.
Installing a module using puppet-module
$ cd /etc/puppet/modules
$ puppet-module install bobsh/iptables
Installed "bobsh-iptables-1.2.0" into directory: bobsh-iptables
$ tree bobsh-iptables/
bobsh-iptables/
|-- COPYING
|-- Modulefile
|-- README.rst
|-- REVISION
|-- Rakefile
|-- lib
|   `-- puppet
|       |-- test
|       |   `-- iptables.rb
|       `-- type
|           `-- iptables.rb
|-- metadata.json
`-- tests
    |-- 010_basic.pp
    |-- 020_icmp_types.pp
    |-- 021_icmp_any.pp
    |-- 030_multiple_sources.pp
    |-- 040_state_types.pp
    `-- 050_sport_and_dport.pp
5 directories, 14 files
The operator first uses thepuppet-module installcommand to download and unpack the iptables module. Once installed, the module contents indicate that the documentation is in the README.rst file. Examples are also located in the bobsh-iptables/tests/ directory. These examples provide a quick way to get started using the newiptablestype provided by the module.
Now that the operator has a module installed from the Forge, let's see how he uses the module in his Puppet manifests.
The iptables module provides a new Puppet type namediptables. We'll see how the Example.com operator writes a simple manifest to use this newly installediptablestype.
First, the Example.com operator generates a new module namedsite-firewallusing the puppet-module tool. The process he uses is shown in
Listing 8-4
. He picks the name “site” because this module is specific to his deployment and will not be distributed outside of Example.com. In this situation, the puppet-module tool provides a quick and convenient way to generate the skeleton directory structure of the module.
Listing 8-4.
Generating a skeleton module with puppet-module
# cd ~
# puppet-module generate site-firewall
=================================================================
Generating module at ~/site-firewall
-----------------------------------------------------------------
site-firewall
site-firewall/files
site-firewall/files/README.markdown
site-firewall/templates
site-firewall/templates/README.markdown
site-firewall/manifests
site-firewall/manifests/init.pp
site-firewall/manifests/README.markdown
site-firewall/spec
site-firewall/spec/spec.opts
site-firewall/spec/unit
site-firewall/spec/unit/puppet
site-firewall/spec/unit/puppet/provider
site-firewall/spec/unit/puppet/provider/README.markdown
site-firewall/spec/unit/puppet/type
site-firewall/spec/unit/puppet/type/README.markdown
site-firewall/spec/README.markdown
site-firewall/spec/spec_helper.rb
site-firewall/tests
site-firewall/tests/init.pp
site-firewall/lib
site-firewall/lib/puppet
site-firewall/lib/puppet/facter
site-firewall/lib/puppet/facter/README.markdown
site-firewall/lib/puppet/parser
site-firewall/lib/puppet/parser/functions
site-firewall/lib/puppet/parser/functions/README.markdown
site-firewall/lib/puppet/provider
site-firewall/lib/puppet/provider/README.markdown
site-firewall/lib/puppet/type
site-firewall/lib/puppet/type/README.markdown
site-firewall/Modulefile
site-firewall/metadata.json
site-firewall/README
As we can see in
Listing 8-4
, thegenerateaction creates quite a bit of boilerplate for the operator to fill in and use as a guide. This saves quite a bit of work over the manual method of creating the module directory structure. The puppet-module tool prefixes each module with the author of the class, so the module is actually named “firewall.” Once the skeleton directory structure is created,
Listing 8-5
shows how the operator adds a few iptables resources to the firewall class ininit.pp. In your configuration, it is a good idea to commit the boilerplate code to version control at this point if you wish to do so. This will allow you to easily track changes you make to the generated code.
Listing 8-5.
Adding resources to the firewall class
$ vim site-firewall/manifests/init.pp
Add the following resources:
$ diff --git a/manifests/init.pp b/manifests/init.pp
index ec7243a..bee3943 100644
--- a/manifests/init.pp
+++ b/manifests/init.pp
@@ -13,5 +13,19 @@
 # [Remember: No empty lines between comments and class definition]
 class firewall {
+  Iptables {
+    source      => "0.0.0.0",
+    destination => "0.0.0.0",
+  }
+
+  iptables { "100 Puppet Prod":
+    dport => "8140",
+  }
+  iptables { "101 Puppet Test":
+    dport => "8141",
+  }
+  iptables { "101 Puppet Dev":
+    dport => "8142",
+  }
 }
The diff output in
Listing 8-5
indicates that a number ofiptablesresources have been added to the firewall class in the init.pp file. Once these resources have been declared, the operator packages the
generated module and places it in the module search path with the two commands shown in
Listing 8-6
. If the module is directly copied into the module path without being built, Puppet will fail to load the module since the metadata has not been automatically generated. The workflow for developing modules generated by puppet-module is to develop them outside of the module search path, then build and install them using puppet-module.