Passionate About Pizza: Making Great Homemade Pizza (23 page)
Read Passionate About Pizza: Making Great Homemade Pizza Online
Authors: Curtis Ide
Tags: #Baking, #Cookbook, #Dough, #Pizza

Dough Recipes
The
Passionate About Pizza System
You will make great homemade pizza every time you try if you ignite your passion and follow a systematic approach to making pizza. Plan your pizza-making activities, use the same equipment and high-quality ingredients each time, use proven preparation techniques, rely on your RECIPES, and work to make continual improvements.
This chapter describes the following dough recipes (click to follow link):
Basic Pizza Dough
New York-style Dough
Sicilian-style Dough
Cornmeal Dough
Cracker-style Dough
Focaccia Dough
Half Wheat Dough
Whole Wheat Dough
Rye Dough
Potato Pizza Dough
Slow-Rise Pizza Dough
California-style Sourdough
Herman Sourdough Dough
Neapolitan-style Dough
Dough Recipes Basics
Almost all pizzas are made with yeast dough; that is, dough made from wheat flour and water that is leavened with yeast. The variations of dough come from the type of flour and yeast you use or by varying the additional ingredients such as sugar, oil, or flavorings. You will find a broad range of different dough recipes presented here. You can also adapt many bread recipes into pizza dough by adjusting the quantities to suit pizza and by shaping the dough into a pizza.
To make any type of dough, you mix all the ingredients to get a uniform mixture. You knead the dough to develop the gluten. Gluten in wheat flour is the magic component that makes the dough stretch in a way that it holds its shape. After kneading, you leave the dough to rise. The yeast multiplies and gives off little bubbles of carbon dioxide; the gluten traps these bubbles so that the dough puffs up and expands.
Using Different Flours
You can use flours not made from wheat in your pizza dough. When doing this, you would typically use wheat flour for half (or more) of the quantity of flour in the dough with the other types of flour added to make up the total quantity. The reason for a mixture including wheat flour is that the wheat flour provides the gluten that is necessary for stretching and rising. You can add vital wheat gluten to other flours that do not have sufficient gluten as another option.
Adjusting Dough Consistency
You can make your pizza dough very slack and easy to stretch. Alternatively, you can make your pizza dough very firm and able to take a lot of handling without overstretching. Ideally, you will make your dough the way that works best for a particular style of pizza or the way you prefer it. Several dough ingredients interact and influence the final dough consistency. Because of this, you will benefit from knowing about those factors. Here is what you can do in order to adjust the dough’s consistency to your liking.
Dough becomes firmer, stronger, and takes more effort to shape in these ways:
• Using higher gluten flour (such as bread flour) makes dough stronger.
• Using more flour makes denser dough that is harder to stretch.
• Using little or no oil makes dough stronger.
• Using a shorter rest time keeps dough firmer.
Keeping dough cooler as it rests makes the dough harder to stretch. Dough becomes more slack and easier to shape when:
• Using flour with lower gluten (such as all-purpose flour, 00 flour, or pastry flour) makes slacker dough that shapes more easily.
• Using more water makes slacker dough that shapes more easily.
• Adding oil to the dough (up to 3 Tablespoons per 3 cups of flour) results in slacker dough.
• Letting dough rest longer makes dough slacker and easier to shape.
• Allowing the dough to rise longer (thereby allowing the yeast to multiply longer) makes the dough more slack.
You will see that each dough recipe uses specific flours and particular ratios of flour, oil, and liquid. Each recipe uses that particular combination of these ingredients to create specific handling characteristics in the dough. Within the confines of the recipe, you can alter the amount of flour to fine-tune the dough’s characteristics and make it slacker or stronger. You can make further changes and make your own recipe by varying these same factors. Remember, the recipes are a framework but you can and should experiment and customize them; show your pizza-making passion! Just do not yell at me if things do not turn out.
Using Different Amount or Type of Yeast
Each dough recipe lists a particular type of yeast and it gives the quantity of yeast to use. Take these as recommendations but you can certainly make changes. If you have a favorite brand or type of yeast, use it. If you prefer higher or faster rising, you can use slightly more yeast. If you prefer less or lower rising, you can use slightly less yeast. Of course, you can also vary the amount and type of sweetener you use, as well. More sweetener makes for faster rising. Once you have it figured out what you prefer, write it down!
Flavored Dough
You can jazz up any of the dough recipes in this chapter a bit by adding a little flavoring to the dough. You can add flavored oils, herbs, or cheeses as you make the dough. Almost anything will work, but experiment on your own with flavorings before you try making dinner for your boss or other important guests because some flavorings can kill or slow the yeast. I have used oregano and basil without having problems as well as several flavored oils.
I once killed the yeast when I was making pizza for guests. I added a large amount of some herb when I was mixing the pizza dough. I do not remember which one it was because I was making pizza at a party at someone else’s house using their ingredients. The pizza dough did not rise at all! I have to say that flummoxed me a bit; I waited and waited with no discernable rising of the dough. So, what did I do? I whipped up another batch of dough without that herb and I used my quick-rise techniques to make it rise in about 15 minutes. The party was right back on schedule and nobody noticed but my wife and me!
You might try adding some of the following to your dough to give it some special character:
• Add one teaspoon dried herbs (such as oregano or basil) with the first cup of flour when mixing the dough.
• Use flavored olive oil as one of the dough ingredients when mixing the dough.
• Use flavored liquid such as water in which you cooked vegetables or beer.
• Brush the edge of the dough with olive oil and sprinkle some sesame seeds, poppy seeds, or sunflower seeds on the oiled edge immediately before baking.
• Knead a quarter cup of minced, sautéed onions or scallions into the dough after it has risen when you prepare to let the dough rest.
• Knead a 1/4 cup of fresh, diced herbs into the dough after it has risen.
• Knead a quarter cup grated Parmesan, provolone, or Romano cheese into the dough after it has risen.
Basic Pizza Dough
Basic pizza dough is the most common type of dough used in pizza. This dough is not too fancy or too bland. It is easy to make and shape and you can use it for almost any type of pizza. Basic pizza dough produces a crust that tastes good and crunches nicely when baked on a pizza stone, on a pizza screen, or in a pizza pan.
Pizzerias make their dough in large batches hours ahead of time. They typically use machines to mix it, knead it, let it rise, and prepare it for extended storage. They may use less yeast and dough conditioners to compensate for this longer resting time; as a result, you cannot just use their recipe. Basic pizza dough performs at home similarly to the dough used by most pizzerias.
Makes one fourteen to sixteen inch thin-style pizza.
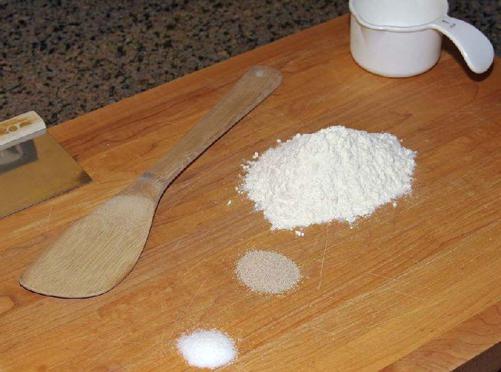
1 cup lukewarm tap water (105 – 115 degrees F)
1 teaspoon sugar
1 package (about 3/4 Tablespoon) active dry yeast (regular or quick-rise)
2 Tablespoons olive oil
1 1/4 to 1 1/2 cups unbleached all-purpose flour
1 1/4 to 1 1/2 cups unbleached bread flour
1 teaspoon salt (I do not recommend omitting the salt)
unbleached all-purpose flour (for kneading and shaping)
Flour
– You can vary the amount of flour in the dough within the range given in the recipe. Using two and a half cups will result in softer dough that is easier to stretch and has a bubblier crust. Using two and three quarters to three cups will result in stiffer dough that is better for tossing around. I mix a bag of all-purpose flour with a bag of bread flour to make it easier to measure out the flour mixture; you might also find this useful.
Water Temperature
– High temperatures kill yeast. When in doubt, use cooler rather than hotter water. Cool (even cold) water will not hurt the yeast; it will just slow down the rising process slightly.
Sugar
– The sugar in the dough is food for the yeast. This allows the yeast to multiply robustly and produces a slightly faster and higher rising dough. You can use a similar amount of any sweetener. You will want to experiment so you know that the sweetener you use does not kill yeast. I have used sugar, honey, malt powder, and molasses with success.
Mixing
–
Pour the water in a large mixing bowl and sprinkle in the sugar and the yeast. Stir gently for a few seconds (do not worry if the yeast is not completely dissolved). Let stand until it starts to get foamy, about ten minutes. You should begin to see the yeast multiply; it will produce bubbles and clumps that rise to the surface of the water. Waiting for the yeast to become bubbly is not necessary if you are very familiar with yeast baking and you know your yeast is active.
Add the oil, one cup of the flour and the salt. Mix thoroughly with a wooden spoon or wire whisk until the mixture is very smooth with no lumps. Add one and a half cups of flour and mix well. The dough should come together and may be fairly sticky. You may need to add up to an additional half-cup or so of flour if the dough is very wet or too sticky.
A heavy-duty mixer or food processor works well for mixing and kneading. Just follow the machine’s instructions. However, you will have better success if you have done the kneading process by hand a few times. That experience will help you know that the mixer is doing its job correctly. You will also know how to tell that the dough has finished kneading.
Kneading
–
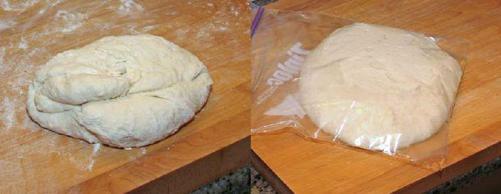
Knead the dough until it is smooth and elastic and no lines of flour show. The dough should feel somewhat elastic and should spring back when pressed. Shape the dough into a ball for rising.
The dough will become less sticky as you knead it and the gluten develops into the matrix that holds the bubbles created by the yeast. You will notice that the amount of flour in the dough makes it feel soft or firm while you knead it; that is okay. Extra flour makes the dough denser; similarly, less flour makes it less dense. You can add flour or liquid to adjust the consistency and ease kneading but resist the tendency to add too much flour.