Passionate About Pizza: Making Great Homemade Pizza (27 page)
Read Passionate About Pizza: Making Great Homemade Pizza Online
Authors: Curtis Ide
Tags: #Baking, #Cookbook, #Dough, #Pizza

Baking
– Bake this dough at 500 degrees Fahrenheit on a stone, in a pan, or on a pizza screen.
Variation
–
You can eliminate the honey (and the oil, if you prefer) and use Caputo™ Tipo 00 pizza flour to make this dough into an authentic Italian-Style sourdough.
Herman Sourdough Dough
This dough has a sweet taste with a unique sourdough tang. It takes some advance planning to create a Herman starter but it is well worth the effort. It is a bonus that you can use Herman Starter in virtually any baked goods from pancakes to cinnamon rolls to white bread. There is even a whole cookbook dedicated to Herman sourdough recipes!
Start by making the Herman Starter several days in advance of when you plan to make the finished pizza. Then proceed to prepare the Herman Sourdough several days later.
Herman Starter
Make two to three days before you make the dough.
1/4 cup lukewarm tap water (105 – 115 degrees F)
1 teaspoon active dry yeast (not quick-rise)
1 cup milk
1 cup unbleached all-purpose flour
1/2 cup sugar
Mixing
– Pour the water into a non-metallic mixing bowl. Make sure to use a bowl that is 5 to 6 times the size of the starter or it may overflow the top. Sprinkle in the yeast and stir gently for a few seconds (do not worry if the yeast does not dissolve completely). Let stand a few minutes. Since there is no sugar for the yeast to feed on yet, the bubbles may not be very noticeable. Add the milk, flour, and sugar and mix thoroughly with a non-metallic spoon.
Rising
– Cover the bowl with a kitchen towel and place it in a draft-free place at room temperature overnight. The next day, place the Herman starter in the refrigerator. You can leave the starter refrigerated for three to five days. Stir with a non-metallic spoon once or twice a day. The starter sponge will smell very yeasty and maybe a little sour as the days go by.
Despite what you might think, leaving the milk-based starter at room temperature should be fine overnight and maybe as long as a few days. As I understand it, the yeast produces alcohol as it multiplies and this alcohol kills the organisms that make milk go sour. It is a little safer to store it in the refrigerator in a container that allows ample room for it to expand so that is what I recommend.
The starter will rise and fall several times in the few days that it is developing its flavor. What is happening is that a particular strain of yeast that thrives in the sweet, milky starter reproduces continually. This yeast will give the dough its unique, sweet tanginess.
Maintaining Herman Starter
To keep the Herman Starter going after you have used it, replenish it by adding one part milk, one part flour, and half a part sugar to the remaining starter. For example, if you remove one cup of starter, replenish it by stirring in 2/3 cup milk, 2/3 cup flour, and 1/3 cup sugar. If you do not need to use the Herman Starter for an extended period, feed it by stirring in one Tablespoon of sugar each five days and stir the starter once every day. The Herman Starter will be ready for use at any time if you keep using it, replenishing it, and feeding it. You can use Herman Starter in bread, muffin, pancake, and other recipes. The starter will keep in the refrigerator for a long time, but its flavor develops best when you use it frequently and feed it regularly.
The Herman Starter sourdough culture does not perform as well when exposed to metal; therefore, you should use non-metallic bowls and utensils for the starter and the dough.
Herman Sourdough
Use Herman Sourdough for pizza baked on a stone, on a screen, or in a pan. Makes one fourteen to sixteen inch pizza.
1 teaspoon active dry yeast (not quick-rise)
1/4 cup lukewarm tap water (105 – 115 degrees F)
1 cup Herman Starter (made at least 2 – 3 days in advance)
1 teaspoon sugar
1 teaspoon salt
2 Tablespoons vegetable shortening (melted)
1 3/4 to 2 1/4 cups unbleached all-purpose flour
unbleached all-purpose flour (for kneading and shaping)
Mixing
– Measure out one cup of the Herman Starter into a non-metallic container and let the starter come to room temperature.
Dissolve the yeast in the quarter cup water in a small bowl or cup and stir gently for a few seconds (do not worry if the yeast does not dissolve completely). Let stand a few minutes. Since there is no sugar for the yeast to feed on yet, the bubbles may not be very noticeable.
Pour the water and dissolved yeast mixture into a large non-metallic mixing bowl with the Herman Starter and stir in the sugar, the salt, and the melted shortening. Mix thoroughly with a non-metallic spoon. Add 1 3/4 cups of the flour and mix well. The dough should come together but will still be a little sticky. You may need to add up to an additional half cup or so of flour if the dough is very wet or very sticky.
This dough has higher water content than other types of dough, so resist the temptation to add too much flour. The dough will stick to your hands (and everything) a little, but be patient. Although sticky when shaping, the dough will be quite light and airy when baked.
Kneading
–
Knead the dough until the dough is smooth and elastic and no bits of raw white flour show. The dough should no longer feel too sticky. It should feel somewhat elastic and should spring back when pressed. Shape the dough into a ball for rising.
Shaping and Assembly
–
This dough is best when hand-stretched or rolled out into a thin crust. Assemble the pizza on a pizza peel or pizza screen.
Baking
–
Bake this dough at 400 degrees Fahrenheit on a stone, in a pan, or on a pizza screen. This dough will brown (and burn) more easily because of the high sugar content. In addition, this dough will not become as crunchy and chewy as other pizza dough. Rather, it will be soft and somewhat bread-like in texture.
Neapolitan-style Dough
If you are on a quest for authentic-tasting Neapolitan-style pizza (they call it Vera Pizza Napoletana), use this dough. This is simple pizza dough of flour, water, and salt without any oil or sugar. Leaving the oil out gives the crust its distinctive light but crunchy crust. Leaving out the sugar gives the yeast less to feed on and results in longer rise time that develops more flavors from the yeast and flour.
Pizzerias make their dough in large batches hours ahead of time. They use machines to mix it, knead it, let it rise, and prepare it for extended storage. They also make dough balls directly after kneading. This recipe uses techniques you can do at home to mimic their dough.
Use Neapolitan-style Dough for thin-style pizza baked on stones. Makes four pizzas eight to ten inches in size.
1 cup lukewarm tap water (105 – 115 degrees F)
1/4 teaspoon active dry yeast (not quick-rise)
2 to 2 1/2 cups Caputo™ Tipo 00 pizza flour
1 teaspoon salt
Caputo™ Tipo 00 pizza flour (for kneading and shaping)
You must make this dough with very high moisture content so that the dough puffs up when baked. Do not add sugar to the dough so that it will not burn when baked at very high heat (700 to 850 degrees Fahrenheit). Do not add oil to this dough, either.
Mixing
– Pour the water in a large mixing bowl and sprinkle in the yeast. Stir gently for a few seconds (do not worry if the yeast is not completely dissolved). Let stand a few minutes. Since there is no sugar for the yeast to feed on, the bubbles may not be very noticeable.
Add one cup of the Caputo™ Tipo 00 pizza flour and the salt. Mix thoroughly with a wooden spoon. Add one cup of the same type of flour and mix well. The dough should come together but will remain quite sticky. Let the dough sit for twenty minutes. This allows the flour to soak up some of the water. In other words, the water hydrates the flour. Better hydrated flour creates dough that will be less sticky and easier to work with while retaining a high level of moisture content. Using Caputo™ Tipo 00 pizza flour ensures the dough will not burn when cooked at high temperature.
Once the dough has been sitting for twenty minutes you can knead the dough. Only add additional flour if it is very, very moist. If you must add flour, only add one Tablespoon at a time just until the mixture behaves like dough. Resist the temptation to add too much flour. I know it is tedious but it is worth it! You will not end up with dough that is too dense because you were too heavy-handed adding four. You will know that the dough has enough flour when it sticks only slightly to your hand when you touch it but it does not leave much residue behind.
Kneading
– This dough works best when kneaded by an electric mixer due to the highly sticky consistency of the dough. Knead the dough until the dough is smooth and elastic and no lines of raw white flour show. As the gluten develops, the dough should become slightly less sticky when pressed. You should notice the dough becoming somewhat stretchy and elastic as you touch it. The dough will most likely be too wet to hold its shape.
You will not knead or punch down this dough after rising so you partition it before rising. Separate the dough into four pieces and place each piece into a separate container to rise. You can use three-cup plastic storage containers. Spray a small amount of olive oil cooking spray into each container and place a piece of dough into it to let it rise. Place a cover on the container to keep in the moisture and prevent the dough from developing a crust.
Rising
–
You make this dough with a small amount of yeast. As a result, the dough will take somewhat longer than normal to rise. It may not double in size even after waiting two hours. The dough is ready to use even if it has not doubled. You can let this dough rise up to a day or so on the counter and up to three days in the refrigerator.
There is no need to punch down this dough or to let it rest (it already rested before kneading). Because you separated the dough before rising, you can shape it directly without additional handling. Not punching down the dough leaves more bubbles to puff up the dough.
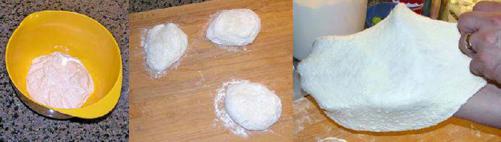
Shaping
–
Shape this dough by hand stretching then assemble the pizza on a pizza peel. The dough will be very wet even after rising. Proceed to very gently hand stretch the dough, as you would handle very soft dough. Shape and assemble each pizza individually.
Baking
–
You must bake this dough in a very high temperature oven between 650 to 800 degrees Fahrenheit. Virtually every such oven has peculiarities that influence the heat and the way it bakes pizza so the amount of time you bake the pizza will vary. Bake until the crust has browned well and has small, burned spots. Turn the pizza, if needed.
Variations
–
Be prepared to experiment with the water content and yeast content of this dough or maybe even the type of flour used until you find the optimal recipe for your particular oven. Those who go on the quest to make authentic Vera Pizza Napoletana frequently become passionate about the types of yeast used, the techniques used for letting the dough rise, and various other subtleties. If you embark on that journey, I applaud you!