Passionate About Pizza: Making Great Homemade Pizza (19 page)
Read Passionate About Pizza: Making Great Homemade Pizza Online
Authors: Curtis Ide
Tags: #Baking, #Cookbook, #Dough, #Pizza

Now that your one arm supports one side of the dough, slide your other hand under the other side of the dough again with your palm facing downward and fingers splayed out wide. Once again, slide your hand in as far as you can and as close to the other edge of the dough as you can. You now should have the shaped dough fairly well supported by both hands and wrists. With large or very slack dough, you can allow the dough to droop from your hands to touch the work surface to keep it better supported; this keeps the dough from stretching any further than it must.
Move your hands and arms so that the shaped dough is directly above the pizza peel, pizza pan, or pizza screen you plan on using. Lower one arm so that the edge of the dough comes near the edge of the pizza peel (or pan or screen). Lower the dough’s edge until it touches the peel (or pan or screen) then move your hand and arm towards your other arm and out from under the dough. By doing this, you take your one arm out while your other arm still supports the dough. The dough should now be laying partly on the pizza peel (or pan or screen) and partly on your one hand and wrist.
You can now take your second hand out from under the dough. One way to do this is to move your arm out and away from the dough by bringing your fingers together and rotating your palm down and out like you were pushing something away to the outside of your body. Your elbow will move up and out as you do this. In essence, you roll the dough off your hand and wrist as you pull out your arm. Another way is to use your free hand to support the dough while you remove your second hand from under the dough. To do it this way, take your free hand and reach over the dough and over your other arm and pick up the edge of the dough again remembering not to squash the edge. Hold up the edge as you take your hand out from under the dough. Then let the edge down to sit on the surface. You can even combine these two techniques. Pick up the edge of the dough with one hand. While doing so, rotate your other hand down and away in order to bring your arm out from under the dough.
Because it is hard to control exactly where the dough goes and how it sits as you take your arms out, it is very likely that you will need to adjust the position of the dough. The dough is probably now sitting somewhat near its final location. Gently reposition the dough with the dough inside the edges of the pizza peel, pizza screen, or pizza pan. You can also adjust the final shape of the dough to retain its circular shape, to make it into an oval, to square off the corners making a rectangle, or whatever you decide is the right shape for this particular pizza. If the dough stretched to be a little too large, you can push that area of the edge in a bit; the dough may look a little wrinkly but it will cook up just fine. If the dough is not quite large enough in one area, you can pick up the edge and stretch it out a bit. If the dough is somewhat off-center of the final location, you can slide one or both hands under the dough again and reposition it just a bit.
If you make a hole in the dough while moving it, just pinch the hole together from the top of the dough. By the time you have placed the dough on the peel or pan with cornmeal under it you have gone beyond the point you can reshape the dough. Just do your best to reconfigure the dough, and then assemble the pizza. The sauce and toppings and the results of baking will hide almost any little inconsistencies in the shaped dough so do not be overly concerned. Now, on to assembling the pizza!
Assembling Pizza
There is a bit of art involved in assembling a pizza. On the one hand, you can just put the sauce and toppings on the pizza. On the other hand, you can paint a picture that pleases the eye, mouth, and heart. One key decision is the order in which you assemble the toppings. You can assemble the sauce, cheese, and toppings in any order. Another decision is how you disburse the toppings and cheese across the pizza. One more decision is the visual pattern that you will create.
One important thing to keep in mind is that the toppings will generally migrate to the center of the pizza. You can minimize this by placing slightly fewer toppings in the center of the pizza.
If you are using a pizza pan, place the shaped crust in the pan and assemble the pizza right in the pan. If you are using a pizza screen, lightly oil the pizza screen and then place the shaped crust on the screen; then assemble the pizza right on the screen. If you are using a baking stone, assemble the pizza on a prepared pizza peel; once assembled, slide the pizza directly onto the baking stone in the oven.
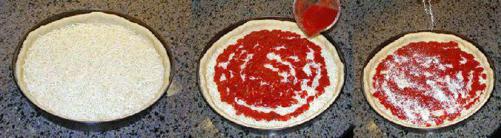
You can use the back of a large spoon or ladle to spread the sauce evenly over the pizza shell. Just pour the appropriate amount of sauce over the center area of the pizza shell. Using the rounded back of the spoon and starting in the center of the pizza, lightly trace little circles around the center of the pizza. As you make the circles larger and larger, the utensil pushes the sauce out towards the edges of the pizza. It is fun; you hide a spiral inside the middle of your pizza!
Sauce-First Assembly

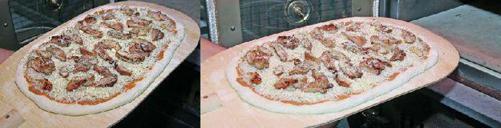
The most common order of assembly is sauce-first assembly. First goes the sauce, then the cheese, followed by the toppings and possibly spices. This results in a conventional pizza.
If you want, you can lightly brush the dough with a small amount of olive oil (including the edge, if desired). This little layer of oil helps carry the flavors of the pizza. You can certainly leave it out; I make most of my pizzas without it and tend only to add oil on pizzas that are somewhat dry. Spread an even layer of sauce over the pizza to within a half-inch of the edge of the dough. The layer of sauce should be just thick enough so that you do not see bare spots through the sauce, but be careful not to use too much sauce. Obviously, personal taste comes into play with the amount of sauce used. Spread the cheese evenly on top of the sauce. Distribute the toppings on the cheese in a pattern that pleases the eye or group the desired toppings together in a pleasing manner. You can dice, chop, slice, julienne, etc. your toppings giving a would-be pizza artist plenty of variety of shapes and colors in his palette. Sprinkle with herbs (optional) and Parmesan cheese, if desired. The sauce and toppings will migrate toward the center, so you should put a little less in the center; otherwise, the cooked pizza may be soggy in the center.
The downside of this sauce-first order of assembly is that the toppings may be prone to slide off the dough if you use a large quantity of toppings or a lot of sauce. In addition, the high heat may scorch or burn delicate toppings.
Cheese-First Assembly
As you probably guessed from the name, in cheese-first assembly you put the cheese on the dough first, followed by the toppings, and then finally the sauce. This method is good for thick-style pizzas that spend a longer time in the oven. Having the sauce on top of the toppings protects them from extended exposure to the heat in the oven. In addition, the cheese helps anchor the toppings to the crust.
Lightly brush the dough with a small amount of olive oil (including the edge, if desired). Place thin slices of cheese or grated cheese evenly across the entire surface of the dough up to within one half inch from the edge. Place the toppings evenly on top of the cheese. Cover the toppings with a layer of sauce up to one half inch from the edge of the dough. Sprinkle with herbs and Romano cheese (if desired).
Custom Assembly
Some pizza recipes cry out for creative assembly. No-sauce pizza, four seasons pizza, stuffed pizza are a few. Go ahead and put your pizzas together in whatever way you desire. Keep using the methods that work and that catch your fancy and throw out those which do not!
The most common customization is whether you put the sauce on first and at what layer you place the various toppings. In other words, you can change the order in which you place things onto the shaped pizza dough. As you customize your pizza recipes, you will probably find yourself varying the toppings you use and the order they go on the pie. That is a perfect way to show your passion for pizza and to make the pizzas your very own!
You can vary the location of the toppings, too. You can place different toppings on segments of the pizza. You can make patterns with your toppings making pizza art! You can even wing it, throw your pizza together without a plan, and make each one different.
You have complete freedom in how you assemble a pizza. You can use this freedom to recover from a mistake, too. If you forgot to put on one topping or if you put things on in a different order than you planned, it is no problem. Just act like you planned it that way!
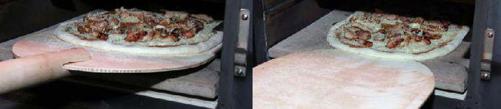
Pizza Peel Technique
The first time you try to put a pizza onto a baking stone using a pizza peel, it can be a little scary. My first time was not only scary, but also messy. I tried to use an improvised cookie sheet as a pizza peel; the dough stayed on the cookie sheet and the toppings and sauce landed on the baking stone. Since the pizza stone was 500 degrees Fahrenheit, the result was scorched toppings and a lot of smoke. It was hilarious, at least in retrospect!
The trick to using a pizza peel is to make sure that the pizza will slide freely on the peel before you try to put it onto the baking stone. You do this by having a thin layer of flour and a sprinkling of cornmeal on the pizza peel before assembling the pizza. The flour and cornmeal work like ball bearings to let the pizza move easily. Err on the side of too much cornmeal rather than too little; the extra should stay on the stone not the bottom of the pizza. The most important thing, though, is to get the pizza moving before the decisive moment. While holding the pizza peel just a few inches above the work surface, shuffle the pizza peel back and forth a little
without
trying to slide the pizza off; you are actually trying to get the peel to move while the pizza stays unmoving. Even after years of making pizza I frequently still start the pizza moving above the counter top rather than inside the oven just to be safe. After you get comfortable with the motion and feel of it, you can do this above the stone immediately before you slide the pizza off the peel.