Passionate About Pizza: Making Great Homemade Pizza (14 page)
Read Passionate About Pizza: Making Great Homemade Pizza Online
Authors: Curtis Ide
Tags: #Baking, #Cookbook, #Dough, #Pizza

It is important that you cook the toppings that need cooking prior to placing them on the pizza. Sausage, beef, chicken, and pork and all other meats make wonderful toppings and they will be fantastic on pizza. However, the surface of the baking pizza typically does not stay hot enough long enough to cook raw meat to the proper, safe internal temperature. So, do not take the risk of you or your guests having stomach discomfort. Cook the ingredients first!
Whenever and however you make your toppings, you should store the toppings in some safe manner. Why am I mentioning this issue? I do not want any microbes to take hold in your toppings that will make you or your guests sick. Therefore, you need to keep the safe food storage rules in mind as you store the toppings or even as you just let them sit for more than a few minutes.
Safe Food Storage Rules
• Cook foods thoroughly (all parts of food above 160 degrees Fahrenheit).
• Keep hot foods hot (above 140 degrees Fahrenheit).
• Keep cold foods cold (below 40 degrees Fahrenheit).
• Cool hot foods quickly (all parts of food must reach below 40 degrees Fahrenheit) if you intend to store them cold.
• Reheat foods thoroughly (all parts of food above 160 degrees Fahrenheit).
• Avoid contact between raw and cooked foods.
Basic Pizza Sauce
If you have not already chosen a sauce to put on your pizza, now is a good time to make such a choice. For a sauce that is tasty on almost any kind of pizza, I suggest you try Basic Pizza Sauce. You can find this recipe and other sauce recipes in the Sauce Recipes section starting on
page 111.
This is the old standby but do not let that deter you. The fresh taste of crushed tomatoes provides a nice tang that mellows just slightly by cooking it over low heat. This sauce is so easy to make that there is no reason to use canned or jarred sauce. Do not even think of using spaghetti sauce or you will end up with a pizza that tastes like spaghetti!
Makes enough for four to six pizzas fourteen to sixteen inches in size.
2 28-ounce cans crushed tomatoes, 2 different brands
1 teaspoon dried oregano
1 teaspoon dried sweet basil
1 – 2 large cloves garlic, crushed with a garlic press
1 teaspoon salt (optional – I always leave it out)
I always leave out the salt from this and most of my sauce recipes. I think it is due to the salt in most cheeses, but if I add salt to the sauce, the pizza sometimes seems too salty.
The mixture of two brands of tomatoes gives this sauce a smoother taste. Do not substitute whole tomatoes or tomato puree in this recipe and do not add any tomato paste. However, it is okay to use crushed tomatoes canned with added tomato puree.
Mix all ingredients in a non-reactive pan (such as stainless steel, glass, or non-stick) and bring to a simmer over very low heat. Cooking the tomatoes at a low temperature helps develop a rich, subtle flavor without bringing out any acidy taste. Maintain at a very low simmer for thirty to forty-five minutes. Do not cook too fast or too long.
You can save whatever sauce you do not use in the refrigerator or freezer for the next pizzas you make. I store my extra sauce in eight to ten ounce portions so that one container’s worth is the right amount of sauce for one pizza.
Letting Dough Rest
After the dough has risen, punch it down with one fist. Punching down refers to putting your fist into the dough to deflate it after it has risen. This quickly gets most of the air out of it so it is easier to handle. After you have deflated it, take it out of the bowl (or plastic bag) and knead it briefly, without adding any flour, to release the large air bubbles (about one minute). Deflating and kneading the dough reduces the likelihood of large bubbles in the crust that would deform the shaped pizza as it bakes.
Creating a Dough Ball
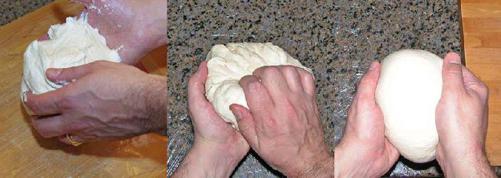
After kneading the rested dough briefly, you need to turn the mass of dough into a dough ball. Making the dough ball gives structure to the dough so that you can more easily make a uniform (circular) shape when you shape the pizza. Grasp the dough mass with your hand so that the edge of the dough is near the base of your fingers and your palm and fingers touch the dough. Move your wrist so that your palm pulls the surface of the dough and your fingers push the dough’s edge into the mass. By pulling the surface of the dough over and pushing the edge of the dough into the center, you create tension on the top of the dough. Continue to do this around and around the entire mass of dough. This results in a dough ball with a smooth top and a bottom where the dough has come together on itself.
Now that you have a dough ball, place the seam-side on the bottom where you intend to let the dough rest and flatten it a little. When I mention a dough disk in other parts of the book, I am referring to a dough ball that you have slightly flattened into a disk shape.
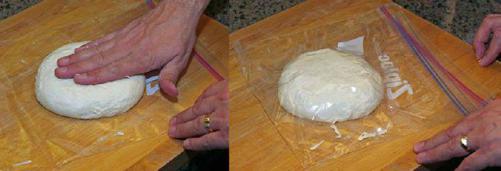
Press the dough into a flat disk about one inch thick; this is the start of the classic circular shape of the pizza. Sandwich the dough between two layers of plastic wrap so that no air can get to the dough; this keeps the dough from drying out and forming a skin. Let it rest briefly on the work surface for five or ten minutes (up to a maximum of twenty minutes) before shaping it.
Why is it necessary to let the dough rest? The dough will be somewhat firm and very elastic after you punch it down and kneaded it a bit. If you try to shape the pizza at this point, you will be frustrated because the dough keeps springing back into shape. Magically, though, if you let the dough sit for a few minutes, it holds its shape after being stretched, rolled, or pushed into shape. Why does this happen? Well, this
rest
allows the gluten in the dough to relax a little so that it is not too springy.
Generally, you want to shape the dough into a flat disk or rectangle before letting it rest to give you a slight head start on the final shaping. If you are going to press the dough into a pizza pan, you can let the dough rest in the pan as described in the next section.
If you do not let the dough rest long enough, it may be too elastic to shape easily. The longer it rests (within reason – up to a maximum of twenty minutes) the softer the dough will be and the easier it is to shape. If you want to throw the dough around a lot, do not let it rest for more than a couple of minutes. If you are going to throw around the dough a lot, you can let it rest in the refrigerator; the coolness imparted by the refrigerator helps keep the dough from stretching too much.
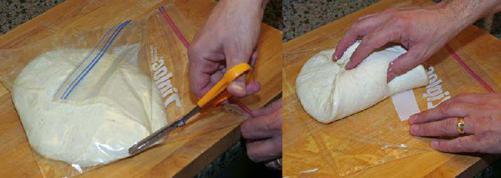
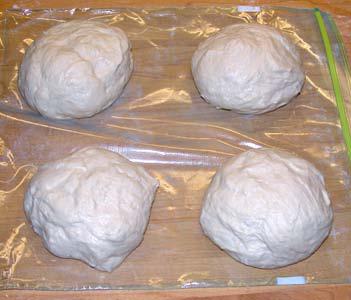
When you plan to make individual pizzas, it works best if you cut the dough into pieces before letting it rest. You cut the dough such that you have even-sized pieces – one for each pizza you plan to make. You then knead and make a dough ball (or disk) from each piece of dough. You can let them rest side by side on plastic wrap.
If you want to be very precise, you can weigh each dough ball to ensure that they all are the same size.
Individual Dough Balls
Storing Dough
Once the dough has risen and has been prepared to rest, it is ready for you to use it within a few minutes. It may be inconvenient to use the dough that quickly or you may have made more dough than you can use right away. On the other hand, you may have specifically made your dough for storage. In any case, you will be happy to know that you can store dough for later use.
As you know, pizza dough has gluten to help it stretch and shape properly and it has yeast to help it rise. When you store the dough, you will need to do it in a way that does not hurt, and, in fact preserves, both the yeast and the gluten. More specifically, you will need to cool the dough in order to preserve its important qualities.
You can use either your refrigerator or your freezer (or both!) for storing dough. Placing the dough in the refrigerator will cool it down sufficiently to store it for up to a few days. Placing the dough in the freezer will cool it down and place the yeast in stasis such that it can be stored for up to a month. If you want to test the limits and store it longer, you are welcome to try. You are the one who will eat the dough and it is unlikely to hurt you.
When dough is in the refrigerator, the yeast’s activity slows but does not stop entirely. As a result, long storage in the refrigerator will result in a yeastier taste, slacker dough, and more difficulty handling the dough during shaping. Longer storage in the freezer may result in freezer burn that may affect the taste of the dough but probably little else.
Preparing Dough for Storage
How do you prepare the dough for storage? Well, that depends on how long you intend to store it. If you plan to use the dough in the next day or two, you can place it in a bowl covered with plastic wrap or place it in a plastic bag, just as you would for letting dough rise. Make sure there is a good seal so that the dough will not dry out. Be prepared for the dough to rise while in the refrigerator; remember refrigeration slows the yeast but rising does not stop.