Oracle RMAN 11g Backup and Recovery (118 page)
Read Oracle RMAN 11g Backup and Recovery Online
Authors: Robert Freeman

340
Part III: Using RMAN Effectively
you may have guessed, following this through to the end of the wizard and selecting Edit RMAN
Script yields:
run {
restore database;
}
If you choose to rename the datafiles upon restore, you are asked for the single location for all files and are given a check box option to Update the Control File to Use the Renamed Files.
Selecting this check box will modify your current control file to point to the datafiles at the new location. This is the same as executing the RMAN command
switch datafile all
. Do this only if you are actually restoring the database, and not just making another set of datafiles in a second location. You can check your script at the end if you want to modify individual filenames.
If you choose to restore datafiles to a new location without recovery, OEM still shuts down the target database and then puts it into mount mode. This actually is not required by RMAN, but OEM’s intelligence only goes so far, and it sees a database restore as the first step to recovery.
Anyway, OEM leaves the database mounted after the file restore. You have to go to the database home page and click Startup to start the database.
A final note about the option Restore All Datafiles. OEM has buried the
backup validate
command at the bottom of the first page of this wizard, under Backup Validation. If you want to simply validate whether a certain type of restore is possible (current point in time or previous point in time), select this option and then follow the wizard as you otherwise would. Note, then, that if you select Edit RMAN Script, it has a slight difference:
run {
restore database
validate
;
}
Recovery from Previously Restored Datafiles
Finally, you can choose to recover the database from previously restored datafiles. This simply means that if you choose this option, only a
recover
command will be issued in RMAN. This does
not
mean that if you choose to restore datafiles to a different location, you can then specify those files in this wizard. This is a recovery only. It relies completely on the control file’s V$DATAFILE list to determine which files to restore.
A check box at the bottom lets OEM open the database in READ ONLY mode after the recovery so that you can validate the database. This option allows you to confirm that the point in time you specified was correct.
RMAN Workshop:
Perform Database Recovery from OEM
Workshop Notes
In this workshop, we perform a PITR to a point in the past, using the backups taken previously in this chapter with OEM.
Step 1.
Go to the Database | Availability | Perform Recovery page. Choose Recover to the Current Time or a Previous Point-in-Time, and then click the Perform Whole Database Recovery button. You will be asked to confirm that EM will bring the database down and then into a mount state for the action.
Chapter 13: Using Oracle Enterprise Manager for Backup and Recovery
341
Step 2.
Select the Recover to a Prior Point-in-Time option. We choose to set this with a date in this example. Click Next.
Step 3.
If you have turned on Flashback Database and your point in time falls within the Flashback window, you get a screen asking if you would like to use Flashback Database. Choose No, Use Traditional Point-in-Time Recovery. Click Next.
Step 4.
Choose to restore the files to the default location. Click Next. This takes you to the Schedule page, but all recovery jobs run immediately. Click Next.
Step 5.
Click the Edit RMAN Script button to look at what RMAN will be running. Click Cancel after your review. Then click Submit Job.
Step 6.
OEM presents a screen saying, “The job has been successfully submitted.” Click the View Job button. The job page shows the history of each job step, known as an
execution.
You can refresh your browser to get up-to-date step and elapsed time values.
Step 7.
Click the Step: Recovery link in the Name column. This allows you to monitor the progress of the RMAN job.
Recovery Scope Less Than the Entire Database
On the Perform Recovery page, under User Directed Recovery, you can change the scope of recovery from Whole Database to a smaller subset of recoverable items in the database. This is anything that is not the whole database. Tablespaces, datafiles, archive logs, tables, and transactions—for anything below the entire database in granularity, you perform recovery from this section.
From here, then, you can recover both logical objects and physical objects. Some logical objects, such as tablespaces, still require a physical media restore/recovery operation. Selecting other logical objects, such as tables, actually takes you into the Oracle Flashback Technology world, which is completely different from media recovery. Physical objects are straightforward: want to recover a single datafile? That would be a restore and recover. You also can perform block media recovery from this location. Note that when you make a selection from the drop-down list, the web page refreshes and displays suboptions related to your choice.
Oracle has done a good job of providing for a complete set of recovery options within OEM, so it would be impossible in this single chapter to review the wizard steps that you walk through based on each type of object level recovery. This chapter would be as long as the rest of this book. We encourage you to go through each of the different types of OEM recovery, to familiarize yourself with the language Oracle uses within OEM for each type of recovery. Often, this language is not the same as that used within RMAN itself.
Backup Management and Reporting
It is perhaps in the area of managing your backups that OEM really proves its worth. Running backups and recoveries from the command line is one thing; reading the output of report and list commands from a terminal is something else completely. From OEM, managing existing backups is considerably more user friendly. The management is divided into three types: managing current backups, managing restore points, and creating backup reports.
342
Part III: Using RMAN Effectively
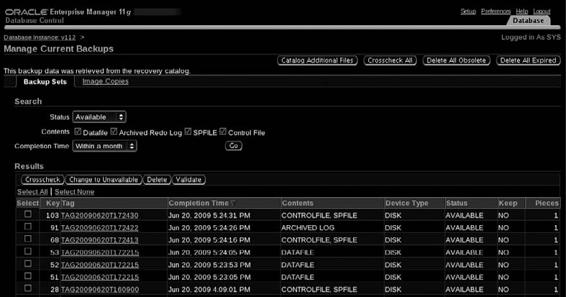
Managing Current Backups
On the database Availability tab, click the Manage Current Backups link to access the page where you can perform common management activities: run crosschecks, delete obsolete backups, delete expired backups, and so forth.
Across the top of the Manage Current Backups page, you will see some quick link buttons for common tasks: Catalog Additional Files, Crosscheck All, Delete All Obsolete, and Delete All Expired. These buttons do exactly what they say they do, and you can read about these options in Chapter 14.
The two tabs below these buttons, Backup Sets and Image Copies, enable you to manage backups in subsets or individually. The Search area allows you to find a backup based on certain search vectors. The default is to list all backups. In the Results area, you can select one or more backups by clicking the corresponding check box, and then select one of the management options: Crosscheck, Change to Unavailable, Delete, or Validate.
When you choose one of these options, the Job Creation Wizard helps you to schedule the maintenance job. This allows you to schedule a particular job, such as a crosscheck, to occur at a regular interval. You can also click Show RMAN Script to see what RMAN is doing.
Managing Restore Points
Click Manage Restore Points on the Maintenance tab to open the page on which you can create new restore points, view existing restore point information, or delete existing restore points. From OEM, you can look at the restore point creation time, the amount of storage required, and the creation SCN. If you notice that Guaranteed Restore Point is grayed out, this is because you are logged into the target database with NORMAL privileges, and SYSDBA privileges are required for creation of guaranteed restore points. In addition, the Recover Whole Database To button is functional only if you are logged in as SYSDBA user. Clicking this button asks you for confirmation, and then takes you to the Perform Whole Database Recovery page.

Chapter 13: Using Oracle Enterprise Manager for Backup and Recovery
343
Creating Backup Reports
Clicking the Backup Reports link on the Maintenance tab takes you to the Backup Reports page, which shows all backup jobs known to the database. These are not just those backups taken by an OEM job—OEM is actually querying the recovery catalog (or control file) to find all backups.
The Backup Reports page enables you to search based on status, start time, and type.
You can click the name of the backup to retrieve specific details about that particular backup, as shown next. This includes a nice summary of the input (what was backed up) and the output (the backup pieces that were created). Then, there is a detailed listing of each input file, its checkpoint information, compression ratio, and so forth. There is enough data here to put anyone to sleep. But this is valuable stuff, and it’s far easier to read and comprehend than the report and list options from the RMAN command line.
Database Cloning from Enterprise Manager
OEM has a subsystem in place to perform database cloning. The database cloning process that OEM
uses employs RMAN functionality, but do not confuse the database cloning with the RMAN
duplicate
command (covered in Chapter 19). OEM cloning has its own logic and its own restrictions that differentiate it from RMAN duplication. As opposed to OEM in 10
g,
in the 11.2 model, the database cloning is far more similar to RMAN than before.
OEM may use RMAN behind the curtain, but the database cloning functionality is logically organized in a completely different area of the vast OEM landscape. You need to navigate to the Data Movement tab from the main EM pages, and then look under Move Database Files for the link Clone Database. Cloning to a different server than the target database is only possible in Grid Control. Database Control can clone only to the same server as the target.
The first decision to be made reflects the newer flexibility of cloning from EM: you can choose to take a new RMAN backup for cloning, use a staging area (10
g
-type cloning), or use an existing RMAN backup. This last option, the most straightforward and logical, was not available on 10
g,
so let us be the first to rejoice and use it as the working example in this book.
After choosing to use an existing RMAN backup, you need to provide the source host credentials and click Continue. Then, because you’ve registered the source database with a known recovery
344
Part III: Using RMAN Effectively
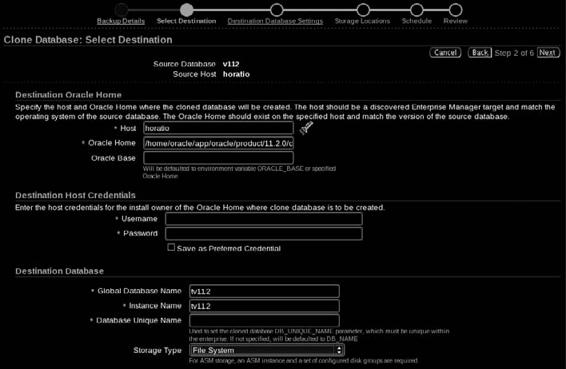
catalog, you don’t need to enter any further source database specifications. Just specify the point in time to which you want to clone.
After ironing out the source database information, you need to sort out how things will look at the destination: the Destination Oracle Home, Destination Host Credentials, the Destination Database specifics, and the degree of parallelism (number of RMAN channels to use—this is not shown in the illustration below). If you are using Database Control, you can change the Oracle Home but not the host. You can change the database name, but it will default to a different name from the existing source database. This is also where you can change the storage type for the new database from File System to ASM, or vice versa.