Oracle RMAN 11g Backup and Recovery (113 page)
Read Oracle RMAN 11g Backup and Recovery Online
Authors: Robert Freeman

$ emca config dbcontrol db repos create
STARTED EMCA at Jun 11, 2009 3:16:23 PM
EM Configuration Assistant, Version 11.2.0.0.2 Production
Copyright (c) 2003, 2005, Oracle. All rights reserved.
Enter the following information:
Database SID: dev1
Listener port number: 1521
Listener ORACLE HOME [ /home/oracle/app/oracle/product/11.2.0/dbhome 1 ]: Password for SYS user:
Password for DBSNMP user:
Password for SYSMAN user:
Email address for notifications (optional):
Outgoing Mail (SMTP) server for notifications (optional):
You have specified the following settings
Database ORACLE HOME ................
/home/oracle/app/oracle/product/11.2.0/dbhome 1
Local hostname ................ horatio.hadba.com
Listener ORACLE HOME ................
/home/oracle/app/oracle/product/11.2.0/dbhome 1
Listener port number ................ 1521
Database SID ................ dev1
Email address for notifications ...............
Outgoing Mail (SMTP) server for notifications ...............
Do you wish to continue? [yes(Y)/no(N)]: Y
Jun 11, 2009 3:16:58 PM oracle.sysman.emcp.EMConfig perform
INFO: This operation is being logged at
/home/oracle/app/oracle/cfgtoollogs/emca/dev1/emca 2009 06 11 15 16 23.log.
Jun 11, 2009 3:17:00 PM oracle.sysman.emcp.EMReposConfig createRepository INFO: Creating the EM repository (this may take a while) ...
Jun 11, 2009 3:24:54 PM oracle.sysman.emcp.EMReposConfig invoke
INFO: Repository successfully created
…
Jun 11, 2009 3:37:09 PM oracle.sysman.emcp.EMDBPostConfig performConfiguration INFO: Database Control started successfully

318
Part III: Using RMAN Effectively
Jun 11, 2009 3:37:09 PM oracle.sysman.emcp.EMDBPostConfig performConfiguration INFO: >\>\>\>\>\>\>\> The Database Control URL is https://horatio.hadba.com:1158/em <<<<<<<<<<< Jun 11, 2009 3:45:27 PM oracle.sysman.emcp.EMDBPostConfig invoke
WARNING:
************************ WARNING ************************
Management Repository has been placed in secure mode wherein Enterprise Manager data will be encrypted. The encryption key has been placed in the file:
/home/oracle/app/oracle/product/11.2.0/dbhome 1/localhost.localdomain dev1/sysman/
config/emkey.ora. Please ensure this file is backed up as the encrypted data will become unusable if this file is lost.
***********************************************************
FINISHED EMCA at Jun 11, 2009 3:45:27 PM
Configuring Backup Settings in Enterprise Manager
It has taken us a bit of extra time to come to terms with Enterprise Manager, but now we can use our recently configured OEM Grid or Database Control to take database backups. Hopefully, you have navigated yourself to the point where you are excited about OEM’s possibilities, and you are ready to begin scheduling your backups so you can get back to the rest of your day. As we get started on this section, bear in mind that we are utilizing EM Database Control, not Grid Control, for this conversation. Thus, we will not be orienting ourselves to a database first—we assume there is only one database available in the console.
First, we need to get our backup settings dialed in. That means a few page clicks in the OEM console. All backup- and recovery-related operations will come from the Availability tab, shown next.
Chapter 13: Using Oracle Enterprise Manager for Backup and Recovery
319
From the Availability tab, the first thing that you need to do is configure backup settings, so click the link called Backup Settings. The Backup Settings page has three tabs, Device, Backup Set, and Policy, which are described in the following sections.
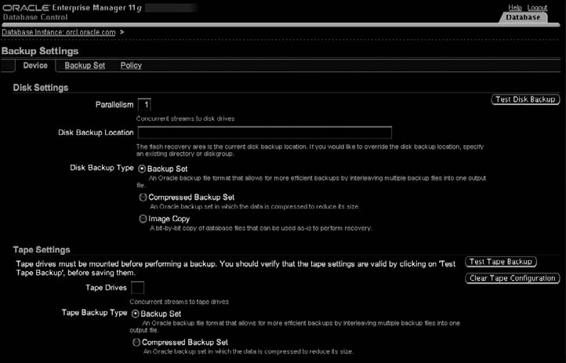
Device Configuration
From the Device tab, shown next, you can set up both disk and tape settings. These settings are not for setting which is the default device, but rather are individual settings for all channels on these devices. For disk backups, you set parallelism, the backup location, and the type of backup (backup set or image copy). This is also where you would turn compression on, if you want to use it. For tape backups, you tell OEM how many tape devices will be employed, and the tape backup type (compressed or noncompressed). In addition, for tapes, you can provide any environment settings that are required for the tape backup software to operate (for more on tape backup settings, see Chapters 4 through 8).
Note that at the bottom of the Device tab is a place (not shown in the screen shot) for host credentials. These are required in order for OEM to submit a job to make the desired changes on the target database. This same requirement appears at the bottom of each tab of the Configure Backup Settings page.
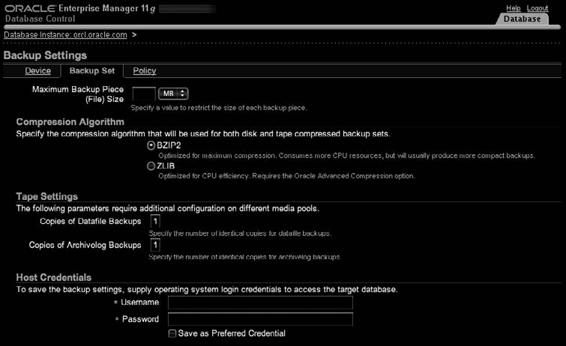
Backup Set Configuration
After making device configuration decisions, click the Backup Set tab, which allows you to make permanent configuration settings for how the backup sets will be generated. Remember, this only applies to those backups that use backup sets instead of image copies (disk backups can be either; tape backups are always backup sets).
If you are using disk backups, you have two things to configure here: the maximum size of your backup pieces, and the compression algorithm. The compression choice is between BZIP2
and ZLIB—with the former optimizing for maximum compression (at the cost of CPU cycles), and the latter optimizing for low CPU utilization (at the cost of less compression). If you will be
320
Part III: Using RMAN Effectively
backing up to tape, you can set up how many copies of each datafile backup set you will create on the tape devices and the number of copies of each archive log backup to create.
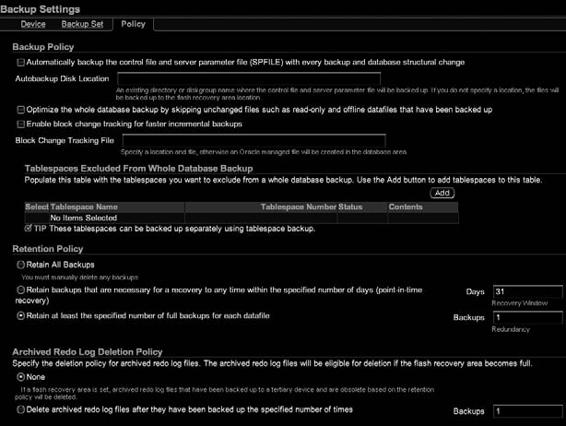
Policy Settings
The Policy tab allows for configuration of those settings that relate to your business backup policy.
This includes turning on autobackups of the control file and SPFILE, and specifying where the autobackups will be (if disk backups are used). On the Policy tab, you can turn on backup optimization (see Chapter 3 for details on backup optimization). This is also where you turn on block change tracking (see Chapter 16) and configure tablespace exclusions (see Chapter 3).
Chapter 13: Using Oracle Enterprise Manager for Backup and Recovery
321
You also use the Policy tab to configure your retention policy. OEM provides three options: retain all backups (ack!), set a policy based on a recovery window, or set a policy based on redundancy. If you choose a recovery window or redundancy, you are required to specify how many days or how many copies, respectively. After this, you again provide host credentials and click OK to submit the changes. OEM connects to the target database host and issues the RMAN
configure
commands to make these changes.
What Is Missing from OEM’s Backup Configuration?
Not all things that RMAN can configure are configured in OEM. Some changes can be made only from the RMAN command line:
■
Backup encryption
Encryption is enabled when you schedule a specific backup, not in the overall backup settings. When you go to schedule an Oracle-Suggested or Customized Backup, you can specify the Encryption level.
■
Default device type
It could be argued that because you schedule backups within OEM
to repeat, the default device type is not required. Regardless, you will not find it in the OEM interface.
■
Archive deletion policy
From RMAN, you can set a specific archive log retention policy that is different from the backup set retention policy. No such option exists in OEM.
■
Snapshot control file location
RMAN allows you to modify the snapshot control file location, which is handy for RAC configurations. OEM has no way of accomplishing this.
■
Backup throttling
There is no
rate
command available in any OEM backups, so there is no way to throttle back the RMAN backup speed. This also holds true for the
duration
command that allows you to specify a backup window with the
minimize time
or
minimize load
options.
RMAN Workshop:
Configure Backup Settings in OEM
Workshop Notes
This workshop assumes that you have the v102 database and want to configure it to back up to a disk location other than the FRA with two channels, that you want
filesperset
to be 2, and that you want a recovery window of seven days.
Step 1.
Set up the disk backup settings. Click the Availability tab and then click the Backup Settings link. The default page that appears is the Device tab. Change Parallelism to
2
and Disk Backup Location to
/u01/backup
. Click the Test Disk Backup button to the right to confirm that the location you have specified exists.
Step 2.
Click the Backup Set tab. Change Maximum Backup Piece (File) Size to
500MB
. Change the Compression Algorithm to ZLIB.
Step 3.
Click the Policy tab. Click the Automatically Backup the Control File and Server Parameter File check box. Set the Autobackup Disk Location to
u01/backup
(the same location as the backups in Step 1).