Microsoft Visual C# 2005 Express Edition: Build a Program Now! (23 page)
Read Microsoft Visual C# 2005 Express Edition: Build a Program Now! Online
Authors: Patrice Pelland
Tags: #General, #Computers, #C♯ (Computer program language), #Programming Languages, #C#, #Microsoft .NET Framework, #Computer Books: Languages, #Computer Graphics, #Application software, #C# (Computer program language), #Programming, #Microsoft Visual C# .NET, #Microsoft Visual C♯ .NET, #Electronic books, #Game Programming & Design, #Computing: Professional & Programming, #C (Computer program language), #Computers - Languages, #Programming Languages - C#, #Programming & scripting languages: general

some content to fields that belong
Adding a Navigate Dialog Box
to the AboutBox class, which are
also the fields from the AboutBox
You saw earlier that deleting the button and the address controls removed the ability to
form. Remember that everything
navigate to a Web page. This, of course, is not useful for a Web browser. Now you’ll add a
in .NET is an object—fields in a
form are members of a class, and
dialog box that will give your user another way to navigate to Web pages.
a form instance is an object.
TO ADD A NAVIGATE DIALOG BOX
As you’ve done for the About box and the splash screen, add another new item to your project. Using
A dialog box is often a
Modal Form
.
1 the templates, select a
Windows Form
template and name it
Navigate.cs
.
It has a predefined behavior in
which the user can’t click anything
other than controls on that form:
the OK and Cancel buttons or the
You'll now add the components for the Navigate form. These are pretty generic to any dialog box 2
red X button to close the form.
form that you would want to create.
This means that until the dialog
box is closed, the user won’t be
able to click anything else in the
First add a table layout panel control with one row and two columns. Use the smart tag to adjust the
application. To understand what’s
3 rows and columns.
happening here, just think about
the Print dialog box in Microsoft
Word: once it is displayed, you
Add one button in each column of that table layout panel control. Name your buttons btnOk and
can’t go back to your document to
4
make any changes while the dialog
btnCancel, respectively.
box is open. The Print dialog box
is a modal form.
5 Using the following table, set the various properties on the form, table layout panel, and buttons.
92
Microsoft Visual C# 2005 Express Edition: Build a Program Now!
C06622132.indd 92
C06622132.indd 92
10/24/05 3:37:20 PM
10/24/05 3:37:20 PM

Control Name
Control Type
Property
Value
Navigate Form
AcceptButton
btnOk
Navigate Form
CancelButton
btnCancel
Navigate Form
FormBorderStyle
FixedDialog
Navigate Form
MaximizeBox
False
Navigate Form
MinimizeBox
False
Navigate Form
ShowIcon False
Navigate Form
ShownInTaskbar
False
Navigate Form
Size:Width
450
Size:Height
150
Navigate Form
StartPosition
CenterParent
tableLayoutPanel1 TableLayoutPanel Anchor
Bottom,Right
btnOk button Text
Ok
btnOk button DialogResult
Ok
btnCancel button
Text
Cancel
btnCancel button
DialogResult
Cancel
That’s it; those are the properties that you will find in any dialog box. 6 Add a label and a text box:
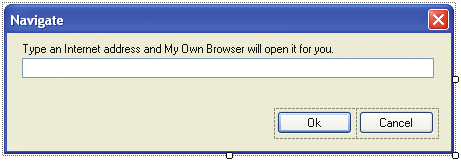
Figure 6-8
Creating a new instance of the form
Name the label
lblInfoUrl
, set the Text property to "Type an Internet address and
Navigate
My Own Browser will open it for you."
Name the text box
txtUrl
, set the AutoCompleteMode property to
SuggestAppend,
and set the AutoCompleteSource property to
AllUrl
. Next set the Modifiers property to
Public
.
Size and position the controls so that the Navigate form looks like the one in 7 Figure 6-8.
Chapter 6: Modify Your Web Browser Now!
93
C06622132.indd 93
C06622132.indd 93
10/24/05 3:37:21 PM
10/24/05 3:37:21 PM

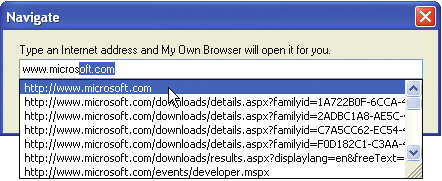
You’ve set some of the autocomplete properties of the text box to behave the same way they do in Microsoft Internet Explorer. This means that the text box will suggest and append URLs based on the letters the user types in. You’ll now wire this form to the application using a new menu called Navigate.
TO WIRE THE FORM TO THE APPLICATION USING THE NAVIGATE MENU
Return to the Browser form in Design view and look at the top of the Browser form. You already have 1 a menu strip with the Help menu; now add a new menu to your menu strip by clicking beside the Help menu and typing
&Navigate
. The
&
in front of the
N
will create an underscored N so that the user can press the keystroke combination Alt+N to fire the click event on the Navigate menu. Once it’s created, you’ll see that the Navigate menu shows up to the right of the Help menu. To 2 move a menu choice, simply select it and drag it where you want. In this case, select it and drop it to the left of the Help menu.
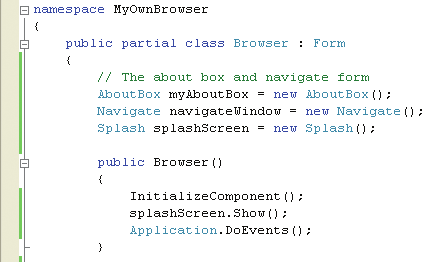
Before adding the code for the event itself, you need to add an important line of code. Remember 3 that in C# everything is an object, and if you want to manipulate another form and exchange data between the two forms, you first need to create an object of that type that is visible to your main form (Browser form)—in this case, an object of type Navigate. Create an instance of the Navigate form outside the source code of any event handler by writing the following line of code in Browser.cs:
Navigate navigateWindow = new Navigate();
Look at Figure 6-9 to see where to insert it.
Figure 6-9
Creating a new instance of the form
Navigate
94
Microsoft Visual C# 2005 Express Edition: Build a Program Now!
C06622132.indd 94
C06622132.indd 94
10/24/05 3:37:21 PM
10/24/05 3:37:21 PM

Now that you have an instance of the Navigate form class, you can write code to exchange data back and forth with the browser form. And that’s exactly what will happen. When the Navigate form displays and the user clicks the OK button with a URL in the text box, the browser control will navigate to the specified URL. Also note that the URL textbox will clear after navigating to the URL to make sure it's empty the next time the user accesses it.
On the browser form, double-click the
Navigate
menu to add the navigateToolStripMenuItem_Click 4 event handler.
If you don’t get IntelliSense when
typing navigateWindow.txtUrl.Text,
5 Add the following code to the NavigateToolStripMenuItem_Click event handler.
be sure you set the Modifiers prop-
erty on txtUrl to Public as described
If (navigateWindow.ShowDialog() == DialogResult.OK)
earlier.
{
this.myBrowser.Navigate(navigateWindow.txtUrl.Text);
}
navigateWindow.txtUrl.Text=“”;
It's important for you to start
learning how to test your own
code by doing what's known as
Build and execute the application by pressing
F5
. The form should resemble Figure 6-10 when the 6
black box
testing. At a high level,
user selects the Navigate menu.
this consists of testing what the
user can do and what is presented
to the user. This means that you
7 Now, test the application with all the modifications you’ve made. Verify every new aspect:
need to test every little detail in
the UI as well as the situations the
UI offers to the user. When you
perform a task like this, I suggest
you create a spreadsheet that
contains a matrix of all test cases.
Then fill it in as you test. This will
give you a visual representation of
all tests and features. You’re now
doing this manually because your
Figure 6-10
application is small in scope, but
Execution of My Own Browser using
you’ll quickly realize that with a
the navigate form with autocomplete
bigger application or an applica-
tion you might sell, you’ll need
Does pressing Alt+N take you to the Navigate form?
some sort of automated mecha-
nism to make sure that the tests
Can you hit Cancel with/without content?
are all executed and you’re not
forgetting any. You’ll then require
Can you navigate to a good URL/bad URL?
a UI testing tool, and in most situ-
ations you’ll need to build your
Is the text box empty when you come back to the Navigate form (that is, after you’ve performed all other
own tools. But that’s out of con-
steps above and pressed Alt+N to come back)?
text for this book; I just wanted to
emphasize the importance of test-
ing your application.
Chapter 6: Modify Your Web Browser Now!
95
C06622132.indd 95
C06622132.indd 95
10/24/05 3:37:22 PM
10/24/05 3:37:22 PM

A Professional Look and Feel at Your Fingertips
In this section, you’ll continue to add functionality to your browser using components that you might have seen in other Microsoft applications. You’ll add appealing and professional touches to your application in a fast and easy way.
Adding a Tool Strip Container and Some Tools
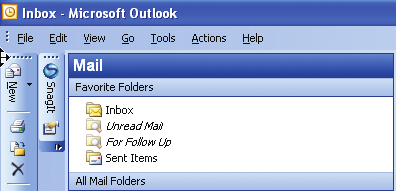
A tool strip container is a new control that ships with this release of Visual C# 2005, and it allows you to let your users customize the application you wrote in a way similar to how they customize the toolbars in Microsoft Office Outlook® or Word. The tool strip container has five panels, one on each side of the screen, and a content panel in the middle. You can have all of them on the screen enabled at one time or choose them selectively at design time. You can also control them with source code. You can put a tool strip and a menu strip in a tool strip container at design time, and at run time your users have the opportunity to arrange their workspace the way they like. The tool strip container gives your application the same look and feel as Outlook (see Figure 6-11). For instance, I was able to put two tool strips on the left of my screen. This means those tool strips are embedded in the tool strip container left panel. But I could easily move any visible toolbar back to the top, the right, or to the bottom. With a tool strip container, you give your users control of the layout of their tool strips and menu strip, which is a great feature to have.
