Microsoft Visual C# 2005 Express Edition: Build a Program Now! (10 page)
Read Microsoft Visual C# 2005 Express Edition: Build a Program Now! Online
Authors: Patrice Pelland
Tags: #General, #Computers, #C♯ (Computer program language), #Programming Languages, #C#, #Microsoft .NET Framework, #Computer Books: Languages, #Computer Graphics, #Application software, #C# (Computer program language), #Programming, #Microsoft Visual C# .NET, #Microsoft Visual C♯ .NET, #Electronic books, #Game Programming & Design, #Computing: Professional & Programming, #C (Computer program language), #Computers - Languages, #Programming Languages - C#, #Programming & scripting languages: general


Figure 3-8
Microsoft Visual Studio 2005 Express Edition documentation
The toolbar at the top of the window includes several interesting elements that will help you to get exactly what you need. Figure 3-9 highlights the most important information about the toolbar.
Gateway to four search sources
Synchronize TOC
Figure 3-9
Important elements on the toolbar
Task-based topics
Save a Help search
Your questions on MSDN forums
For example, let’s say you want to learn more about the Solution Explorer. Click the Search icon in the toolbar and the search page opens. Enter your search query (in this example, “Solution Explorer”), and either press Enter or click the Search button. The help results come from four different sources. Let’s go over each one briefly:
■
Local Help
This source is fed by the MSDN Library (part of the product installation) and is installed on your hard drive. (If you selected it at install.)
Chapter 3: Creating Your First Application
35
CSX_chapter3.indd 35
CSX_chapter3.indd 35
10/24/05 3:03:22 PM
10/24/05 3:03:22 PM

■
MSDN Online
This source contains the most up-to-date information from the MSDN
Online Library.
■
Codezone Community
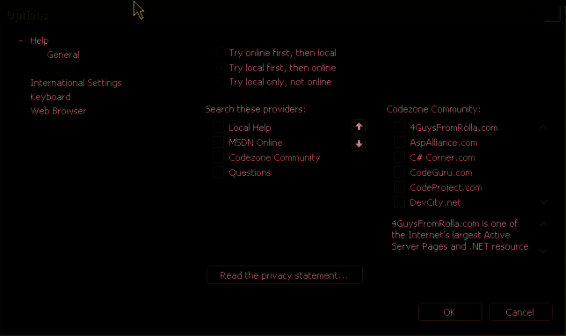
The Codezone Community is a set of Web sites based on Microsoft developer products. To see a list of all Web sites that are researched click Tools/Options and then Online. Figure 3-10 shows what you should look for. Notice the list of Web sites on the right that are part of the Codezone Community. In the future, this list might be expanded to show more sites to provide even better coverage of the community. On the same screen, you can customize different settings related to the Help system. On the General tab, you can set up how the Help system retrieves and presents information. You can set up the international setting to get local help in the language of your operating system, if available, and get online Help in a predefined list of languages supported by MSDN. Look at the keyboard shortcut mapping for menu commands used throughout the product (for example, notice that the shortcut for Copy is Ctrl+C), or to assign new shortcuts to commands that might not have one already.
Figure 3-10
Options screen with the Online
settings, including the Codezone
Community Web sites
36
Microsoft Visual C# 2005 Express Edition: Build a Program Now!
CSX_chapter3.indd 36
CSX_chapter3.indd 36
10/24/05 3:03:22 PM
10/24/05 3:03:22 PM
■
Questions
This section searches the MSDN Online forums (http://forums.microsoft.com/
msdn/). These forums are hosted by Microsoft and are an excellent source of information
MVPs stands for Most Valuable
because they have questions and answers on topics asked by other programmers of all
Professionals. MVPs are profes-
levels and experience. There’s a good chance that somebody has had the same problem
sionals that are not Microsoft
employees but are recognized
or the same question as you, so your chance of finding an answer to your problem is
by Microsoft as experts in their
fields.
much better. You can have confidence in the answers you get because answers on the MSDN forums are often validated by Microsoft employees or MVPs. A check mark in a green circle tells you which answer has been validated as correct.
Coding Your Console Application
Now that you know how to get help if needed, I believe you are ready to code your first console application.
TO CODE A CONSOLE APPLICATION
1 To begin, either type or copy the following code in your code window: 1 using
System;
2 using
System.Collections.Generic;
3 using
System.Text;
4
5 namespace
MyFirstConsoleApplication
6 {
7
class Program
8
{
9
static void Main(string[] args)
10
{
11
// Declaring two integer numbers variables that will hold the 2 parts 12
// of the sum and one integer variable to hold the sum
13
int number1;
14
int number2;
15
int sum;
16
17
// Assigning two values to the integer variables
18
number1 = 10;
Chapter 3: Creating Your First Application
37
CSX_chapter3.indd 37
CSX_chapter3.indd 37
10/24/05 3:03:23 PM
10/24/05 3:03:23 PM


19
number2 = 5;
20
21
// Adding the two integers and storing the result in the sum variable
Learning to Read Code
22
sum = (number1 + number2);
Another way of learning
23
about code is to read all the
24
// Displaying a string with the 2 numbers and the result.
comments in an application
25
Console.WriteLine("The sum of " + number1.ToString() + " and " + number2.
source code. I will explain a lot
ToString() + " is " + sum.ToString());
26
}
of the source code in this book,
27
}
but after using some topics more
28 }
than once (or twice) I might not
re-explain each line, but instead
Now that the code is in the window, you can save your work by
explain only the new material. I
2
You can also save using the fol-
clicking the
Save
button. This will save the current file. Click the
lowing keystrokes:
Ctrl+S
to save
will try to include helpful com-
Save All
button to save all modified files in the project.
the current file and
Ctrl+Shift+S
to
ments in the code to guide you
save all files.
as you’re learning. At the end of
Now it is time to build (or compile) the application. Click the
Build
3
each chapter, I will also include
menu and then click on
Build Solution
.
hyperlinks that will point to
articles, videos, and white papers.
If you keyed the code exactly as it appears above, everything should be fine and you should see the mes
I will often include keywords
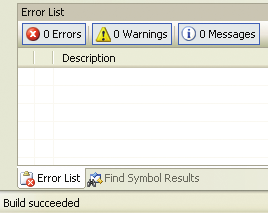
sage “Build succeeded” in the status bar at the bottom of the window. (See Figure 3-11). If everything is not okay, you’ll see errors in the Error List window (as shown in Figure 3-12). If you keyed the code and have
to help you search for more
errors, try copying and pasting the code instead from the completed code samples.
information in online help. That
(http://www.microsoft.com/mspress/companion/0-7356-2229-9/) Then build the code again.
should help you to progress in
your learning in the language
and in .NET in general. You have
to keep in mind that this book is
really showing you all you can do
with the product and the steps to
get there. It’s not a book on OOP
or the C# language itself. We are
Figure 3-11
still going to go through 70-80%
Empty Error List window and status
of the language and most OOP
bar with “Build Succeeded” message
concepts, but it will always be
through building applications and
never through dry references and
explanations.
Figure 3-12
Error List window with errors
38
Microsoft Visual C# 2005 Express Edition: Build a Program Now!
CSX_chapter3.indd 38
CSX_chapter3.indd 38
10/24/05 3:03:24 PM
10/24/05 3:03:24 PM
In Chapter 7, you’ll learn about all the debugging techniques you can use when you get an error. To see the execution results of your application, click the
Start Debugging
button in the main toolbar 4 (or hit F5).
Wow! That was fast, wasn’t it? You probably saw a command window for a few seconds and then it disappeared. It didn’t leave you a lot of time to see if your application displayed the expected output. In the next section, you’ll look at a new way of running your application to solve this problem. To do this, you’ll need to customize the IDE.
Customizing the IDE
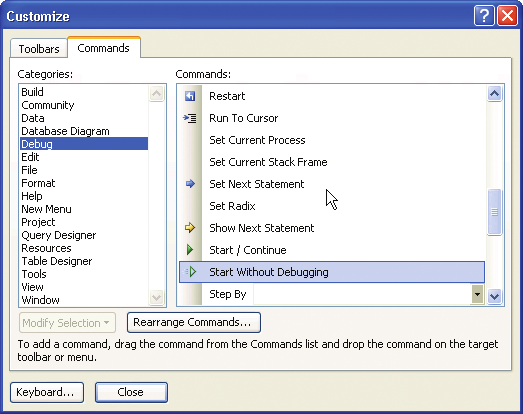
You can easily customize the IDE to fit your needs. Here, you want to execute your application and then have the application pause automatically at the end of the last instruction to allow you as much time as you need to view the output. You’ll do this by adding an icon and its attached command to the main toolbar. The name of the command you’ll be adding to the IDE is “Starting Without Debugging.”
TO CUSTOMIZE THE IDE
Select the
Tools
menu and then select
In the Categories area on the left side of the
1
3
Customize
.
window, select
Debug
.
In the Customize dialog box, select the
Scroll down in the Commands area and select
2
Commands
tab.
4
Start Without Debugging
.
Chapter 3: Creating Your First Application
39
CSX_chapter3.indd 39
CSX_chapter3.indd 39
10/24/05 3:03:25 PM
10/24/05 3:03:25 PM

