iOS Programming: The Big Nerd Ranch Guide, 3/e (Big Nerd Ranch Guides) (49 page)
Read iOS Programming: The Big Nerd Ranch Guide, 3/e (Big Nerd Ranch Guides) Online
Authors: Aaron Hillegass,Joe Conway
Tags: #COM051370, #Big Nerd Ranch Guides, #iPhone / iPad Programming

In this part of the chapter, you will update
Homepwner
to present the
DetailViewController
modally when the user creates a new
BNRItem
. When the user selects an existing
BNRItem
, the
DetailViewController
will be pushed onto the
UINavigationController
’s stack as before.
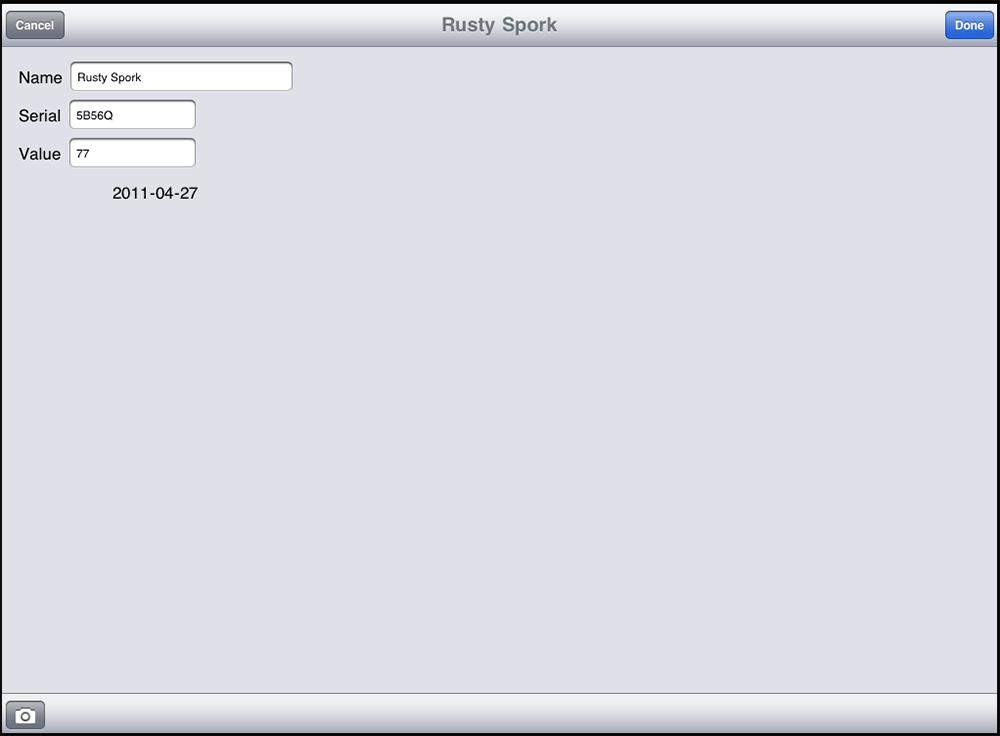
Figure 13.4 New item
To implement this dual usage of
DetailViewController
, you will give it a new designated initializer,
initForNewItem:
. This initializer will check whether the instance is being used to create a new
BNRItem
or to show an existing one. Then it will configure the interface accordingly.
In
DetailViewController.h
, declare this initializer.
- (id)initForNewItem:(BOOL)isNew;
@property (nonatomic, strong) BNRItem *item;
If the
DetailViewController
is being used to create a new
BNRItem
, we want it to show a
Done
button and a
Cancel
button on its navigation item. Implement this method in
DetailViewController.m
.
{
self = [super initWithNibName:@"DetailViewController" bundle:nil];
if (self) {
if (isNew) {
UIBarButtonItem *doneItem = [[UIBarButtonItem alloc]
initWithBarButtonSystemItem:UIBarButtonSystemItemDone
target:self
action:@selector(save:)];
[[self navigationItem] setRightBarButtonItem:doneItem];
UIBarButtonItem *cancelItem = [[UIBarButtonItem alloc]
initWithBarButtonSystemItem:UIBarButtonSystemItemCancel
target:self
action:@selector(cancel:)];
[[self navigationItem] setLeftBarButtonItem:cancelItem];
}
}
return self;
}
In the past, when you’ve changed the designated initializer of a class from its superclass’s designated initializer, you’ve overridden the superclass’s initializer to call the new one. In this case, you’re just going to make it illegal to use the superclass’s designated initializer by throwing an exception when anyone calls it.
In
DetailViewController.m
, override
UIViewController
’s designated initializer.
{
@throw [NSException exceptionWithName:@"Wrong initializer"
reason:@"Use initForNewItem:"
userInfo:nil];
return nil;
}
This code creates an instance of
NSException
with a name and a reason and then throws the exception. This halts the application and shows the exception in the console.
To confirm that this exception will be thrown, let’s return to where this
initWithNibName:bundle:
method is currently called – the
tableView:didSelectRowAtIndexPath:
method of
ItemsViewController
. In this method,
ItemsViewController
creates an instance of
DetailViewController
and sends it the message
init
, which eventually calls
initWithNibName:bundle:
. Therefore, selecting a row in the table view will result in the
“
Wrong initializer
”
exception being thrown.
Build and run the application and tap a row. You application will halt, and you will see an exception in the console. Notice that the name and the reason are part of the console message.
You don’t want to see this exception again, so in
ItemsViewController.m
, update
tableView:didSelectRowAtIndexPath:
to use the new initializer.
didSelectRowAtIndexPath:(NSIndexPath *)indexPath
{
[[DetailViewController alloc] initForNewItem:NO];
NSArray *items = [[BNRItemStore sharedStore] allItems];
Build and run the application again. Nothing new and exciting will happen, but your application will no longer crash when you select a row in the table.
Now that we’ve got our new initializer in place, let’s change what happens when the user adds a new item.
In
ItemsViewController.m
, edit the
addNewItem:
method to create an instance of
DetailViewController
in a
UINavigationController
and present the navigation controller modally.
{
BNRItem *newItem = [[BNRItemStore sharedStore] createItem];
[[DetailViewController alloc] initForNewItem:YES];
[detailViewController setItem:newItem];
UINavigationController *navController = [[UINavigationController alloc]
initWithRootViewController:detailViewController];
[self presentViewController:navController animated:YES completion:nil];
}
Build and run the application and tap the
New
button to create a new item. An instance of
DetailViewController
will slide up from the bottom of the screen with a
Done
button and a
Cancel
button on its navigation item. (Tapping these buttons, of course, will throw an exception since you haven’t implemented the action methods yet.)
To dismiss a modally-presented view controller, you must send the message
dismissViewControllerAnimated:completion:
to the view controller that presented it. You’ve done this before with
UIImagePickerController
– the
DetailViewController
presented it, and when the image picker told the
DetailViewController
it was done, the
DetailViewController
dismissed it.
Now, we have a slightly different situation. When a new item is created, the
ItemsViewController
presents the
DetailViewController
modally. The
DetailViewController
has two buttons on its
navigationItem
that will dismiss it when tapped:
Cancel
and
Done
. There is a problem here: the action messages for these buttons are sent to the
DetailViewController
, but it is the responsibility of the
ItemsViewController
to do the dismissing. The
DetailViewController
needs a way to tell the view controller that presented it,
“
Hey, I’m done, you can dismiss me now.
”
Fortunately, every
UIViewController
has a
presentingViewController
property that points to the view controller that presented it. The
DetailViewController
will grab a pointer to its
presentingViewController
and send it the message
dismissViewControllerAnimated:completion:
. Implement the action method for the
Save
button in
DetailViewController.m
.
{
[[self presentingViewController] dismissViewControllerAnimated:YES
completion:nil];
}
The
Cancel
button has a little bit more going on. When the user taps the button on the
ItemsViewController
to add a new item to the list, a new instance of
BNRItem
is created, added to the store, and then the
DetailViewController
slides up to edit this new item. If the user cancels the item’s creation, then that
BNRItem
needs to be removed from the store. At the top of
DetailViewController.m
, import the header for
BNRItemStore
.
#import "BNRItem.h"
#import "BNRImageStore.h"
#import "BNRItemStore.h"
@implementation DetailViewController
Now implement the action method for the
Cancel
button in
DetailViewController.m
.
{
// If the user cancelled, then remove the BNRItem from the store
[[BNRItemStore sharedStore] removeItem:item];
[[self presentingViewController] dismissViewControllerAnimated:YES
completion:nil];
}
Build and run the application. Create a new item and tap the
Cancel
button. The instance of
DetailViewController
will slide off the screen, and nothing will be added to the table view. Then, create a new item and tap the
Done
button. The
DetailViewController
will slide off the screen, and your new
BNRItem
will appear in the table view.
Note that the
cancel:
and
save:
methods are not declared anywhere. This is okay. Remember that declaring a method lets the compiler know that the method exists. For most methods, the compiler will give you an error when you try to send a message whose method has not been declared. However, when setting the action of a
UIBarButtonItem
or
UIControl
, the compiler does not validate the action message because it isn’t being called at that point. Instead, the message is validated at runtime when it is actually sent. If the method is defined, all goes well; if not, you get an unrecognized selector exception.
There is one final note to make. We’ve said that the
ItemsViewController
presents the
DetailViewController
modally. This is true in spirit, but the actual relationships are more complicated than that. The
DetailViewController
’s
presentingViewController
is really the
UINavigationController
that has the
ItemsViewController
on its stack. You can tell this the case because when the
DetailViewController
is presented modally, it covers up the navigation bar. If the
ItemsViewController
was handling the modal presentation, then the
DetailViewController
’s view would fit within the view of the
ItemsViewController
, and the navigation bar would not be obscured.
For the purposes of presenting and dismissing modal view controllers, this doesn’t matter; the modal view controller doesn’t care who its
presentingViewController
is as long as it can send it a message and get dismissed. But, we shouldn’t lie to you (sorry about that), so we’ll go into the fascinating details of view controller relationships at the end of this chapter.