iOS Programming: The Big Nerd Ranch Guide, 3/e (Big Nerd Ranch Guides) (45 page)
Read iOS Programming: The Big Nerd Ranch Guide, 3/e (Big Nerd Ranch Guides) Online
Authors: Aaron Hillegass,Joe Conway
Tags: #COM051370, #Big Nerd Ranch Guides, #iPhone / iPad Programming

To present a view modally,
presentViewController:animated:completion:
is sent to the
UIViewController
whose
view
is on the screen. The view controller to be presented is passed to it, and its view slides up from the bottom of the screen.
In
DetailViewController.m
, add code to the end of
takePicture:
to present the
UIImagePickerController
.
// Place image picker on the screen
[self presentViewController:imagePicker animated:YES completion:nil];
}
(Don’t worry about the third argument,
completion:
. We’ll talk about it more in
Chapter 13
.)
You can build and run the application now. Select a
BNRItem
to see its details and then tap the camera button on the
UIToolbar
.
UIImagePickerController
’s interface will appear on the screen (
Figure 12.9
), and you can take a picture (or choose an existing image if you don’t have a camera). Tapping the
Use Photo
button dismisses the
UIImagePickerController
.
(If you are working on the simulator, there won’t be any images available. However, you can open
Safari
in the simulator, navigate to a page with an image, and click and hold on that image. When the action sheet appears, choose
Save Image
. This image will be saved in the simulator’s photo library. But, the simulator can be flaky, so you might have to try a few different images before one actually saves.)
Figure 12.9 UIImagePickerController preview interface

But, oops – you dismissed the controller without keeping a reference to the image anywhere in the code. To hold on to the selected image, you need to implement the delegate method
imagePickerController:didFinishPickingMediaWithInfo:
in
DetailViewController
.
But before you implement this method, let’s take care of the two warnings that appeared during the last build telling you that
DetailViewController
does not conform to the
UIImagePickerControllerDelegate
or the
UINavigationControllerDelegate
protocol. In
DetailViewController.h
, add the protocols to the class declaration. (Why
UINavigationControllerDelegate
?
UIImagePickerController
is a subclass of
UINavigationController
.)
That’s better. Notice that the two warnings have gone away.
The
imagePickerController:didFinishPickingMediaWithInfo:
message will be sent to the image picker’s delegate when a photo is selected. In
DetailViewController.m
, implement this method to put the image into the
UIImageView
that you created earlier.
didFinishPickingMediaWithInfo:(NSDictionary *)info
{
// Get picked image from info dictionary
UIImage *image = [info objectForKey:UIImagePickerControllerOriginalImage];
// Put that image onto the screen in our image view
[imageView setImage:image];
// Take image picker off the screen -
// you must call this dismiss method
[self dismissViewControllerAnimated:YES completion:nil];
}
Build and run the application again. Take a photo, the image picker is dismissed, and you are returned to the
DetailViewController
’s
view
. Do you see your image? Oddly enough, you might or you might not. Let’s figure out what’s going on and fix the problem.
When a photo is taken, that image is loaded into memory. However, the image file is so large that it causes a low-memory warning. Recall that a low-memory warning gives the system the option of requiring view controllers to release their views if they are not currently visible. When a modal view controller is on the screen, its view is visible, and the view of the view controller that presented it is not. In our case, the low-memory warning destroys
DetailViewController
’s
view
, and the
imageView
is no longer available when we try to set it.
To get around this problem, we must create a separate store for images. Instead of putting the image directly into the
imageView
, we will put it into this store. Then when the
DetailViewController
’s view next appears on screen, we’ll have the
DetailViewController
grab the image from the image store and put it into its own
imageView
. In general, this is a best practice: a view controller should re-populate its
view
’s subviews with data whenever it is sent the message
viewWillAppear:
to eliminate the possibility that a low-memory warning could wipe out its content.
The image store will hold all the pictures the user will take. In
Chapter 14
, you will have the
BNRItem
objects write out their instance variables to a file, which will then be read in when the application starts. However, as we’ve seen, images tend to be very large, so it’s a good idea to keep them separate from other data. The image store will fetch and cache the images as they are needed. It will also be able to flush the cache if the device runs low on memory. Create a new
NSObject
subclass called
BNRImageStore
. Open
BNRImageStore.h
and create its interface:
@interface BNRImageStore : NSObject
{
NSMutableDictionary *dictionary;
}
+ (BNRImageStore *)sharedStore;
- (void)setImage:(UIImage *)i forKey:(NSString *)s;
- (UIImage *)imageForKey:(NSString *)s;
- (void)deleteImageForKey:(NSString *)s;
@end
Like the
BNRItemStore
, the
BNRImageStore
needs to be a singleton. In
BNRImageStore.m
, write the following code to ensure
BNRImageStore
’s singleton status.
+ (id)allocWithZone:(NSZone *)zone
{
return [self sharedStore];
}
+ (BNRImageStore *)sharedStore
{
static BNRImageStore *sharedStore = nil;
if (!sharedStore) {
// Create the singleton
sharedStore = [[super allocWithZone:NULL] init];
}
return sharedStore;
}
- (id)init
{
self = [super init];
if (self) {
dictionary = [[NSMutableDictionary alloc] init];
}
return self;
}
Then, implement the other three methods declared in the header file.
{
[dictionary setObject:i forKey:s];
}
- (UIImage *)imageForKey:(NSString *)s
{
return [dictionary objectForKey:s];
}
- (void)deleteImageForKey:(NSString *)s
{
if (!s)
return;
[dictionary removeObjectForKey:s];
}
Notice that the
dictionary
is an instance of
NSMutableDictionary
. A dictionary is a lot like an array: it is a collection object and it has an immutable (
NSDictionary
) and mutable version (
NSMutableDictionary
). However, dictionaries and arrays differ in how they store their objects. An array is an ordered list of pointers to objects that is accessed by an index. When you have an array, you can ask it for the object at the
n
th index:
[someArray insertObject:someObject atIndex:0];
// Get that same object out
someObject = [someArray objectAtIndex:0];
A dictionary’s objects are not ordered within the collection. So instead of accessing entries with an index, you use a
key
. The key is usually an instance of
NSString
.
[someDictionary setObject:someObject forKey:@"MyKey"];
// Get that same object out
someObject = [someDictionary objectForKey:@"MyKey"];
We call each entry in a dictionary a
key-value pair
. The
value
is the object being stored in the collection, and the
key
is a unique value (usually a string) that you use to retrieve the value later. (In other development environments, a dictionary is called a
hash map
or
hash table
, but we still use the term key-value pair to talk about the information they store.)
Figure 12.10 NSDictionary diagram
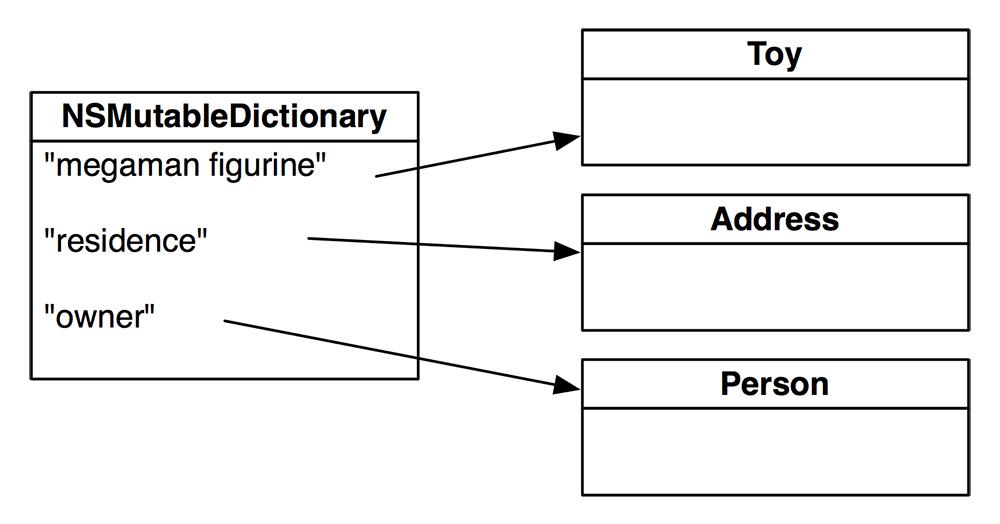
The purpose of a dictionary is difficult to understand if you are new to programming, but the general idea is that a dictionary maps one value to another (
Figure 12.10
). Consider a robot that responded to the facial expressions of a human. For example, if a human smiled, the robot would wink. Thus, the human-to-robot response would be stored in a dictionary. The
“
wink
”
response would be the value stored for the
“
smile
”
key. When a human made another facial expression at the robot, it would look up that expression in its dictionary and find the appropriate response.
Consider solving the same human-to-robot response problem with an array as the collection object. One approach would be to store every response in an ordered array. With this approach, you would have to remember the index of every response by assigning a numeric value to each facial expression. If you added a new expression-response pair, you’d have to recompute the indices of each response. At some point early in your programming career, you’ve probably done something like that:
int scowlIndex = 1;
RobotResponses responses[2] = { "wink", "scream"};
if ([human isSmiling])
response = responses[smileIndex];
else if ([human isScowling])
response = responses[scowlIndex];
Another approach would be to store an object that held both the facial expression and the response in an array. When the human made a facial expression, you would search the list for the appropriate response.
if ([p expression] == [human facialExpression])
response = [p response];
}
Both of these approaches are inefficient and clumsy. A dictionary makes this lookup process a lot faster and easier to understand:
[dictionary setValue:@"wink" forKey:@"smile"];
response = [dictionary objectForKey:[human facialExpression]];
When using a dictionary, there can only be one object for each key. If you add an object to a dictionary with a key that matches the key of an object already present in the dictionary, the earlier object is removed. If you need to store multiple objects under one key, you can put them in an array and add the array to the dictionary as the value.
Finally, note that a dictionary’s memory management is like that of an array. Whenever you add an object to a dictionary, the dictionary owns it, and whenever you remove an object from a dictionary, the dictionary releases its ownership.