Read iOS Programming: The Big Nerd Ranch Guide, 3/e (Big Nerd Ranch Guides) Online
Authors: Aaron Hillegass,Joe Conway
Tags: #COM051370, #Big Nerd Ranch Guides, #iPhone / iPad Programming
iOS Programming: The Big Nerd Ranch Guide, 3/e (Big Nerd Ranch Guides) (53 page)

You now have a place to save data on the filesystem and a model object that can be saved to the filesystem. The final two questions we must answer are: how do we kick off the saving and loading processes and when do we do it? To save
BNRItem
s, you will use the class
NSKeyedArchiver
when the application
“
exits.
”
In
BNRItemStore.h
, declare a new method.
Implement this method in
BNRItemStore.m
to send the message
archiveRootObject:toFile:
to the
NSKeyedArchiver
class.
{
// returns success or failure
NSString *path = [self itemArchivePath];
return [NSKeyedArchiver archiveRootObject:allItems
toFile:path];
}
The
archiveRootObject:toFile:
method takes care of saving every single
BNRItem
in
allItems
to the
itemArchivePath
. Yes, it is that simple. Here’s how it works.
The method begins by creating an instance of
NSKeyedArchiver
. Then, it sends the message
encodeWithCoder:
to the root object (in our case,
allItems
).
NSKeyedArchiver
is a subclass of
NSCoder
, so we can pass this new instance of
NSKeyedArchiver
as the argument to
encodeWithCoder:
.
The
allItems
array then sends
encodeWithCoder:
to all of the objects it contains, passing the same
NSKeyedArchiver
. The contents of this array – a bunch of
BNRItem
s – then encode their instance variables into the very same
NSKeyedArchiver
(
Figure 14.3
). Once all of these objects have been encoded, the
NSKeyedArchiver
writes the data it collected to the
path
.
Figure 14.3 Archiving an array

When the user presses the home button on the device, the message
applicationDidEnterBackground:
is sent to the
HomepwnerAppDelegate
. That’s when we want to send
saveChanges
to the
BNRItemStore
.
In
HomepwnerAppDelegate.m
, implement
applicationDidEnterBackground:
to kick off saving the
BNRItem
s. Make sure to import the header file for
BNRItemStore
at the top of this file.
@implementation HomepwnerAppDelegate
- (void)applicationDidEnterBackground:(UIApplication *)application
{
BOOL success = [[BNRItemStore sharedStore] saveChanges];
if (success) {
NSLog(@"Saved all of the BNRItems");
} else {
NSLog(@"Could not save any of the BNRItems");
}
}
(This method may have already been implemented by the template. If so, make sure to add code to the existing method instead of writing a brand new one.)
Build and run the application on the simulator. Create a few
BNRItem
s. Then, click the home button to leave the application. Check the console, and you should see that all of the
BNRItem
s were saved. (If they were not, double-check the
NSCoding
implementations in
BNRItem.m
.)
While you cannot load these
BNRItem
s back into the application yet, you can still verify that
something
was saved. In
Finder
, hit Command-Shift-G. Then, type in
~/Library/Application Support/iPhone Simulator
and hit return. This is where all of the applications and their sandboxes are stored for the simulator.
Open the directory
5.0
(or, if you are working with another version of iOS, select that directory). Open
Applications
to see the list of every application that has run on your simulator using iOS 5.0. Unfortunately, these applications have really unhelpful names. You have to dig into each directory to find the one that contains
Homepwner
.
Figure 14.4 Homepwner’s sandbox

In
Homepwner
’s directory, navigate into the
Documents
directory (
Figure 14.4
). You will see the
items.archive
file. Here’s a tip: make an alias to the
iPhone Simulator
directory somewhere convenient to make it easy to check the sandboxes of your applications.
Now let’s turn to loading these files. To load
BNRItem
s when the application launches, you will use the class
NSKeyedUnarchiver
when the
BNRItemStore
is created. In
BNRItemStore.m
, add the following code to
init
.
{
self = [super init];
if (self) {
NSString *path = [self itemArchivePath];
allItems = [NSKeyedUnarchiver unarchiveObjectWithFile:path];
// If the array hadn't been saved previously, create a new empty one
if (!allItems)
allItems = [[NSMutableArray alloc] init];
}
return self;
}
The
unarchiveObjectWithFile:
method will create an instance of
NSKeyedUnarchiver
and load the archive located at the
itemArchivePath
into that instance. The
NSKeyedUnarchiver
will then inspect the type of the root object in the archive and create an instance of that type. In this case, the type will be an
NSMutableArray
because you created this archive with a root object of this type. (If the root object was a
BNRItem
instead,
unarchiveObjectWithFile:
would return an instance of
BNRItem
.)
The newly allocated
NSMutableArray
is then sent
initWithCoder:
and, as you may have guessed, the
NSKeyedUnarchiver
is passed as the argument. The array starts decoding its contents (instances of
BNRItem
) from the
NSKeyedUnarchiver
and sends each of these objects the message
initWithCoder:
passing the same
NSKeyedUnarchiver
.
The clever part about
NSKeyedUnarchiver
is that it knows which object is currently decoding its instance variables. Thus, you don’t need to uniquely identify each object in an archive. You only need to identify the relationship between an object and its instance variables, and this relationship is already identified by the key used to encode and decode the object in the
NSCoding
protocol methods.
You can now build and run the application. Any
BNRItem
s a user enters will be available until the user explicitly deletes them. One thing to note about testing your saving and loading code: If you kill
Homepwner
from
Xcode
, the
BNRItem
s will not be saved. You must hit the home button first and then kill it from
Xcode
by clicking the
Stop
button.
Now that you can save and load
BNRItem
s, there is no reason to auto-populate each one with random data. In
BNRItemStore.m
, modify the implementation of
createItem
so that it creates an empty
BNRItem
instead of one with random data.
{
[allItems addObject:p];
return p;
}
In
Homepwner
,
BNRItem
s are archived when the application enters the
background state
. It is useful to understand all of the states an application can be in, what causes them to transition between states, and how your code can be notified of these transitions. This information is summarized in
Figure 14.5
.
Figure 14.5 States of typical application
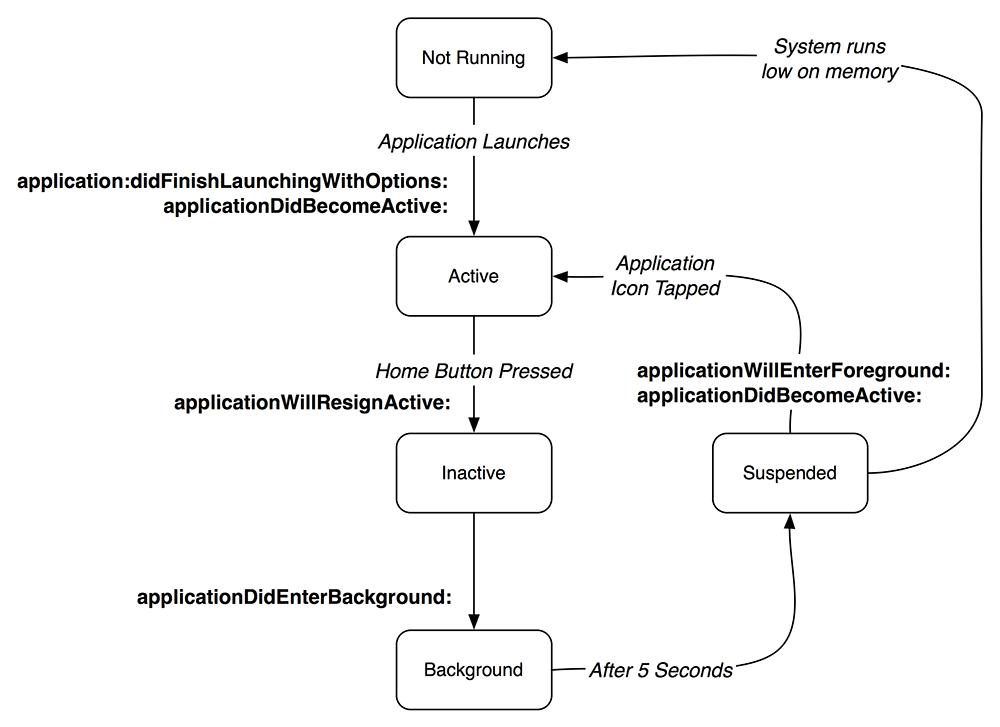
When an application is not running, it is in the
not running
state, and it does not execute any code or have any memory reserved in RAM.
After the user launches an application, it enters the
active state
. When in the active state, an application’s interface is on the screen, it is accepting events, and its code is handling those events.
While in the active state, an application can be temporarily interrupted by a system event like an SMS message, push notification, phone call, or alarm. An overlay will appear on top of your application to handle this event. This state is known as the
inactive state
. In the inactive state, an application is mostly visible (an alert view will appear and obscure part of the interface) and is executing code, but it is not receiving events. Applications typically spend very little time in the inactive state. You can force an active application into the inactive state by pressing the lock button at the top of the device. The application will stay inactive until the device is unlocked.
When the user presses the home button or switches to another application in some other way, the application enters the
background state
. (Actually, it spends a brief moment in the inactive state before transitioning to the background.) In the background, an application’s interface is not visible or receiving events, but it can still execute code. By default, an application that enters the background state has five seconds before it enters the
suspended state
.
An application in the suspended state cannot execute code, you cannot see its interface, and any resources it doesn’t need while suspended are destroyed. A suspended application is essentially freeze-dried and can be quickly thawed when the user relaunches it. The resources that are destroyed are ones that can be reloaded, like cached images, system-managed caches, and other graphics data. (You don’t have to worry about destroying and reloading these resources; your application handles it automatically.)
Table 14.1
summarizes the characteristics of the different application states.
Table 14.1 Application states
| State | Visible | Receives Events | Executes Code |
|---|---|---|---|
| Not Running | No | No | No |
| Active | Yes | Yes | Yes |
| Inactive | Mostly | No | Yes |
| Background | No | No | Yes |
| Suspended | No | No | No |
You can see what applications are in the background or suspended by double-clicking the home button on your device. (Recently run applications that have been terminated may also appear in this list.)
Figure 14.6 Background and suspended applications in the dock

An application in the suspended state will remain in that state as long as there is adequate system memory. When the operating system decides memory is getting low, it terminates suspended applications as needed. And it will do so without warning. A suspended application gets no notification that it is about to be terminated; it is simply removed from memory. (An application may remain in the dock after it has been terminated, but it will have to be relaunched when tapped.)
When an application changes its state, the application delegate is sent a message. Here are some of the messages from the
UIApplicationDelegate
protocol that announce application state transitions.
- applicationDidBecomeActive:
- applicationWillResignActive:
- applicationDidEnterBackground:
- applicationWillEnterForeground:
You can implement code in these methods to take the appropriate actions for your application. Transitioning to the background state is where you should always save any outstanding changes and the state of the application because it is the last time your application can execute code before it enters the suspended state. Once in the suspended state, an application can be terminated at the whim of the operating system.
