Foundation Game Design with ActionScript 3.0, Second Edition (91 page)
Read Foundation Game Design with ActionScript 3.0, Second Edition Online
Authors: Rex van der Spuy

_soundChannel = _sound.play(0);
_soundChannel.addEventListener
  (Event.SOUND_COMPLETE, loopSoundHandler);
Next, create aloopSoundHandlerthat plays the sound again and then adds another newSOUND_COMPLETElistener.
public function loopSoundHandler(event:Event):void
{
  if (_soundChannel != null)
  {
    //Play the sound
    _soundChannel = _sound.play(0);
    //Add a new listener
    _soundChannel.addEventListener
      (Event.SOUND_COMPLETE, loopSoundHandler);
  }
}
Very importantly, this code first checks whether the sound channel actually exists by only running the directives if the_soundChannelobject isn't null.
You also need to remove the listener anywhere in your program whenever the music stops.
_soundChannel.stop();
_soundChannel.removeEventListener
  (Event.SOUND_COMPLETE, loopSoundHandler);
The
volume
of a sound is how loud or soft it is. The
pan
determines how much of the sound comes through the left or right speaker. To control these properties, you first need to import theSoundTransformclass.
import flash.media.SoundTransform;
You then need twoNumbervariables to store the volume and pan settings.private var _volume:Number = 1;
private var _pan:Number = 0;
If the volume has a value of 1, it means it's at normal volume. If it's 0, the sound is completely silent. If it's 2, the sound is double the original volume.
The pan values have a range between -1 and 1. Note that -1 means the sound is coming completely from the left speaker, 1 means the sound is coming completely from the right speaker, and 0 means that the sound is balanced equally between both speakers. You can set the pan value to any number within this range. If you set it to 0.5, the sound will be come mainly from the right speaker, but you'll also hear it, although less audibly, in the left speaker.
Once you've chosen values for the volume and pan, you use them to create aSoundTransformobject, like this:
var transform:SoundTransform = new SoundTransform(_volume, _pan);
The last step is to apply thisSoundTransformobject to yourSoundChannelobject, like this:_soundChannel.soundTransform = transform;
SoundChannelobjects have a property called soundTransform. You add theSoundTransformobject to this property, as this code shows. Yes, I know, these are a few irritating and confusing little hoops to have to jump though. And the only difference between the soundTransform property and theSoundTransformclass is the capitalization of the first letter! But courage! You can do it, and it's not hard once you actually see it in practice. To help you out, take a look in the LoopingMusic project folder and open the application class. Run the SWF or compile it, and you'll hear some looping game background music. Here's the application class:
package
{
import flash.display.Sprite;
import flash.events.Event;
//Classes needed to play sounds
import flash.media.Sound;
import flash.media.SoundChannel;
import flash.media.SoundTransform;
[SWF(width="550", height="400",
backgroundColor="#FFFFFF", frameRate="60")]
public class LoopingMusic extends Sprite
{
//Embed the sound
[Embed(source="../sounds/music.mp3")]
private var Music:Class;
//Create the Sound and Sound channel
//objects for the sound
private var _music:Sound = new Music();
private var _musicChannel:SoundChannel = new SoundChannel();
//Variables needed to set volume and panning
private var _volume:Number = 1;
private var _pan:Number = 0;
public function LoopingMusic()
{
_musicChannel = _music.play(30, int.MAX_VALUE);
//Change the volume and pan settings
_volume = 0.5;
      _pan = 0;

//Create the SoundTransform object
      var transform:SoundTransform
        = new SoundTransform(_volume, _pan);

//Add the SoundTransform object to the

//musicChannel's soundTransform property
      _musicChannel.soundTransform = transform;
    }
  }
}
The music is set to loop when the program starts, skipping the first 30 milliseconds to avoid the short gap at the start of the music.
_musicChannel = _music.play(30, int.MAX_VALUE);
Next, the volume and speaker pan values are set.
_volume = 0.5;
_pan = 0;
The volume is set to half its loudness. Because the pan has a value of zero, the music is equally balanced through both speakers. Try setting the pan value to 1 or -1, then recompile the program and listen to how the speaker panning changes.
TheSoundTransformobject is then created using the volume and pan values as arguments.
var transform:SoundTransform
   = new SoundTransform(_volume, _pan);
It's created as a local object, which is how sound transform objects are usually created. The reason for this is because you only ever need to create a SoundTransform object when you're changing pan and volume settings like this, and you'll probably never need to use it anywhere else in the class. The last step is to apply this newtransformobject to themusicChannelobject's soundTransform property._musicChannel.soundTransform = transform;
This sets the new volume and pan settings. Every time you make changes to the volume and pan settings, you need to create another temporarySoundTransformobject and re-apply it to theSoundChannelobject.
You've only just scratched the surface of using sound with AS3.0, but it's plenty to get you started using sound in your own games. You'll also find a comprehensive look at sound in games in
Advanced Game Design with Flash
.
You now have a character that can bounce and jump around the stage, but the stage itself is pretty empty. The cat needs some boxes to jump on. Wouldn't it be great if you could make an interactive game world that looks like
Figure 9-9
?
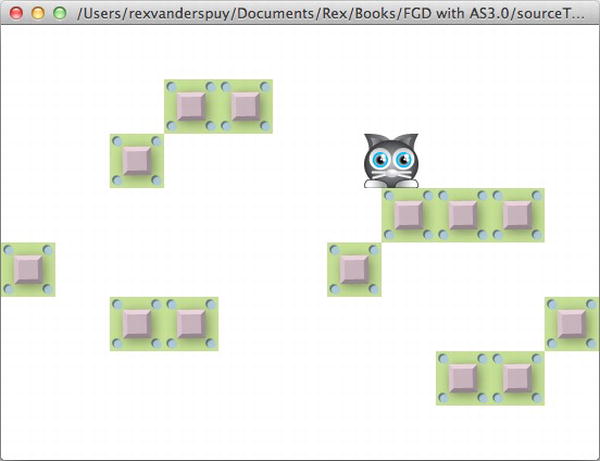
Figure 9-9.
The beginnings of a platform game, with boxes to jump on.
You could easily create 13 boxes and check them for collisions with the character using theCollision.blockmethod, like this:
Collision.block(_character, _box1);
Collision.block(_character, _box2);
Collision.block(_character, _box3);
Collision.block(_character, _box4);
Collision.block(_character, _box5);
Collision.block(_character, _box6);
Collision.block(_character, _box7);
Collision.block(_character, _box8);
Collision.block(_character, _box9);
Collision.block(_character, _box10);
Collision.block(_character, _box11);
Collision.block(_character, _box12);
Collision.block(_character, _box13);
These 13 lines of code will work just fine. But who really wants to write so much repetitive code?
Before you go any further in your game design career, you need to learn a pair of programming techniques that go hand in hand:
loops
and
arrays
. You're going to use them together to build a system for managing interactivity between lots of objects on the stage. This includes making lots of objects, changing properties on lots of objects, and checking for collisions between lots of objects. Over the next few pages you're going to learn some staple tricks of the trade that will vastly expand what your games are capable of doing.
If you're like me, you'd probably find writing out or copying/pasting those thirteen lines of repetitive code a terrible chore. Aren't computers supposed to be miraculous time-saving devices designed to spare you this sort of drudge work? Yes, they are, and yes, there is a better way.
Those 13 directives are exactly the same in every way, except for one thing: the number of the box object name. Could you make some kind of basic template to tell AS3.0 to repeat it 13 times and just insert the correct number? Yes, you can! It's a programming device called a
loop
.
Loops are used to repeat a section of code a specific number of times. There are quite a few different kinds of loops you can create in AS3.0, and even though they all do almost the same thing, some are slightly more appropriate in different situations than others. Far and away the most commonly used loop is the for loop, which is a block statement that begins with the keywordfor(meaning
for
this many number of times). Any directives inside the for loop are repeated as many times as the loop specifies—from once to hundreds or thousands of times.
The structure of the for loop might look weird and confusing at first because its arguments actually contain three separate statements.
- A variable that's used to track the number of times the loop has repeated. This is known as the
loop index variable
, which is usually represented by the letter
i
(it stands for
index). - A conditional statement that tells the loop when it should stop.
- A statement that adds 1 to the index variable every time the for loop repeats. (Although 1 is usually added each time the loop repeats, you can add or subtract numbers in many different ways to fine-tune the loop if necessary.) Each of these statements is separated by a semicolon.
Here's an example of a for loop that displays the numbers from 0 to 4:
for(var i:int = 0;  i < 5;  i++)
{
  trace(i);
}
If you use this code in the class's constructor method, you'll see this trace message when you run the program:
0
1
2
3
4
In the chapter's source files you'll find a project folder called ForLoop. Here's theForLoopapplication class that implements exactly this system:
package
{
  import flash.display.Sprite;
  public class ForLoop extends Sprite
  {
    public function ForLoop()
    {
      for(var i:int = 0;  i < 5;  i++)
      {
        trace(i);
      }
    }
  }
}
When you compile it, you'll see the numbers from 0 to 4 displayed as trace output.
It's easy to understand how a for loop works if you break down what it does into smaller parts. The first thing it does is declare the variable that will be used to count the number of loops.
for(
var i:int = 0;
i < 5;  i++)
This creates a local integer variable calledi, which is initialized to 0. The next statement tells the loop how many times it should repeat.
for(var i:int = 0; i < 5; i++)
This is a conditional statement. It tells the loop to repeat while the index variable is less than 5. In this example, the index variable is initialized to zero, so the loop will repeat until it reaches 4. You can use any kind of conditional statement you want here.
The last statement increases the index variable by 1 each time the directives in the loop are run.
for(var i:int = 0;  i < 5;
i++
)
The first time the loop runs,istarts with its initialized value, which is zero. The next time it repeats, the ++ operator adds a value of 1. That means thatithen equals 1 (because 0 plus 1 equals 1, of course). The next time the loop repeats, 1 is added toiagain, which results in a value of 2. This repeats whileiis less than 5. As soon as it gets a value of 5, the loop stops dead in its tracks.
Althoughi++is the most common way to increase the value of the index variable, you can use any statement you like to increase or decrease it. For example,i += 2will increase the index variable by 2 each time the loop repeats andi--will decrease it by 1 if you want your loop to count backward.
If you opened the ForLoop project, experiment with a few different values and conditional statements and see what the output looks like when you test it. You can initializeito any number you like and use any condition to quit the loop. Here's another example whereiis initialized to l and the loop repeats until it becomes 5:
for(var i:int = 1;  i <= 5;  i++)
{
  trace(i);
}
This produces the following trace output:
1
2
3
4
5
Initializing the index variable to 1 and quitting the loop on 5 is particularly useful because it makes it very clear where the loop starts and ends. It counts from one to five, like a normal human being!