Foundation Game Design with ActionScript 3.0, Second Edition (97 page)
Read Foundation Game Design with ActionScript 3.0, Second Edition Online
Authors: Rex van der Spuy

Figure 10-6.
The wand rotates around the center of the fairy and always points in the direction of the mouse.
To make this work, you first have to find the angle between the mouse and the center of the fairy. The code does this using theMath.atan2function. Here's the code that works out the angle between the mouse and the fairy:
_angle
  = Math.atan2
  (
    _fairy.y - stage.mouseY,
    _fairy.x - stage.mouseX
  );
AS3.0 has a specialized function calledMath.atan2function that tells you the angle of rotation of an object. You use it by supplying it with any vx or vy values that describe a distance vector between two objects. (Refer back to
Chapter 6
for a refresher on what a distance vector is and how to find it.) In this example, the distance vector is described by the difference between the fairy and the mouse's position on the stage:
  _fairy.y - stage.mouseY,
  _fairy.x - stage.mouseX
Very importantly, when you useMath.atan2, make sure thatvyvalue is the first argument, and thevxvalue the second, like so:
Math.atan2(vy, vx)
Math.atan2returns a number in
radians.
Unfortunately, this is not useful for rotating sprite objects. You need to convert this number to
degrees,
which is the type of value expected by the rotation property.
To convert radians to degrees, you can use a simple calculation: multiply the value in radians by 180 divided by pi (3.14). AS3.0 has a built-in function calledMath.PIthat returns the value of pi, just to make things easier for you. Here's what the final line of code might look like:
Math.atan2(vy, -vx) * (l80/Math.PI)
This gives you a rounded-off value in degrees that you can apply to therotationproperty of any sprite.
For a detailed explanation of how rotation and Math.atan2 works, see the bonus chapter “Case Studies: Maze and Platform Games” in the book's download package.
I decided that I wanted the wand to rotate around the fairy within a 50-pixel radius. A variable calledradiusdefines this distance.
var radius:int = -50;
A negative value pushes the wand away from the center of the fairy, which happens to be the direction in which the mouse will be pointing.
The wand's x and y position is found by multiplying the radius by angle ratios obtained using two specialized functions:Math.cosandMath.sin. They both take the_anglevalue as arguments. The result is then added to the fairy's x and y position so that the wand moves with the fairy.
_wand.x = _fairy.x + (radius * Math.cos(_angle));
_wand.y = _fairy.y + (radius * Math.sin(_angle));
Math.cosandMath.sinfunctions are two specialized trigonometry functions that return the ratio of two sides of the triangle formed by the measurement of the angle. The result is exactly as you see it on the stage.
Each time you click the left mouse button, the code calls themouseDownHandlerthat creates and fires stars in whatever direction the fairy's wand is pointing.
private function mouseDownHandler(event:MouseEvent):void
{
  //Create a star and add it to the stage
  var starImage:DisplayObject = new StarImage();
  var star:GameObject = new GameObject(starImage);
  stage.addChild(star);
  //Set the star's starting position
  //to the wand's position
  star.x = _wand.x;
  star.y = _wand.y;
  //Set the star's velocity based
  //on the angle between the center of
  //the fairy and the mouse
  star.vx = Math.cos(_angle) * -7;
  star.vy = Math.sin(_angle) * -7;
  //Push the star into the _stars array
  _stars.push(star);
}
Each star is created and added to the stage using theGameObject, class, in exactly the same way that the code created the_fairyand_wandobjects.
var starImage:DisplayObject = new StarImage();
var star:GameObject = new GameObject(starImage);
stage.addChild(star);
When it's created, the star's x and y positions are the same as the wand's.
star.x = _wand.x;
star.y = _wand.y;
Each star then needs a unique velocity that will make it move away from the fairy in the direction that the mouse is pointing. To find this, we can use the same_anglevalue we're using to rotate the wand and feed it to theMath.cosandMath.sinvalues. If we multiply those results by −7, it will make the star move away from the center of the fairy at seven pixels per frame.
star.vx = Math.cos(_angle) * -7;
star.vy = Math.sin(_angle) * -7;
The star is then pushed into the_starsarray so that we can move and manage it along with all the other stars in the game.
_stars.push(star);
Aforloop in theenterFrameHandleris what makes the stars move and checks the stage boundaries.
for(var i:int = 0; i < _stars.length; i++)
{
  var star:GameObject = _stars[i];
  star.x += star.vx;
  star.y += star.vy;
  //check the star's stage boundaries
  if (star.y < 0
  || star.x < 0
  || star.x > stage.stageWidth
  || star.y > stage.stageHeight)
  {
    //Remove the star from the stage
    stage.removeChild(star);
    star = null;
    //Remove the star from the _stars
    //array
    _stars.splice(i,1);
    //Reduce the loop counter
    //by one to compensate
    //for the removed star
    i--;
  }
}
The loop first makes each star in the_starsarray move in the correct direction by adding its vx and vy values that we calculated in themouseDownHandlerto its x and y positions.
var star:GameObject = _stars[i];
star.x += star.vx;
star.y += star.vy;
It then checks to see whether the star has crossed the stage boundaries.
if (star.y < 0
|| star.x < 0
|| star.x > stage.stageWidth
|| star.y > stage.stageHeight)
{…
If it has, it removes the star. First, it removes it from the stage and sets its value tonull.
stage.removeChild(star);
star = null;
It then uses thesplicemethod to delete the star from the_starsarray.
_stars.splice(i,1);
The code then has to reduce the loop counter by one to compensate for the star that was just cut out of the array.
i--;
If you don't do this, it throws the counter off by one, and the loop will skip the next item.
What's new here is usingspliceto remove an element from an array.spliceuses two arguments: the first is the index number of the element to remove, and the second is the number of elements it should remove from that point onward.
splice(whereToRemoveTheElement, numberOfElementsToRemove);
In this case, you want to remove the current star, which is at index numberi. If the loop is in its third repetition, that would be element number2. (Remember, array elements are numbered starting at zero.)
In the second argument,lis the number of elements to remove. In this case, you want to remove only one element.
Whatsplicedoes in this program is to remove the star from the array so the program no longer has to move it or check it for stage boundaries. If you don't splice it out of the array, the array will just get bigger and bigger, and the program will start to generate errors because it would contain references to star objects that have already been removed from the stage withremoveChild.
You can also use splice to insert elements into an array. For example, if you want to add an object called box into an array as the third element, you can use a line of code that looks like this:
array.splice(2, 0, box);
This adds the box object at index position 2. 0 means that you didn't delete the element that was originally at position 2. That object will be pushed up to position 3, and any objects that come after it would also be renumbered.
If you want to insert an object into an array and replace the existing element, you can use the following format:
array.splice(2, 1, box);
The box object will now be inserted at position 2, but it also indicates that one element should be deleted from the array. That would be the original element at position number 2. It's now gone for good, replaced by box, and the rest of the elements in the array won't be renumbered.
spliceis a very versatile method to use with arrays, and you'll certainly find many occasions when it will help you manage game objects.
This little bit of code for firing projectiles is one of the most important you need to know as a game designer. If any of your game objects need to fire bullets, come back to this section in the chapter and adapt this code to your game. It's a game programming classic.
We've taken a detailed look at many different types of player control systems in this book, but it hasn't been exhaustive. To make the widest variety of games possible, there are a few more player control schemes that you'll likely want to implement, such as the following:
- A mouse-controlled platform game character
- A keyboard-controlled spaceship
- A car for an overhead driving game
- A tank that can rotate and fire bullets from a turret
You'll find working examples and detailed explanations of how all these systems work in the bonus chapter “Advanced Player Control Systems,” which you'll find in the book's download package.
Figure 10-7
shows the kinds of game objects you'll learn how to make.

Figure 10-7.
Advanced player control systems
We've taken a good look at player control systems, but what about your game enemies? They're fun to make and easy to program. As you'll see in this next section, just a few simple techniques and a bit of run-of-the-mill logic is all you need to build some surprisingly sophisticated enemy artificial intelligence (AI) systems.
You already know how to make an object follow the mouse, and that basic skill is at the heart of an AI system that you can modify for use in a wide variety of game situations. All you need to do is mix and match some of the techniques you already know, and you can design enemies that do the following:
- Follow the player
- Run away from the player
- Aim and fire bullets at the player
Let's find out how.
Open theFollowproject folder and run the SWF. You'll see that Killer Bee follows and rotates toward the mouse if it's within a 200-pixel range.
Figure 10-8
illustrates what you will see. After it reaches the mouse, it circles around it with very bee-like persistence.
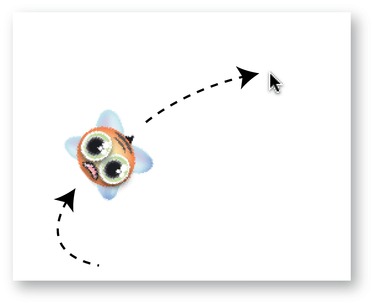
Figure 10-8.
The bee rotates toward the mouse and follows it around the stage.
The bee is created using the generalGameObjectclass we used in the ButtonFairy project. Here's theFollowapplication class that creates the effect:
package
{
  import flash.display.DisplayObject;
  import flash.display.Sprite;
  import flash.events.Event;
  import flash.events.MouseEvent;
  import flash.ui.Mouse;
  [SWF(width="550", height="400",
  backgroundColor="#FFFFFF", frameRate="60")]
  public class Follow extends Sprite
  {

//Embed the image
    [Embed(source="../images/bee.png")]
    private var BeeImage:Class;
    //Properties
    private const SPEED:Number = 3;
    private const TURN_SPEED:Number = 0.3;
    private const RANGE:Number = 200;
    private const FRICTION:Number = 0.96;
    private var _beeImage:DisplayObject = new BeeImage();
    private var _bee:GameObject = new GameObject(_beeImage);
    //The bee's angle of rotation
    private var _beeAngle:Number;
    public function Follow()
    {
      stage.addChild(_bee);
      _bee.x = 275;
      _bee.y = 175;
      //Add the event listeners
      stage.addEventListener(Event.ENTER_FRAME, enterFrameHandler);
    }
    private function enterFrameHandler(event:Event):void
    {
      //Get the target object
      var target_X:Number = stage.mouseX;
      var target_Y:Number = stage.mouseY;
      //Calculate the distance between the target and the bee
      var vx:Number = target_X - _bee.x;
      var vy:Number = target_Y - _bee.y;
      var distance:Number = Math.sqrt(vx * vx + vy * vy);
      if (distance <= RANGE)
      {
        //Find out how much to move
        var move_X:Number = TURN_SPEED * vx / distance;
        var move_Y:Number = TURN_SPEED * vy / distance;
        //Increase the bee's velocity
        _bee.vx += move_X;
        _bee.vy += move_Y;

//Find total distance to move
        var moveDistance:Number
          = Math.sqrt(_bee.vx * _bee.vx + _bee.vy * _bee.vy);
        //Apply easing
        _bee.vx = SPEED * _bee.vx / moveDistance;
        _bee.vy = SPEED * _bee.vy / moveDistance;
        //Rotate the bee towards the target
        //Find the angle in radians
        _beeAngle = Math.atan2(_bee.vy, _bee.vx);
        //Convert the radians to degrees to rotate the bee correctly
        _bee.rotation = _beeAngle * 180 / Math.PI + 90;
      }
      //Apply friction
      _bee.vx *= FRICTION;
      _bee.vy *= FRICTION;
      //Move the bee
      _bee.x += _bee.vx;
      _bee.y += _bee.vy;
    }
  }
}