Foundation Game Design with ActionScript 3.0, Second Edition (87 page)
Read Foundation Game Design with ActionScript 3.0, Second Edition Online
Authors: Rex van der Spuy

This structure is an extremely simplified version of a well-know software
design pattern
called the Model View Controller (MVC). A design pattern is a structure for organizing computer code across multiple classes so that they're easy to manage. I've cut a few corners so that the structure is much easier to understand and work with than a true MVC pattern. Let's call this the LMVC pattern (Lazy Model View Controller). It's great for understanding how classes work together and will hold you in good stead for many, many game projects, especially while you're learning to program. In fact, it might be the only pattern you ever need to use.
The essential thing to understand with this structure is that one class is entirely responsible for the game logic and controlling the objects on the stage. This is known as the
View/Controller
class. In Monster Mayhem, theLevelOneandLevelTwoclasses are the View/Controller classes. The game object classes are the
Model
classes. The Model classes just contain data about the objects and manage their own internal changes of state. The data they contain is in their properties. The View/Controller classes control these Model classes like a puppet master pulling all their strings. If you understand this structure and can be disciplined about sticking to it in your own games, you'll find your games easy to build, manage, and debug.
Figure 8-24
illustrates this structure.
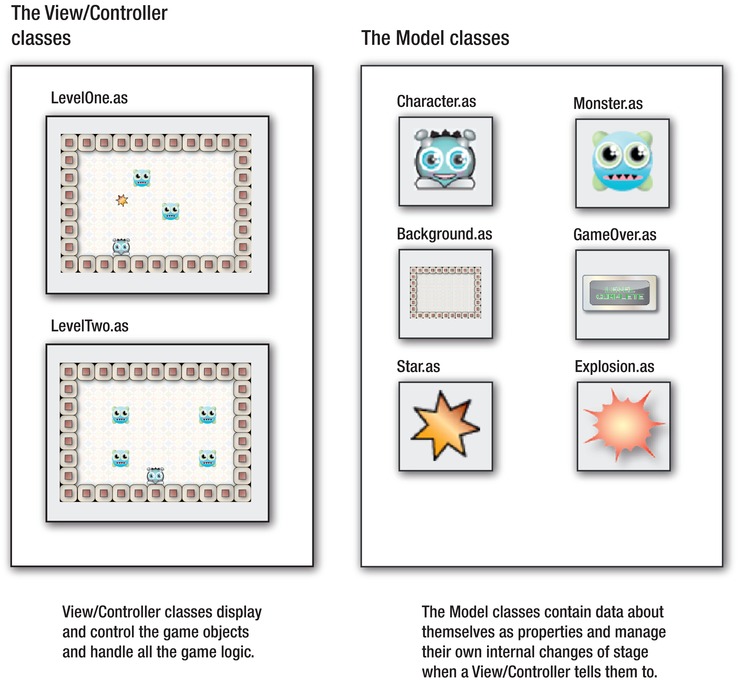
Figure 8-24.
View/Controller classes control the game logic and Model classes.
You're going to use this same structure for the rest of the examples in this book, so make sure you fully understand it before going much further. To simplify the code examples, however, and because they won't contain more than one game level, all the logic will be in the application class, as it has been in the previous chapters. (That means the application class will become the game's View/Controller.) But if you ever design a game with more than one level or you have lots of different game screens you need to switch between, come back to this chapter and use the structure of Monster Mayhem for planning your game.
When you gain more experience as a programmer and your games start to become much more complex, you're going to need to learn the true Model View Controller pattern. It's a very efficient way of managing complex games and can save you from writing a lot of repetitive code. You can find out all about how to structure a Model View Controller system in
Advanced Game Design with Flash.
This was a big chapter! There was a lot of code and many new concepts to absorb. Everything covered here, however, is absolutely essential to gaining a solid foundation in AS3.0 game design. You'll have to deal with all these issues sooner or later in your game design career. If you didn't understand everything the first time, break the chapter down into smaller chunks and work through each section carefully until it makes sense. Compare what you see happening while you play the game with the code that makes it work. The best way to understand this chapter is to create your own version of Monster Mayhem from scratch. You definitely have the skills to do it, and the steps you go through will reinforce all the concepts covered here.
I hope this chapter got you thinking about how to start using classes to help build games. The structure you used here can take you quite far if you use it carefully.
Until then, have fun with some of the new techniques you looked at in this chapter. How about coming up with a game that combines them with some of the other techniques you learned in earlier chapters? For example, what about a dungeon or space game with huge scrolling levels? That would be amazing! And how about incorporating some puzzle solving using text input, such as the number guessing game from
Chapter 4
? Perhaps combine Monster Mayhem and Time Bomb Panic into a hybrid game with increasing difficulty at each new level? Even at this stage in the book, you have some real game-coding power at your fingertips. The best way to learn is to dive in and start making a game.
In the next chapter, you'll look at a completely different game genre: a platform game. You'll learn how to make objects move using physics simulations, how to store and analyze data using arrays, and add sounds and music to your games.
Have fun designing your next great game! I'll meet you in
Chapter 9
when you're done!

Physics, Loops, Arrays, and Sounds
One of the most popular genres of video game is the
platform game
, which also poses some very interesting programming and design challenges. From a programming point of view, if you can program a platform game, you've reached a benchmark in your development as a game designer.
In this chapter, I'm going to show you all the skills you need to make your own platform game. You'll take a detailed look at core video game design techniques such as
- Natural motion using physics and thermodynamics simulations.
- Complex player character behavior.
- Collisions with accurate bounce and friction.
- Embedding sound and music.
- Using arrays.
You'll look at these techniques within a practical, real-world context so that you'll have a clear idea of how to apply them to your own games. But first, let's take a detailed look at the techniques you need to know to use physics in your own games.
When you bump into a wall, what happens? If you are a character in Monster Mayhem from the previous chapter, absolutely nothing—you just stop moving and that's the end of the story. In real life, things are
much more complicated. A bouncy rubber ball traveling at high speed bounces back at an angle. Something heavier, such as a rock, falls with a thud. Here's another example: when you step on a car's accelerator, the car gradually increases in speed and takes a bit of time to slow down after you hit the brakes. These sorts of physical reactions are part of what makes real-world games such as tennis and car racing so much fun.
Over the next few pages you'll see how to create a moving game character that simulates real-world physics and thermodynamics using the following techniques:
- Acceleration
: Gradually speeding up. - Friction
: Gradually slowing down. - Bouncing
: Changing the direction of motion when the object hits the edge of the stage. - Gravity
: Adding a force that pulls the object to the bottom of the stage. - Jumping
: One of the most required abilities for video game characters.
Applying physics to games is easy to do. Most of the techniques boil down to a simple calculation that's applied to the vx and vy properties. Although the calculations are simple, it's sometimes far from obvious how they can be used in a practical way. It's exactly this practical application that you'll examine.
In this book, most of the physics calculations that you'll apply are based on a system called
Euler integration
(its popular name is “easy video game physics”). Video game physics appear to be absolutely precise in the context of a video game but are actually only approximations of the real thing. Games use approximated physics because the CPU power required to process them is far, far less than if you used calculations from a physics textbook. If you need to perform text-book–level physical simulations of the real world, Keith Peters'
ActionScript 3.0 Animation: Making Things Move
and
AdvanceED ActionScript 3.0 Animation
go into detail on this subject.
To start experimenting with physics, you first need to create a game object class with properties that you can use to apply some physics formulas.
In the chapter's source files you'll find a folder called Acceleration. Open the src subfolder and find theCharacterclass. It embeds an image of the cat game character using code that should be very familiar to you by now. It also includes some special public properties that you're going to need for the examples in this chapter. Here's theCharacterclass with the special physics properties highlighted:
package
{
  import flash.display.DisplayObject;
  import flash.display.Sprite;
  public class Character extends Sprite
  {
    //Embed the image
    [Embed(source="../images/character.png")]
    private var CharacterImage:Class;
    //Private properties
    private var _character:DisplayObject = new CharacterImage();
    //Public properties
    public var vx:Number = 0;
    public var vy:Number = 0;
    public var accelerationX:Number = 0;
    public var accelerationY:Number = 0;
    public var speedLimit:Number = 5;
    public var friction:Number = 0.96;
    public var bounce:Number = -0.7;
    public var gravity:Number = 0.3;
    public var isOnGround:Boolean = undefined;
    public var jumpForce:Number = -10;
    public function Character()
    {
      //Display the image in this class
      this.addChild(_character);
    }
  }
}
You'll recognize the vx and vy properties, but the others will be new. You'll see how each of these new properties works in the examples ahead.
Figure 9-1
illustrates theCharacterclass's public properties with their initial values.
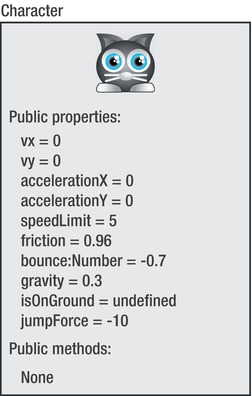
Figure 9-1.
The Character class contains properties needed for physics.
Notice that most of the properties are typed as Number. This is because they need to store decimal values. You can't type properties as int or uint if you need them to store physics values because physics values will always be fractional.
The isOnGround property is a Boolean variable. It's been initialized as undefined. If you don't know whether a Boolean variable should be true or false, assigning it a value of undefined means “I don't know yet.” This is the same as assigning a number variable a value of 0 or a string value a pair of empty quotes.
The simplest type of physics motion is acceleration, so let's see how to make it work with the new character object.
Acceleration
means to gradually increase velocity. This is what your bicycle does when you start pedaling faster. To gradually speed up game objects, you need to add a value to your object's vx or vy properties in theenterFrameHandler. You might recall from
Chapter 5
that vx refers to velocity on the x axis and vy refers to velocity on the y axis. In a nutshell, these properties represent an object's speed travelling either horizontally or vertically.
In AS3.0, if you gradually want to increase an object's velocity on the x axis, you need to use an addition assignment operator (+=) to add the value of the acceleration to the vx property. Your code might look something like this:
vx += 0.2;
On the y axis, your code might look like this:
vy += 0.2;
Where did 0.2 come from? That's the value of acceleration. The exact number depends entirely on you and how quickly or slowly you want the object to speed up. A larger number such as 0.6 makes the object accelerate faster, and a lower number such as 0.l makes it accelerate much more slowly. Choosing the right number is just a matter of trial and error, and observing the effect it has on the object.
Let's see this effect on the cat character on the stage. Run theAccelerationapplication class and move the cat object around the stage with the arrow keys. It gradually speeds up before reaching its maximum speed of 5 pixels per frame, as illustrated in
Figure 9-2
.
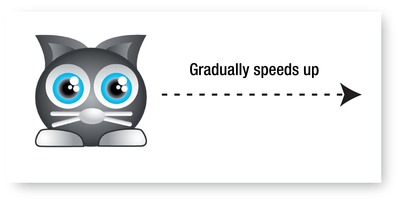
Figure 9-2.
Gradually increase an object's speed with acceleration.
Here's theAccelerationapplication class. I've highlighted all the code involved in applying acceleration and moving the character.
package
{
  import flash.display.Sprite;
  import flash.events.Event;
  import flash.events.KeyboardEvent;
  import flash.ui.Keyboard;
  [SWF(width="550", height="400",
    backgroundColor="#FFFFFF", frameRate="60")]
  public class Acceleration extends Sprite
  {
    private var _character:Character = new Character();;
    public function Acceleration()
    {
      //Add the character to the stage
      stage.addChild(_character);
      _character.x = 250;
      _character.y = 175;
      //Add the event listeners
      stage.addEventListener
        (KeyboardEvent.KEY_DOWN, keyDownHandler);
      stage.addEventListener
        (KeyboardEvent.KEY_UP, keyUpHandler);
      stage.addEventListener
        (Event.ENTER_FRAME, enterFrameHandler);
    }
    public function keyDownHandler(event:KeyboardEvent):void
    {
      if (event.keyCode == Keyboard.LEFT)
      {

_character.accelerationX = -0.2;
      }
      else if (event.keyCode == Keyboard.RIGHT)
      {

_character.accelerationX = 0.2;
           }
      else if (event.keyCode == Keyboard.UP)
      {

_character.accelerationY = -0.2;
      }
      else if (event.keyCode == Keyboard.DOWN)
      {

_character.accelerationY = 0.2;
      }
    }
    public function keyUpHandler(event:KeyboardEvent):void
    {
      if (event.keyCode == Keyboard.LEFT
      || event.keyCode == Keyboard.RIGHT)
      {

_character.accelerationX = 0;

_character.vx = 0;
      }
      else if (event.keyCode == Keyboard.DOWN
      || event.keyCode == Keyboard.UP)
      {

_character.accelerationY = 0;

_character.vy = 0;
      }
    }
    public function enterFrameHandler(event:Event):void
    {

//Apply acceleration

_character.vx += _character.accelerationX;

_character.vy += _character.accelerationY;

//Limit the speed

if (_character.vx > _character.speedLimit)

{

_character.vx = _character.speedLimit;

}
      if (_character.vx < -_character.speedLimit)
      {
        _character.vx = -_character.speedLimit;
      }
      if (_character.vy > _character.speedLimit)
      {
        _character.vy = _character.speedLimit;
      }
      if (_character.vy < -_character.speedLimit)
      {
        _character.vy = -_character.speedLimit;
      }

//Move the character
      _character.x += _character.vx;
      _character.y += _character.vy;
      //Check stage boundaries
      if (_character.x < 0)
      {
        _character.x = 0;
      }
      if (_character.y < 0)
      {
        _character.y = 0;
      }
      if (_character.x + _character.width > stage.stageWidth)
      {
        _character.x = stage.stageWidth - _character.width;
      }
      if (_character.y + _character.height > stage.stageHeight)
      {
        _character.y = stage.stageHeight - _character.height;
      }
      //Trace the result
      trace("_character.vx:  " + _character.vx);
      trace("_character.x:  " + _character.x);
      trace("    ----------");
    }
  }
}