Building Web Sites All-in-One For Dummies® (70 page)
Read Building Web Sites All-in-One For Dummies® Online
Authors: Claudia Snell

12.
Select the Text tool and type the desired name.
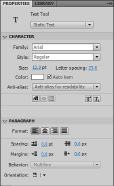
In this case, the button is called Home. When a visitor clicks this button, he goes home. A full-blown tutorial on the Text tool is beyond the scope of this book. However, if you look at the Property inspector in Figure 1-18, you see how easy it is to set parameters for the Text tool.
13.
Press F5 in the Down frame on the Text layer.
This copies the contents of the Up frame to the Over and Down states.
14.
Press F6 to create keyframes for the Over and Down states on the Button Shape layer.
The fact that you created keyframes enables you to change or modify the contents of these frames, or make some other change that will notify users they have indeed found a clickable button. The graphic on the Down state appears when users successfully click the button.
15.
Make changes in the Over and Down states for the Button Shape layer.
For the purpose of this demonstration, we changed the color of the button to red in the Over frame and to orange in the Down frame.
16.
With the Text layer selected, click the Insert Layer icon.
This houses the sound that plays when the user clicks the button.
Flash creates a new layer.
17.
Name the layer
Sound
.
18.
Click the Down frame in the Sound layer and press F6.
Flash creates a keyframe.
Figure 1-18:
Add text to the button.

19.
Choose File
â
Import
â
Import To Library.
Select a short sound file. For a button, choose a sound less than two seconds in duration. If you decide to add sound to a button, choose one that fits the site you're designing. For example, if you're creating a navigation menu for a photographer's Web site, a shutter click is an ideal sound.
20.
With the Down frame of the Sound layer selected, drag the sound from the Library to the Stage.
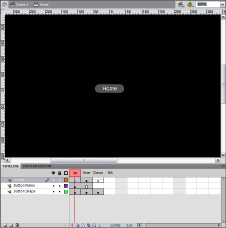
It doesn't matter where you place it. Remember that sounds are heard and not seen. Figure 1-19 shows the completed button. The waveform in the Down frame is Flash's way of notifying you that the sound is in the frame. This is a sound with low amplitude. The waveform is the solid line in the down frame. After all, a shutter click doesn't fluctuate like a Beethoven symphony.
21.
Click the Back button (looks like an arrow, and is left of the Scene title above the uppermost layer).
The button is added to the Library and is ready for use.
Figure 1-19:
A button wired for sound.

Assembling your menu
After you create a button, you can duplicate the button and then change the text to flesh out your menu. If you did the math right, your button is perfectly sized. When you align the buttons end to end, your menu is assembled. To assemble the menu, follow these steps:
1.
Right-click the Home button in the document Library and then choose Duplicate from the contextual menu.
The Duplicate Symbol dialog box appears. (See Figure 1-20.)
Figure 1-20:
Duplicating the button.

2.
Name the symbol.
The logical choice would be the page to which the button will link.
3.
Click OK.
Flash duplicates the button.
4.
Create enough duplicates to flesh out your menu.
For the menu we're creating here, you need four more buttons.
5.
Double-click one of the duplicated buttons.
Flash enters symbol-editing mode.
6.
Change the button text.
7.
Repeat for the other buttons in your menu.
After creating the duplicate, arrange the buttons on the Stage. To do so, follow these steps:
1.
Select the first button in your menu and drag it on the Stage.
You don't have to position it exactly. You can use the Align panel to align and distribute the buttons.
2.
Drag the remaining buttons onto the Stage.
Position the buttons end to end.
3.
Select all the buttons.
You can do this easily with the Selection tool. Simply click and drag around the perimeter of the buttons.
4.
Press Ctrl+K (Windows) or
Ã
+K (Mac).
The Align panel opens.
5.
Click the To Stage icon, and then click the Vertical Centers icon.
Flash aligns the buttons vertically to the Stage.
6.
Click the To Stage icon, and then click the Distribute Horizontal Center icon.
The buttons are distributed horizontally to the Stage.
7.
Click the Align Vertical icon.
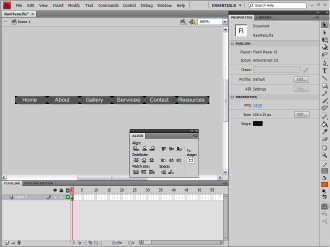
Flash aligns the buttons vertically to the center of the Stage. (See Figure 1-21.)
Figure 1-21:
Six little buttons all lined up neatly in a row.

Adding functionality to the buttons
If you test your menu now, the familiar pointer-hand icon appears when you pause your cursor over a button, and the button changes color and makes a noise when clicked. However, the button will do zilch, nada. To make the button truly functional, you need to specify the page to which the button links. To do that, you must venture into the wild and wooly world of ActionScript. As we mention earlier in this chapter, this segment covers ActionScript 2.0. For a full treatise on Flash CS4 and ActionScript 3.0, check out
Flash All-In-One Desk Reference For Dummies
by Doug Sahlin and Bill Sanders (Wiley). To make the buttons truly functional, follow these steps:
1.
Select the first button in your menu.
2.
Press F9 (or choose Window
â
Actions) and then click the divider to display all the action books.
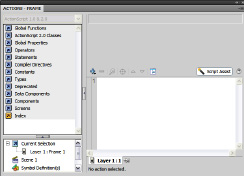
This opens the Actions panel shown in Figure 1-22. If this is your first introduction to ActionScript, you might be reminded of Pandora's box. The Actions panel has so many actions that they're divided into what the Flash designers refer to as
books.
When you click a book, you have access to all the actions within that book. But sometimes books open other books.
Figure 1-22:
Yikes! Look at all those Action books.

3.
Click the Script Assist button.
This button helps novice ActionScript users select the right parameters for each action. If you don't click this button, you've got to write some of the code yourself. Not fun.
4.
Click the Global Functions book, click the Browser/Network book, and then double-click the
getURL
action.
Flash adds the action to your script. Just fill in the blanks. Notice that Flash adds a line that begins with
on (release)
. This is an
event;
in other words, this event must occur for the action to execute. The default button event,
on(release)
, means the action executes when the user releases the mouse button, just what the doctor ordered for a navigation menu.
5.
In the URL text field (shown in upcoming Figure 1-23), type the URL for the Web page that opens when the button is clicked.
The page you want to open when the button is clicked should be in the same folder as your Flash navigation menu. Therefore, you just type the name of the file. For example, if you're creating a button that links to the home page, the link is
index.htm
.
6.
Choose one of the following options from the Window drop-down menu:
â¢
_self
opens the page in the current frame in the current window.
â¢
_blank
opens the page in a new window.
â¢
_parent
opens the page in the parent of the current frame.
â¢
_top
opens the page in the top-level frame in the current window.
If the button links to a page within the site, choose
_self
. If you're opening a page from another site, choose
_blank
. At this point, your Actions panel should look like the one shown in Figure 1-23.
7.
Repeat Steps 4â6 for the remaining buttons in your menu.
You have to select each button in turn, and then add the ActionScript.
8.
Choose File
â
Save.
The Save dialog box appears.
9.
Enter a name for the file, specify the location where you want to save the file, and then click Save.
