Building Web Sites All-in-One For Dummies® (107 page)
Read Building Web Sites All-in-One For Dummies® Online
Authors: Claudia Snell

9.
Enter a password and then confirm the password.
10.
Click OK.
The Change Administrator Password dialog box closes. The password you entered has to be entered any time a user tries to choose the role of administrator when making a connection to the Web site.
11.
Click Rollbacks.
The Rollbacks section of the Administer Website dialog box appears. This section of the dialog box allows you to enable rollbacks. When you enable
rollbacks,
Contribute makes a copy of a page as soon as a user clicks the Edit Page button. A user can roll back to a previous version of the page, which is a handy option if the page gets messed up eight ways to Sunday or the boss decides he doesn't like the employee's handiwork. The default number of rollbacks is three. Enter a higher number if you think the client will need it.
12.
Set options in other sections of the Administer Website dialog box as needed.
The other sections of the Administer Website dialog box are easy to understand. A detailed explanation of each section is beyond the scope of this book.
13.
Click Close.
Your settings are uploaded to the server.
Sending a connection key
If your client's personnel are techno-phobic, they probably know nothing about FTP credentials and all that stuff. In fact, if your client's personnel are really young, they might think FTP are the initials of a rapper. But we digress. When you're using Contribute with nontechnical people, you send them a connection key. The connection key is their gateway to Contribute nirvana, or something like that. A
connection key
is a no-brainer way to connect to a Web site. To send a connection key, follow these steps:
1.
Choose Edit
â
Administer Websites and then choose the Web site you want to administer.
The Users and Roles section opens by default.
2.
Click the Send Connection Key button.
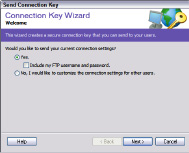
The Connection Key Wizard appears. (See Figure 2-14.)
Figure 2-14:
Let's get somebody connected.
3.
Accept the default option to send your current settings, and then enable the Include My FTP Username and Password check box.
When the user receives the connection key, the user name and password are encrypted; the recipient won't be able to decipher this information. Alternatively, you can customize the connection settings for other users, which means you can give them a unique user name and password.
4.
Click Next.
The Role Information page of the Connection Key Wizard appears. (See Figure 2-15). If the person you're sending the connection key to will only be editing pages, choose Writer. Or, if the person will also be creating new pages, choose Publisher. Alternatively, you can choose to add another person to become an administrator. This option is handy if you and your client will jointly administer the site.
5.
Choose a role and then click Next.
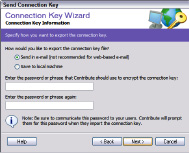
The Connection Key Information page of the Connection Key Wizard appears. (See Figure 2-16.)
6.
Choose the manner in which you're going to send the connection key.
You can send a connection key via e-mail, choose to save the connection key to your local machine for distribution via floppy disk, or upload it to a secure folder on a local server. The wizard recommends that you don't send the key via Web-based e-mail, which is an excellent suggestion because it isn't secure. If you're dealing with a local client, save the key to your local machine, transfer it to a Flash drive, and then deliver it to the client when you're showing her personnel how to use Contribute. If your client is distant, send the floppy disk via the most convenient method. Send the password under separate cover.
Figure 2-15:
Time for a little role playing.
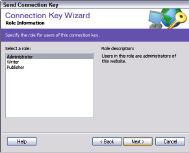
Figure 2-16:
How are you sending the connection?
7.
Enter the password that the recipient will need to unlock the connection key and then confirm the password.
8.
Click Next.
The Summary page of the Connection Key Wizard appears.
9.
Review the information for accuracy. If something is incorrect, click the Back button to navigate to the page where you need to change the information.
10.
Click Done.
If you specified saving the key to the local machine, you're prompted for a location in which to save the key. If you already have a floppy disk loaded, save the key to your floppy drive. If you've specified sending the key via e-mail, your default e-mail application opens. Fill in the blanks and let the e-mail fly, Guy.
Editing Web pages
After you have your client's Web editing team up and running with Contribute, he can begin editing pages. Editing pages in Contribute is as simple as navigating to the site and then to the page that needs to be edited. The following steps show you some of the basic editing tasks you can perform with Contribute. A full tutorial on all the features of Contribute is beyond the scope of this book. If you need to know more information about Contribute, refer to the online help. The online help can also show you how to create new pages with Contribute. To edit a page in Contribute, follow these steps:
1.
Launch Contribute.
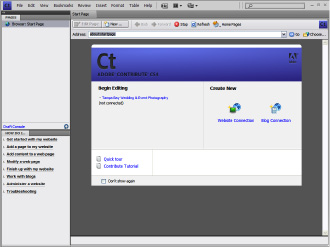
When you launch Contribute, the application connects to Web sites to which you made a connection. The sites are listed on the Contribute start page. (See Figure 2-17.)
Figure 2-17:
You have connections.
2.
Click the site you want to edit.
Contribute navigates to the site's home page. Alternatively, you can enter the URL to the page you want to edit after Contribute loads.
3.
Click Connect.
After navigating to a page on a site to which you made a connection, the Edit Page button appears. (See Figure 2-18.)
4.
Use the site navigation menu to navigate to the page you want to edit and then click the Edit Page button.
Contribute creates a draft of the page. (See Figure 2-19.) At this stage, you can edit any part of the page that isn't locked. If you set up the site by creating templates in Dreamweaver, you should have locked areas â such as navigation menus â to prevent users from tampering with your hard work. While in draft mode, you can change text, do minimal image editing, change image properties, and so on. Notice the toolbars at the top of the page. You can use the buttons on them to insert images, create links, and insert tables. Notice the tools for formatting text. They look quite similar to what you find in most word-processing applications.
 If a page needs extensive editing, click the Save for Later button. When you do this, Contribute saves the draft to your local machine. You can edit any draft by clicking the desired page in the Pages panel. After editing the page offline, click the Publish button to upload the edited page to the server.
Figure 2-18:
Okay. Roll your sleeves up and click the Edit Page button.
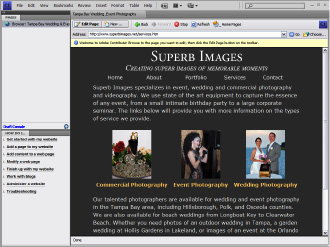
Figure 2-19:
Draft Web pages are convenient, but they will never replace draft beer.
