Read Microsoft Visual C# 2005 Express Edition: Build a Program Now! Online
Authors: Patrice Pelland
Tags: #General, #Computers, #C♯ (Computer program language), #Programming Languages, #C#, #Microsoft .NET Framework, #Computer Books: Languages, #Computer Graphics, #Application software, #C# (Computer program language), #Programming, #Microsoft Visual C# .NET, #Microsoft Visual C♯ .NET, #Electronic books, #Game Programming & Design, #Computing: Professional & Programming, #C (Computer program language), #Computers - Languages, #Programming Languages - C#, #Programming & scripting languages: general
Microsoft Visual C# 2005 Express Edition: Build a Program Now! (40 page)

notification as well as the reason why the form is closing. If the user is closing the form, setting the Cancel
entering the following keywords:
property to true will stop the closing process and prevent the form from closing. The next instruction is a
CloseReason enumeration.
call to the Hide method. The Hide method is simply a synonym for setting the Visible property to false. The form will simply be hidden.
The UserClosing event would also
When the user selects the Exit choice from the context menu, the FormClosing event will be raised; howev
be called whenever the user press-
es Alt+F4 or if the user selects
er, the reason given will not be UserClosing. Instead it will be ApplicationExitCall, and therefore the applica
Close from the Form Control menu
tion will continue the closing process.
(the menu that appears when you
click on the left corner where the
icon is usually located).
You’ll now add the code for the Open . . . menu choice. To write the code for this event, select 7
cmsNotify
in the component tray and then double-click on the
Open . . .
menu choice on the context menu strip. The click event handler will be created, and you’ll call the Restore method to handle the form’s visibility, which is done by the this.Restore() code. You will add code to make sure the form has the focus so that it ends up on top of any other displayed windows. Add the following code to the tsmiOpen_Click event handler:
35 private void tsmiOpen_Click(object sender, EventArgs e)
36 {
37 this.Restore();
38 this.Focus();
39 }
Chapter 9: Build Your Own Weather Tracker Application Now!
175
CSX_Chapter 9.indd 175
CSX_Chapter 9.indd 175
10/24/05 6:59:20 PM
10/24/05 6:59:20 PM
Now, test the application with the following test scenario:
■ Start the application by pressing
F5.
Right-click on the notify icon and select
Open . . .
The Main form should appear in the middle of your screen. Minimize the Main form by clicking the
Close
button. Once it is minimized, double-click the notify
icon. You should again see the Main Form. Terminate the application by selecting the
Exit
menu choice.
Adding the Splash Screen and About Dialog Box
Since you have done these procedures in Chapter 6, I won't spend too much time on this section. You'll just add forms that are almost finished from the companion content. Follow these steps to add the SplashWeather.cs form and AboutWeatherTracker.cs form to your project.
TO ADD A SPLASH SCREEN AND ABOUT DIALOG BOX
In the Solution Exoplorer, right-click the
Weather Tracker
project, select
Add
, and then select 1
Existing Item
. The Add Existing Item dialog box apears.
Browse to the SplashAbout folder under the Chapter9 companion content. By default the companion 2 content is located at \My Documents\Microsoft Press\VCS 2005 Express\. Select the
AboutWeatherTracker.cs
file and, while pressing the
Ctrl
key, select the
SplashWeather.cs
3 file.
Click
Add
to add the AboutWeatherTracker and SplashWeather forms to your project in Solution 4 Explorer.
Using the following table, set the specified properties on the SplashWeather form. Images are located in the Images folder under Chapter9 of the companion content.
o
176
Microsoft Visual C# 2005 Express Edition: Build a Program Now!
CSX_Chapter 9.indd 176
CSX_Chapter 9.indd 176
10/24/05 6:59:21 PM
10/24/05 6:59:21 PM
Control Name
Control Type
Property
Value
SplashWeather
Form
BackgroundImage
mountain.jpg
SplashWeather
Form
BackgroundImageLayout
Stretch
Using the following table, set the specified properties on the AboutWeatherTracker form. Images are located in the Images folder under Chapter9 of the companion content.
Component
Property
Value
LogoPictureBox
Image
Sunset.jpg
Now you need to attach these two forms to the rest of the application.
TO ATTACH FORMS TO AN APPLICATION
To attach the splash screen, begin by opening the code for
Main.cs
and modify the constructor so 1 that it looks like the following:
1 public partial class Main : Form
2 {
3 SplashWeather splashScreen = new SplashWeather();
4 public Main()
5 {
6 InitializeComponent();
7 splashScreen.Show();
8 Application.DoEvents();
9 }
The previous step will display the splash screen, but you need to close it and make it disappear. Open 2 the
Main.cs
form in design mode and select the form. Click the
events
button (yellow lightning) at the top of the Properties window and double click the
Load
event.
Chapter 9: Build Your Own Weather Tracker Application Now!
177
CSX_Chapter 9.indd 177
CSX_Chapter 9.indd 177
10/24/05 6:59:22 PM
10/24/05 6:59:22 PM
3 Add the following code to the Main_Load event handler.
10 private void Main_Load(object sender, EventArgs e)
11 {
12 //Splash screen business.
13 Thread.Sleep(2000);
14 splashScreen.Close();
15 }
Place your cursor within the “Thread” text. You should see a familiar yellow and red smart tag. This 4 smart tag is there to let you know that the Thread class is in the System.Threading namespace and that you don’t have it in your using directives at the top of Main.cs. Move your mouse over the smart tag, click the down arrow, and then select
using System.Threading
; to add it to your list of using directives. To attach the About dialog box, you need to tie it to the context About
. . .
menu choice. Go to your 5
Main.cs
form in design mode.
Select
cmsNotify
in the component tray and double-click the
About . . .
menu choice in the context 6 menu strip. Add the following code to the tsmiAbout_Click event hander. 16 private void tsmiAbout_Click(object sender, EventArgs e)
17 {
18 aboutScreen.ShowDialog();
19 }
At the top of Main.cs, just below SplashWeather splashScreen = new SplashWeather();, add the follow7 ing line of code: 20 AboutWeatherTracker aboutScreen = new AboutWeatherTracker();
In the Solution Explorer, right-click the
Weather Tracker
project and select
Properties
to open the 8 Project Designer.
On the Application tab, click
Assembly Information
and set the assembly information for the project. 9 This information will fill the splash screen and About dialog box fields. 10 On the Application tab, change the application icon to
Sun.ico
. Click the ellipsis (
...
) button next to the Icon drop-down list. Select the
Sun.ico
file in the Chapter9 Images folder.
178
Microsoft Visual C# 2005 Express Edition: Build a Program Now!
CSX_Chapter 9.indd 178
CSX_Chapter 9.indd 178
10/24/05 6:59:22 PM
10/24/05 6:59:22 PM
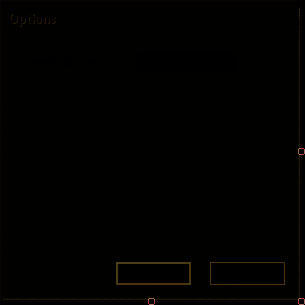
Adding the Options Dialog Box
You now have three forms. You will add the final Options dialog box form that will
Figure 9-4
The Options dialog box
appear when the user selects the Options… menu choice in the context menu from the notify icon.
TO ADD THE OPTIONS DIALOG BOX FORM
1 In the Solution Explorer, right-click
Weather Tracker,
select
Add
, and then select
Windows Form
. 2 From the templates, select
Windows Form
, name the form
Options.cs
, and then click
Add
. Using the following table, set properties and add controls to the Options form so that it looks like 3 the form shown in Figure 9-4.
Component
Control Type
Property
Value
Options
Form
Font
Tahoma 8
Options
Form
BackColor
System:MenuHighlight
Options
Form
StartPosition
CenterScreen
Options
Form
ForeColor
Web:White
Options
Form
ControlBox
False
Options
Form
FormBorderStyle
FixedDialog
Options
Form
MaximizeBox
False
Options
Form
MinimizeBox
False
Options
Form
Text
Options
txtCurrentZipCode
Textbox
AcceptReturn
True
txtCurrentZipCode
Textbox
BackColor
System:InactiveCaption
lblCurrentZipCode
Label
Text
Current Zip Code:
Continued on the next page
Chapter 9: Build Your Own Weather Tracker Application Now!
179
CSX_Chapter 9.indd 179
CSX_Chapter 9.indd 179
10/24/05 6:59:23 PM
10/24/05 6:59:23 PM
Continued from the previous page
Component
Control Type
Property
Value
btnOk
Button
BackColor
System:InactiveCaption
btnOk
Button
FlatStyle
Popup
btnOk
Button
Text
Ok
btnCancel
Button
BackColor
System:InactiveCaption
btnCancel
Button
Text
Cancel
btnCancel
Button
FlatStyle
Popup
Options
Form
AcceptButton
btnOk
Options
Form
CancelButton
btnCancel
TO HOOK UP THE FORM TO THE CONTEXT MENU
1 Display the
Main
form in design mode.
Select
cmsNotify
in the component tray, and double-click the
Options . . .
menu choice in the 2 context menu.
3 Add the following line of code to the tsmiOptions_Click event handler: 1 private void tsmiOptions_Click(object sender, EventArgs e)
2 {
3 optionsForm.ShowDialog();
4 }
At the top of Main.cs, just below AboutWeatherTracker aboutScreen = new AboutWeatherTracker();, 4 add the following line of code:
At this point in the chapter, the
Options optionsForm = new Options();
current project state is saved in
the Chapter9 companion content
in a folder named Weather Tracker
Press
F5
to run the application. You should see your splash screen. Use the context menu on the notify 5
UI. To add the Web service func-
icon to open the
About
dialog box and the
Options
dialog box. When finished, exit the application.
tionality, you can continue with
your own project or use the proj-
You are now finished with this part of the project. Be sure to save your project. It is time to add the meat of
ect in Weather Tracker UI.
the project: using Web services.
180
Microsoft Visual C# 2005 Express Edition: Build a Program Now!
CSX_Chapter 9.indd 180
CSX_Chapter 9.indd 180
10/24/05 6:59:23 PM
10/24/05 6:59:23 PM
Using Web Services
You have constructed a nice shell, but the shell is rather empty at this moment. You need to
access weather data in order to populate the shell. To accomplish this, you will learn to con
The weather Web service you will
use in this part of the chapter
sume Web services. But first: what is a Web service?
requires a free registration. Of
A Web service is an application that runs on a Web server, such as Internet Information
course, when you say free, you
have to think about the availability
Services (IIS). A Web service has a series of exposed public methods that an application
and robustness of the Web service.
I tried to choose a reliable Web
can call. There are numerous examples of Web services on the Internet. You can use Web
service, but I can’t guarantee that
services that perform a variety of operations, such as finding a ZIP code, viewing a map,
it will be available at all times. You
