Windows Server 2008 R2 Unleashed (303 page)
Read Windows Server 2008 R2 Unleashed Online
Authors: Noel Morimoto

Image rollback has been successfully used for training purposes where an employee runs
through a process, then rolls back the image so they can run through the same process all
over again repeating the process on the same base image but without previous installa-
tions or configurations.
In network infrastructures, a snapshot is helpful when an organization applies a patch or
update to a server, or a software upgrade is performed and problems occur; the administrator
can simply roll back the image to the point prior to the start of the upgrade or migration.
Snapshots for Guest Session Server Fault Tolerance
Snapshots are commonly used in business environments for the purpose of fault tolerance
or disaster recovery. A well-timed snapshot right before a system failure can help an orga-
nization roll back their server to the point right before the server failed or problem
occurred. Rather than waiting hours to restore a server from tape, the activation of a snap-
shot image is nothing more than choosing the snapshot and selecting to start the guest
image. When the guest image starts up, it is in the state that the image was at the time the
snapshot was created.
Creating a Snapshot of a Guest Image
Snapshots are very easy to create. To create a snapshot, do the following:
1. From the Server Manager console or from the Hyper-V Manager MMC snap-in, click
to select the guest session for which you want to create a snapshot.
Using Snapshots of Guest Operating System Sessions
1539
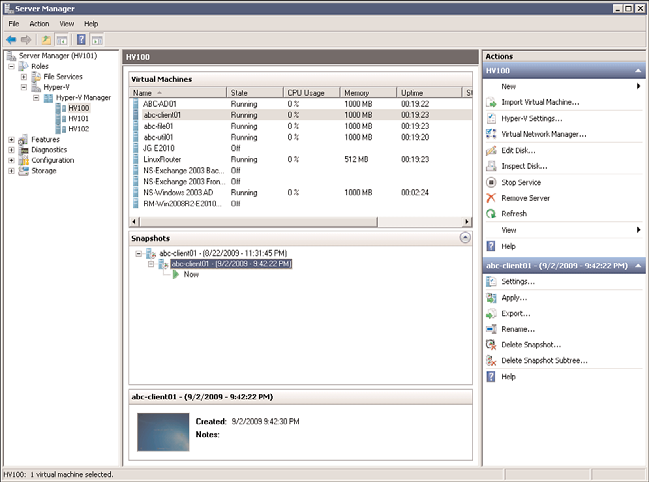
2. Right-click the guest session name, and choose Snapshot. A snapshot of the image
will immediately be taken of the guest image and the snapshot will show up in the
Snapshots pane, as shown in Figure 37.8.
ptg
FIGURE 37.8
Snapshot of a running Hyper-V guest session.
37
Rolling Back a Guest Image to a Previous Snapshot Image
The term used in Windows Server 2008 R2 Hyper-V to roll back an image is called “apply-
ing” a snapshot to an existing image. When an image is rolled back, the image that is
currently running has the snapshot information applied to the image, thus bringing the
image back to an earlier configuration state. To apply a snapshot, do the following:
1. From the Server Manager console or from the Hyper-V Manager MMC snap-in, click
the snapshot to which you want to revert the running guest image.
2. Right-click the snapshot image and choose Apply. The configuration state of the image
will immediately be reverted to the state of the image when the snapshot was taken.
NOTE
By default, the name of the snapshot image takes on the date and time the image was
created. As an example, if the virtual machine is called “Windows 2008 R2 IIS,” an
image taken on September 2, 2009 at 9:42 p.m. would show up as “Windows 2008
R2 IIS - (9/2/2009 - 9:42:22 PM).” Snapshots can be renamed to something more
meaningful, if desired, such as “Clean Build with All Patches”.
1540
CHAPTER 37
Deploying and Using Windows Virtualization
Reverting a Snapshot Session
When working with snapshots, if you snapshot a session, the revert action can be used on
the virtual machine to revert the guest session’s state to the last created or applied snap-
shot. All changes since the last creation or application of a snapshot will be discarded.
Quick Migration and Live Migration
There are two forms of automated migration provided by Windows Server 2008 R2 Hyper-
V: Quick Migration and Live Migration. These migration processes can be used to increase
service availability for planned and unplanned downtime.
Although both technologies achieve the same thing—moving virtual servers between
Hyper-V hosts—they use different methods and mechanisms to achieve it. Both require at
least two Hyper-V host servers in a cluster, attached to the same shared storage system.
Usually, the shared storage is an iSCSI or Fibre Channel storage area network (SAN).
Quick Migration
Quick Migration provides a way to quickly move a virtual machine from one host server
ptg
to another with a small amount of downtime.
In a Quick Migration, the guest virtual machine is suspended on one host and resumed on
another host. This operation happens in the time it takes to transfer the active memory of
the virtual machine over the network from the first host to the second host. For a host
with 8GB of RAM, this might take about two minutes using a 1GB iSCSI connection.
Quick Migration was the fastest migration available for Windows Server 2008 Hyper-V.
Microsoft made considerable investments in Hyper-V migration technologies, trying to
reduce the time required to migrate virtual machines between Hyper-V hosts. The result
was Live Migration, which has the same hardware requirements as Quick Migration, but
with a near instantaneous failover time.
Live Migration
Since the release of Hyper-V V1 with Windows Server 2008, the number-one most-
requested feature by customers is the ability to migrate running virtual machines between
hosts, with no downtime. VMware’s VMotion has been able to do this for some time.
Finally, with Windows Server 2008 R2, it can be done natively with Hyper-V for no extra
cost. This makes it a compelling reason to move to Hyper-V.
Live Migration uses failover clustering. The quorum model used for your cluster will
depend on the number of Hyper-V nodes in your cluster. In this example, we will use two
Hyper-V nodes in a Node and Disk Majority Cluster configuration. There will be one
shared storage LUN used as the cluster quorum disk and another used as the Cluster
Shared Volume (CSV) disk, described later in this chapter. For more details on clustering,
see Chapter 29, “System-Level Fault Tolerance (Clustering/Network Load Balancing).”
Quick Migration and Live Migration
1541
NOTE
If there is only one shared storage LUN available to the nodes when the cluster is
formed, Windows will allocate that LUN as the cluster quorum disk and it will not be
available to be used as a CSV disk.
This section describes how to use Hyper-V Live Migration to move virtual machines
between clustered Hyper-V hosts.
Configuring the Cluster Quorum Witness Disk
Live Migration requires a Windows Server 2008 R2 cluster configured to use shared
storage. Typically, these are LUNs provisioned on an iSCSI or Fibre Channel SAN. One
LUN will be used as the witness disk for quorum and another will be used as a Cluster
Shared Volume (CSV) to store the virtual machine images. The CSV will be configured
later in this chapter.
The LUN for the shared witness quorum disk must be configured before the cluster is
formed, so that cluster manager can configure the cluster properly. Connect this LUN via
ptg
iSCSI or Fibre Channel to both nodes you will use for the cluster. The disk must be initial-
ized and formatted with an NTFS file format prior to cluster use. When properly config-
ured, both nodes share the same online Basic disk and can access the disk at the same time.
IMPORTANT
37
The Windows cluster service will always use the first shared disk as the cluster quorum
disk. Provision this disk first on each node.
Now that the shared storage witness disk has been configured, we can move on to
installing the Windows cluster.
Installing the Failover Clustering Feature
Before a failover clustering can be deployed, the necessary feature must be installed. To
install the Failover Clustering feature, perform the following steps:
1. Log on to the Windows Server 2008 R2 cluster node with an account with adminis-
trator privileges.
2. Click the Server Manager icon in the Windows taskbar.
3. Select the Features node in the tree pane when Server Manager opens.
4. In the tasks pane, select the Add Features link.
5. In the Select Features window, select Failover Clustering, click Next, and click Install
on the Confirm Installation Selections page to install the feature.
1542
CHAPTER 37
Deploying and Using Windows Virtualization
6. When the installation completes, click Close to complete the installation and return
to Server Manager.
7. Close Server Manager and install the Failover Clustering feature on each of the
remaining cluster nodes.
Running the Validate a Configuration Wizard
Failover Cluster Management is used to administer the Failover Clustering feature. It can
be run from Server Manager or as a separate MMC console. After the feature is installed,
run the Validate a Configuration Wizard from the tasks pane of the Failover Cluster
Management console. All nodes should be up and running when the wizard is run. To run
the Validate a Configuration Wizard, perform the following steps:
1. Log on to one of the Windows Server 2008 R2 cluster nodes with an account with
administrator privileges over all nodes in the cluster.
2. Click Start, click All Programs, click Administrative Tools, and select Failover Cluster
Management.
3. When the Failover Cluster Management console opens, click the Validate a
Configuration link in the Actions pane.
ptg
4. When the Validate a Configuration Wizard opens, click Next on the Before You
Begin page.
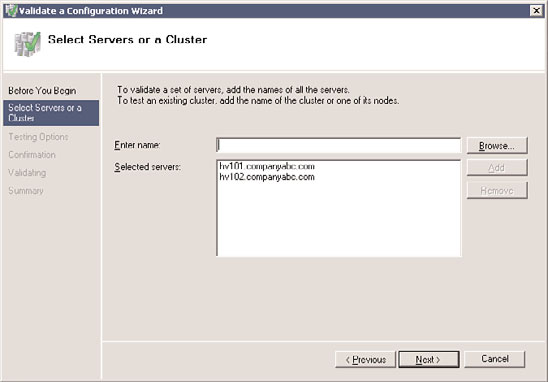
5. On the Select Servers or a Cluster page, enter the name of a cluster node, and click
the Add button. Repeat this process until all nodes are added to the list, as shown in
Figure 37.9, and click Next to continue.
FIGURE 37.9
Adding the servers to be validated by the Validate a Configuration Wizard.
Quick Migration and Live Migration
1543
6. On the Testing Options page, read the details that explain the requirements for all
tests to pass in order to be supported by Microsoft. Select the Run All Tests
(Recommended) option button, and click Next to continue.
7. On the Confirmation page, review the list of servers that will be tested and the list
of tests that will be performed, and click Next to begin testing the servers.
NOTE
For years, administrators have complained that the Validate a Configuration Wizard win-
dow is too small. In Windows Server 2008 R2, administrators can finally resize the win-
dow by dragging the lower-right corner. This is not obvious, but try it—it works!
8. When the tests complete, the Summary page displays the results, and if the tests
pass, click Finish to complete the Validate a Configuration Wizard. If the tests failed,
click the View Report button to review the details and determine which test failed
and why the test failed.
Even if the Validate a Configuration Wizard does not pass every test, depending on the
test, creating a cluster might still be possible. After the Validation a Configuration Wizard
ptg
is completed successfully, the cluster can be created.
Creating a Node and Disk Majority Cluster
When the failover cluster is first created, all nodes in the cluster should be up and
37
running. To create the failover cluster, perform the following steps:
1. Log on to one of the Windows Server 2008 R2 cluster nodes with an account with
administrator privileges over all nodes in the cluster.
2. Click Start, click All Programs, click Administrative Tools, and select Failover Cluster
Management.
3. When the Failover Cluster Management console opens, click the Create a Cluster