Windows Server 2008 R2 Unleashed (229 page)
Read Windows Server 2008 R2 Unleashed Online
Authors: Noel Morimoto

4. When the Diagnostic Report Wizard window opens, select either the health report,
propagation test, or propagation report, and click Next.
5. If a report was selected, the report will be saved to the c:\DFSReports folder with a
default name; if necessary, change the report name and location and click Next.
6. On the Members to Include page, add or remove the desired folder target servers for
the report, and click Next.
1164
CHAPTER 28
File System Management and Fault Tolerance
7. On the Options page, select the desired options for the report details, to count or
not count backlogged files and whether or not to count the replicated files and
folders, including data set size on each member, and click Next.
8. Review the selections and if everything looks correct, click Create to generate and
display the report.
9. The report will be displayed in the default browser; close the browser and DFS
Management console when you are finished.
Taking a Target Offline for Maintenance
When a target needs to be rebooted or just taken offline for a short maintenance window,
the connected users must be gracefully referred to another replica, or they must be discon-
nected from the DFS server.
To take a folder target offline for maintenance, follow these steps:
1. Open the DFS Management console and locate the namespace and expand it to
reveal the desired folder and select the folder.
2. Once the folder is selected in the tree pane, in the tasks pane, select the Folder
Targets tab and select the target that will be taken offline.
ptg
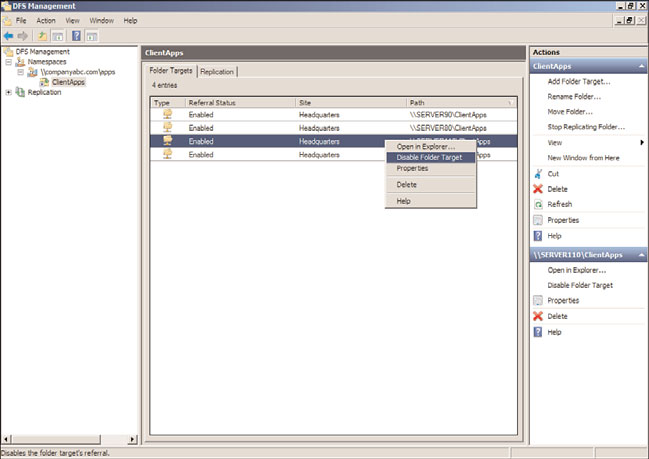
3. Right-click the appropriate target, and select Enable or Disable Folder Target, as
shown in Figure 28.27. This option changes the current referral status of a target.
FIGURE 28.27
Disabling DFS referral to free a server for maintenance.
Managing and Troubleshooting DFS
1165
4. Repeat the preceding steps for any additional DFS root or folder targets on the server
on which you are disabling referrals.
5. Wait long enough for all the existing connections to close. Usually, after you make
the referral change, all users should be disconnected after the cache interval has
been exceeded. Start counting after the referral is disabled. One way to know for sure
that all users have been disconnected from a target is to open Share and Storage
Management on the target server and use the Manage Sessions and Manage Open
Files links in the Actions pane to determine if any users and systems are connected.
6. When all connections are closed on the target server, perform the necessary tasks
and enable the target from the DFS Management console when maintenance is com-
pleted and server functionality has been restored.
Disabling Replication for Extended Downtime
When a server containing a replicated folder target will be offline for an extended period of
time, for upgrades or due to unexpected network downtime, removing that server’s targets
from all replication groups is recommended. Doing this relieves the available replica
servers from having to build and store change orders and staging files for this offline
server. Because the staging folder has a capacity limit, an offline server might cause the
ptg
active server’s staging folders to reach their limit, essentially shutting down all replication.
When the server is once again available, the administrator can add this server back to the
list of targets and configure replication. The data will be moved to the preexisting folder
where it can be compared with file IDs sent over on the change orders from the initial
master. If the file ID is the same, it will be pulled from the preexisting folder instead of
across the WAN to reduce network traffic.
Limiting Connections to Site DFS Targets
28
In previous versions of DFS, prior to Windows Server 2003 R2 and Windows Server 2008,
one issue administrators faced was that users could connect to a folder target across a
WAN link for an extended period of time, after only a short network disruption. To
enhance performance and keep this situation down to a minimum, DFS administrators
can set referral priority and restrict folder target access to local Active Directory site DFS
folder target servers. To set referral priority or restrict access to local site target servers,
perform the following steps:
1. Open the DFS Management console, and add the necessary namespace to the console.
2. Expand the namespace to reveal the desired folder, right-click the DFS folder, and
select Properties.
1166
CHAPTER 28
File System Management and Fault Tolerance
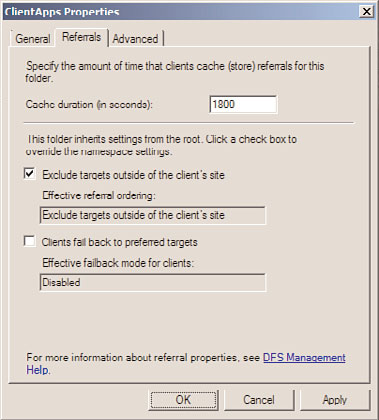
3. Select the Referrals tab, and check the Exclude Targets Outside of the client’s site and
click OK, as shown in Figure 28.28.
ptg
FIGURE 28.28
Restricting client connections to local Active Directory site for DFS folder
targets.
Administrators do not need to perform any special steps to back up DFS data other than
backing up the actual data in the folders as well as the System State of the servers that
host and participate in the DFS namespace. The following elements should be backed up:
.
Folder Target data—
This is the actual data that is being accessed by end users.
With a true multimaster replication topology, only one target needs to be backed up
for each DFS folder target.
.
DFS hierarchy—
For standalone DFS namespaces, the System State of the root server
and System State of all servers containing DFS targets should be backed up. For
domain-based DFS namespaces, the System States of domain controllers and all
other servers containing DFS targets should be backed up. Active Directory stores all
the DFS hierarchy and DFSR replication connection information. Active Directory is
backed up with the domain controller System State.
To back up the DFS Hierarchy only, the DFSutil can be used to export the settings. To
perform this task, follow these steps:
1. Log on to the Windows Server 2008 R2 system that has the DFS services installed,
with an account with local server administrator privileges.
Using the Volume Shadow Copy Service
1167
2. Click Start, Run; then type cmd in the search pane and press Enter to open a
Command Prompt window.
3. In the Command Prompt window, type dfsutil domain companyabc.com and press
Enter to list all of the namespaces in the companyabc.com domain as an example.
For our example, we returned the Apps name space located at
\\companyabc.com\apps.
4. Once the namespace name is determined, type dfsutil root export
\\companyabc.com\apps c:\dfs-export-namespace-Apps.xml and press Enter to
export this namespace.
5. In the Command Prompt window, type c:\dfs-export-namespace-Apps.xml to
review the exported information.
This process should be performed on all DFS server and domain-based namespaces for
reference. Also, this file can be used to migrate a DFS namespace from a set of namespace
servers to a different set of servers by deleting the original namespace, editing this file,
and using the dfsutil root import command.
Using the Volume Shadow Copy Service
ptg
The Windows Server 2008 R2 Volume Shadow Copy Service (VSS) is a feature available for
NTFS volumes. VSS is used to perform a point-in-time backup of an entire volume to the
local disk. This backup can be used to quickly restore data that was deleted from the
volume locally or through a network-mapped drive or network file share. VSS is also used
by Windows Server Backup and by compatible third-party backup applications to back up
local and shared NTFS volumes.
VSS can make a point-in-time backup of a volume, including backing up open files. This
entire process is completed in a very short period of time but is powerful enough to be
used to restore an entire volume, if necessary. VSS can be scheduled to automatically back
28
up a volume once, twice, or several times a day. This service can be enabled on a volume
that contains DFS targets and standard Windows Server 2008 R2 file shares.
Using VSS and Windows Server Backup
When the Windows Server Backup program runs a backup of a local NTFS volume, VSS is
used by default to create a snapshot or shadow copy of the volume’s current data. This
data is saved to the same or another local volume or disk. The Backup program then uses
the shadow copy to back up data, leaving the disk free to support users and the operating
system. When the backup is complete, the shadow copy is automatically deleted from the
local disk. For more information on VSS and Windows Server Backup, please refer to
Chapters 30 and 31, “Backing Up the Windows Server 2008 R2 Environment” and
“Recovering from a Disaster,” respectively. One important point is that in order for VSS
backups to work properly, shadow copies should be enabled on every volume and enough
free space should exist to store the shadow copies. Even if the schedule is set to once a
year, enabling shadow copies on the volume defines the shadow copies with the Volume
Shadow Copy provider and reduces VSS errors on backups.
1168
CHAPTER 28
File System Management and Fault Tolerance
Configuring Shadow Copies
Enabling shadow copies for a volume can be very simple. Administrators have more
options when it comes to recovering lost or deleted data and, in many cases, can entirely
avoid restoring data to disk from a backup tape device or tape library. In addition, select
users can be given the necessary rights to restore files that they’ve accidentally deleted.
The Volume Shadow Copy Service is already installed and is automatically available using
NTFS-formatted volumes.
To enable and configure shadow copies, follow these steps:
1. Log on to the Windows Server 2008 R2 system with an account with administrator
privileges.
2. Click Start, click All Programs, click Administrative Tools, and select Server Manager.
3. In the tree pane, double-click the Storage node, and select Disk Management.
4. In the tasks pane, scroll down to locate the desired volume, right-click the volume,
and select Properties.
5. Select the Shadow Copies tab, and in the Select a Volume section, click on the
desired volume, and click the Settings button.
ptg
6. The Settings page allows you to choose an alternate volume to store the shadow
copies. Select another volume to store the shadow copies in line with best practices
and set the storage space limit for the shadow copies. The default is usually set to
10% of the volume size; accepting the defaults is recommended.
7. After the location and maximum size are configured, click the Schedule button and
define the schedule. The defaults create a shadow copy at 7:00 a.m. and 12:00 p.m.,
but for this example, set up an additional shadow copy to run at 5:00 p.m., as
shown in Figure 28.29.
8. Click OK to close the Schedule window and click OK again to close the Volume
Shadow Copy Settings window. The shadow copy for the originally selected volume
is now enabled.
9. If necessary, select the next volume and enable shadow copying; otherwise, click the
Create Now button to create the initial shadow copy.
10. If necessary, select the next volume and immediately create a shadow copy by click-