Windows Server 2008 R2 Unleashed (209 page)
Read Windows Server 2008 R2 Unleashed Online
Authors: Noel Morimoto

Managing Computers with Domain Policies
1067
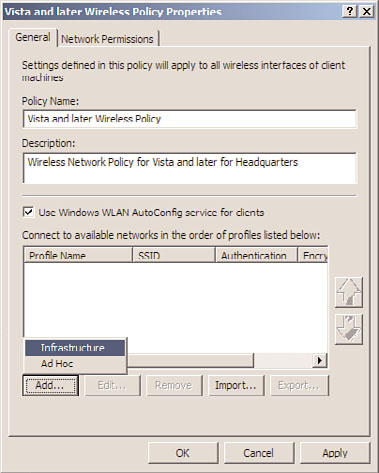
11. In the Wireless Network Profile section near the bottom of the window, click the
Add button to define a new wireless network, and click the Infrastructure link, as
shown in Figure 27.17.
ptg
FIGURE 27.17
Selecting to create a new infrastructure wireless network.
27
12. When the new profile opens, type in a descriptive name and in the Network Name(s)
SSID section, type in the SSID name of the network, and click the Add button.
13. If there is an existing “NEWSSID” network name, select it and click Remove.
14. If the client machine should automatically connect to this wireless network when
the network is within range, and if the SSID of the wireless network is not broad-
casted, check the Connect Even If the Network Is Not Broadcasting check box and
check the Connect Automatically When This Network Is in Range check box.
15. Select the Security tab and configure the security properties of the wireless network,
including the default authentication and encryption specifications. When finished,
click OK to close the profile window.
16. Back in the Wireless Network Policy window, select the Network Permissions tab.
From this tab, administrators can restrict the configuration. Click OK to close out of
the Vista and Later Wireless Policy Properties window.
17. Back in the Group Policy Management Editor window, close the GPO.
1068
CHAPTER 27
Group Policy Management for Network Clients
18. In the Group Policy Management Console, link the new WirelessPolicyGPO GPO to
an OU with a Windows Vista or later system that can be used to test the policy.
19. On the client workstation, after the group policy applies, in the Available Wireless
Network, the network matching the wireless profile name should be listed. Click on
this profile and if a security key is required, enter this key now. If a key is required, it
must be provided by an administrator as certain authentication and encryption
schemes in GPO wireless policies that require keys do not allow the keys to be
entered into the GPO.
20. After the testing is completed, configure security filtering and possibly also WMI fil-
tering to limit the application scope of the WirelessPolicyGPO policy and link it to
the desired organizational unit(s), domain, or site.
One important point to note is that for Windows to manage the wireless networks and
populate wireless profiles via Group Policy, the WLAN AutoConfig service needs to be
installed and started on Windows Vista and later operating systems.
Configuring Power Options Using Domain Policies
Using group policies to manage the power profiles on Windows systems is a feature that
has been missing and desired for many years. Starting with Windows Server 2008 R2,
Windows Vista and Windows 7 power plans can be defined and applied using domain
ptg
policies using computer preference settings. To configure a centrally managed power plan
for Windows Vista and later operating systems, perform the following steps:
1. Log on to a designated Windows Server 2008 R2 administrative server.
2. Click Start, click All Programs, click Administrative Tools, and select Group Policy
Management.
3. Add the necessary domains to the GPMC as required.
4. Expand the Domains node to reveal the Group Policy Objects container.
5. Create a new GPO called PowerProfileGPO and open it for editing.
6. After the PowerProfileGPO is opened for editing in the Group Policy Management
Editor, expand the Computer Configuration node and expand the Preferences node.
7. Expand the Control Panel Settings, right-click the Power Options node, and select
New – Power Plan (Windows Vista and Later).
8. On the Advanced Settings page, change the default action to Update, change the
default power plan from Balanced to High Performance, check the Set as the Active
Power Plan check box, and click OK to complete the settings. If desired, change any
of the default settings to other values.
9. Close the Group Policy Management Editor and link the policy in the Group Policy
Management Console to a test organizational unit.
10. Once the new policy passes validation testing, link it to a production organizational
unit as desired.
Managing Computers with Domain Policies
1069
Managing Scheduled Tasks and Immediate Tasks with Domain Policies
There are many times when Group Policy administrators would have liked to run an
application or a command on a remote machine without having to reboot or log on to
that particular system. For example, there might be a critical security or application
update that needs to be rolled out and executed immediately. Historically, this would
require a new group policy with a script or software package assigned and the machine
would need to be rebooted to run the script or install the application. Now with Windows
Server 2008 R2, this can be accomplished with the new Scheduled Task and Immediate
Task preference settings for both Windows XP and Windows Vista and later operating
systems. As an example of this that ties to the previous section on AppLocker, the policy
administrators can create a policy that sets the Application Identity service to Automatic
Startup mode, and they can create another policy that uses the computer Scheduled Task
Immediate Task preference to start the service by running the command Net Start
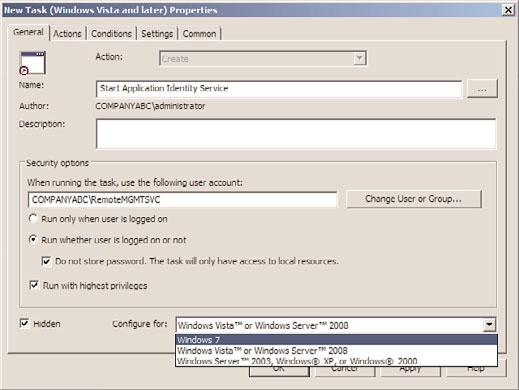
AppIDSvc. To create a Scheduled Task or Immediate Task preference setting for a computer,
create a new domain policy, open the policy for editing and navigate to the Computer
Configuration\Preferences\Control Panel\Scheduled Tasks node. Right-click on the node
and select New – Immediate Task (Windows Vista and Later). Configure and save the task
settings, as shown in Figure 27.18. Save the policy and test it out to verify it works as
desired, and then deploy it in production or recreate it as a starter GPO so that it can be
updated and reused as a template.
ptg
27
FIGURE 27.18
Defining a new Immediate Task preference setting for Windows 7 systems.
1070
CHAPTER 27
Group Policy Management for Network Clients
Group Policy enables administrators to define how the end-user experience and desktop
will be configured. Also, with user-based group policies, end users can be granted or
denied access to certain Windows applications and features and even can be limited from
reading or writing to removable media. Common user group policy configurations
include, but are not limited to, the following:
. Start menu configuration
. Restricting Control Panel and display settings
. Internet Explorer settings
. Software restrictions
. Microsoft Management Console restrictions
. Screensaver settings
. Mapping network drives
. Installing printers
. Creating desktop shortcuts
ptg
. Application-specific configurations, including customizing Microsoft Office if the
administrative templates are loaded and used in the policy
. Network configuration settings
. Folder redirection and offline file settings
Managing the user environment and desktop with group policies, for the most part, can
be used to configure the graphical user interface for the user and to impose security
restrictions to increase the reliability of the computer systems in use. In some cases, appli-
cation shortcuts can be added to the desktop and applets can be hidden from view in the
Control Panel or Start menu, but in more restrictive cases, they can be hidden and
restricted from execution. Many organizations would like the end-user desktop to be very
simple and present the end users with only the necessary applications relevant to their
job. Although this is an extreme case, it can be performed by configuring the settings
located in the User Configuration\Policies\Administrative Templates\Start Menu and
Taskbar Settings node. A more functional Start menu GPO extension can also be used to
manage the configuration of the Start menu for Windows XP, Windows Vista, and
Windows 7 by configuring settings located in the User Configuration\Preferences\Control
Panel Settings\Start Menu node.
Desktop security is also a very big concern for companies, now more than ever. One easy
configuration organizations can use to better secure end-user desktops is to implement a
password-locking screensaver. Automatic desktop locking with screensavers can be a very
handy configuration, but sales and remote users should be granted extended computer
idle time before a screensaver kicks in and locks the system in the middle of a sales
Managing Users with Policies
1071
presentation or a web-based meeting. Screensaver settings can be configured in the User
Configuration\Policies\Administrative Templates\Control Panel\Personalization Settings
node. To enable a password-protected screensaver with a blank screen screensaver that
works on every version of Windows, the following four settings must be configured:
.
Enable Screen Saver—
Enabled
.
Password Protect the Screen Saver—
Enabled
.
Force Specific Screen Saver—
Enabled “scrnsave.scr”
.
Screen Saver Time Out—
Enabled “900”, to go to screensaver after 15 minutes of
inactivity
Another of the biggest pain points for companies is being able to back up end-user data,
which, by default, is stored on the local drive of the computer system the user logs on to.
When users log on to multiple computers or Remote Desktop Services systems, administra-
tors can configure users with roaming profiles and/or specific Remote Desktop Services
profiles, which follow them between systems and are stored on server shares. This configu-
ration is set on the actual user object and is not necessarily a Group Policy setting.
Remote Desktop Services profiles are great for Remote Desktop Services systems, but imple-
menting roaming profiles for an entire company on every computer can introduce chal-
ptg
lenges because each time the user logs on to a system, the entire profile is copied to the
local computer and when the user logs off, the profile is copied back to the server. The
larger the profile gets, the longer it takes to copy the profile between the server shares and
the computer system. On Remote Desktop Services systems, it is very easy for administra-
tors to remotely log off and complete the copy of the profile back to the server share.
However, for end-user workstations, when roaming profiles get large, many users do not
27
wait for the profile copy to complete and manually shut down the system or unplug it
from the network. This, of course, can cause profile corruption and, even worse, data loss.
Group Policy settings can be used to mitigate these issues somewhat and restrict the data
that is included in the roaming profile. To improve Remote Desktop Services profile and
standard roaming profile performance, administrators can use Group Policy to redirect
user folders to server shares using folder redirection.
Configuring Folder Redirection
Folder redirection can be used to redirect certain special folders in the end user’s profile to
server shares. Special folders such as the Documents folder, which is the default folder for