The Cook's Illustrated Cookbook (328 page)
Read The Cook's Illustrated Cookbook Online
Authors: The Editors at America's Test Kitchen
Tags: #Cooking

![]() WHY THIS RECIPE WORKS
WHY THIS RECIPE WORKS
Pie dough often contains vegetable shortening, which makes the dough easier to handle and yields a crust that is remarkably flaky. But vegetable shortening crusts can lack flavor. We set out to create a basic pie dough that combined the right fat and the right proportion of fat to flour to give us a supremely tender and flaky crust that was also incredibly flavorful. When it comes to flavor, nothing beats butter. We experimented with a variety of combinations and ultimately settled on a proportion of 3 parts butter to 2 parts shortening as optimal for both flavor and texture. We also settled on a ratio of 2 parts flour to 1 part fat. We found that the 2:1 ratio produces dough that is easier to work and a baked crust that is more tender and flavorful than any other. While this pie dough can be made by hand, the food processor is faster and easier and does the best job of cutting the fat into the flour.
MAKES ENOUGH FOR ONE 9-INCH PIE
If you don’t have a food processor, see
“TEST KITCHEN TIP NO. 142 HAND MIXING PIE DOUGH”
.
2¹⁄ | cups (12¹⁄ |
2 | tablespoons sugar |
1 | teaspoon salt |
8 | tablespoons vegetable shortening, cut into ¹⁄ |
12 | tablespoons unsalted butter, cut into ¹⁄ |
6–8 | tablespoons ice water |
1.
Process flour, sugar, and salt together in food processor until combined, about 5 seconds. Scatter shortening over top and process until mixture resembles coarse cornmeal, about 10 seconds. Scatter butter over top and pulse mixture until it resembles coarse crumbs, about 10 pulses.
2.
Transfer mixture to large bowl. Sprinkle 6 tablespoons ice water over mixture. Stir and press dough together, using stiff rubber spatula, until dough sticks together. If dough does not come together, stir in remaining ice water, 1 tablespoon at time, until it does.
3.
Divide dough into 2 even pieces. Turn each piece of dough onto sheet of plastic wrap and flatten each into 4-inch disk. Wrap each piece tightly in plastic and refrigerate for 1 hour. Before rolling dough out, let it sit on counter to soften slightly, about 10 minutes. (Dough can be wrapped tightly in plastic and refrigerated for up to 2 days or frozen for up to 1 month. If frozen, let dough thaw completely on counter before rolling it out.)
HAND MIXING PIE DOUGH
While a food processor makes quick work of mixing pie dough, our
“ALL-BUTTER SINGLE-CRUST PIE DOUGH”
and Classic Pie Doughs can be mixed by hand. Here’s how:
Freeze butter in its stick form until very firm. Whisk flour, sugar, and salt together in a large bowl. Add chilled shortening, if using, and press it into the flour using a fork. Grate the frozen butter on the large holes of a box grater into the flour mixture, then cut the mixture together, using 2 butter or dinner knives, until the mixture resembles coarse crumbs. Add liquid as directed, stirring with a rubber spatula.
MAKES ENOUGH FOR ONE 9-INCH PIE
If you don’t have a food processor, see
“TEST KITCHEN TIP NO. 142 HAND MIXING PIE DOUGH”
. For more information on fitting pie dough, see
“FITTING PIE DOUGH”
.
1¹⁄ | cups (6¹⁄ |
1 | tablespoon sugar |
¹⁄ | teaspoon salt |
3 | tablespoons vegetable shortening, cut into ¹⁄ |
5 | tablespoons unsalted butter, cut into ¹⁄ |
4–6 | tablespoons ice water |
1.
Process flour, sugar, and salt together in food processor until combined, about 5 seconds. Scatter shortening over top and process until mixture resembles coarse cornmeal, about 10 seconds. Scatter butter over top and pulse mixture until it resembles coarse crumbs, about 10 pulses.
2.
Transfer mixture to medium bowl. Sprinkle 4 tablespoons ice water over mixture. Stir and press dough together, using stiff rubber spatula, until dough sticks together. If dough does not come together, stir in remaining ice water, 1 tablespoon at time, until it does.
3.
Turn dough onto sheet of plastic wrap and flatten into 4-inch disk. Wrap tightly in plastic and refrigerate for 1 hour. Before rolling dough out, let it sit on counter to soften slightly, about 10 minutes. (Dough can be wrapped tightly in plastic and refrigerated for up to 2 days or frozen for up to 1 month. If frozen, let dough thaw completely on counter before rolling it out.)
4.
Adjust oven rack to middle position and heat oven to 375 degrees. Roll dough into 12-inch circle on lightly floured counter. Loosely roll dough around rolling pin and gently unroll it onto 9-inch pie plate, letting excess dough hang over edge. Ease dough into plate by gently lifting edge of dough with one hand while pressing into plate bottom with other hand. Leave any dough that overhangs plate in place.
5.
Trim overhang to ¹⁄
2
inch beyond lip of pie plate. Tuck overhang under itself; folded edge should be flush with edge of pie plate. Crimp dough evenly around edge of pie using your fingers. Wrap dough-lined pie plate loosely in plastic and place in freezer until dough is fully chilled and firm, about 30 minutes, before using.
6.
Line chilled pie shell with double layer of aluminum foil, covering edges to prevent burning, and fill with pie weights.
7A. FOR A PARTIALLY BAKED CRUST:
Bake until pie dough looks dry and is light in color, 25 to 30 minutes. Transfer pie plate to wire rack and remove weights and foil. (Crust must still be warm when filling is added.)
7B. FOR A FULLY BAKED CRUST:
Bake until pie dough looks dry and is light in color, 25 to 30 minutes. Remove weights and foil and continue to bake crust until deep golden brown, 10 to 12 minutes longer. Transfer pie plate to wire rack and let crust cool completely, about 1 hour.
We like rolling our single-crust dough in fresh graham cracker crumbs because it adds flavor and crisp textural appeal to our custard pies.
Crush 3 whole graham crackers to fine crumbs. (You should have about ¹⁄
2
cup crumbs.) Dust counter with graham cracker crumbs instead of flour. Continue sprinkling dough with crumbs, both underneath and on top, as it is being rolled out.
![]() WHY THIS RECIPE WORKS
WHY THIS RECIPE WORKS
Saving time is always a good idea—just as long as you’re not sacrificing quality. But while store-bought graham cracker pie crusts are tempting (all you have to do is fill, chill, then serve), they taste stale and bland. We wanted a fresh-tasting homemade crust that wasn’t too sweet, with a crisp texture. Turns out, a classic graham cracker crust couldn’t be easier to make: combine crushed crumbs with a little butter and sugar to bind them, then use a measuring cup to pack the crumbs into the pie plate. And producing a perfect graham cracker crust has a lot to do with the type of graham crackers used. After experimenting with the three leading brands, we discovered subtle but distinct differences among them and found that these differences carried over into crumb crusts made with each kind of cracker. In the end, we preferred Keebler Grahams Crackers Original in our crust.
See “MAKING A GRAHAM CRACKER OR COOKIE CRUST” illustration that follows recipe.
MAKES ENOUGH FOR ONE 9-INCH PIE
We don’t recommend using store-bought graham cracker crumbs here as they can often be stale. Be sure to note whether the crust needs to be warm or cool before filling (the pie recipes will specify) and plan accordingly.
8 | whole graham crackers, broken into 1-inch pieces |
5 | tablespoons unsalted butter, melted and cooled |
3 | tablespoons sugar |
1.
Adjust oven rack to middle position and heat oven to 325 degrees. Process graham cracker pieces in food processor to fine, even crumbs, about 30 seconds. Sprinkle melted butter and sugar over crumbs and pulse to incorporate, about 5 pulses.
2.
Sprinkle mixture into 9-inch pie plate. Using bottom of measuring cup, press crumbs into even layer on bottom and sides of pie plate. Bake until crust is fragrant and beginning to brown, 13 to 18 minutes; transfer to wire rack. Following particular pie recipe, use crust while it is still warm or let it cool completely.
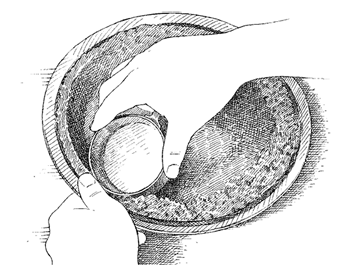
Press crumb mixture into pie plate. Use thumb and measuring cup to square off top edge of crust.
![]() WHY THIS RECIPE WORKS
WHY THIS RECIPE WORKS
In the test kitchen, we have found that it’s difficult to produce an apple pie with a filling that is tart as well as sweet and juicy. We wanted to develop a recipe for classic apple pie—one with the clean, bright taste of apples that could be made year-round, based on apple varieties that are always available in the supermarket. To arrive at the tartness and texture we were after, we had to use two kinds of apples in our pie, Granny Smith and McIntosh. The Grannies could be counted on for tartness and for keeping their shape during cooking; the Macs added flavor, and their otherwise frustrating tendency to become mushy was a virtue, providing a nice, juicy base for the harder Grannies. While many bakers add butter to their apple pie fillings, we found that it dulled the fresh taste of the apples and so did without it. Lemon juice, however, was essential, counterbalancing the sweetness of the apples. To give the apples the upper hand, we settled on modest amounts of cinnamon, nutmeg, and allspice.
See “ASSEMBLING DOUBLE-CRUST PIES” illustrations that follow recipe.