The Cook's Illustrated Cookbook (260 page)
Read The Cook's Illustrated Cookbook Online
Authors: The Editors at America's Test Kitchen
Tags: #Cooking

WHEN BAKING POWDER LOSES ITS PUNCH
Over time, baking powder (which includes baking soda, acid, salt, and cornstarch), loses its ability to produce carbon dioxide and give baked goods their lift—sooner than many producers claim. We compared biscuits made with cans that had been opened and stored 1 month all the way up to a year. The rise of the biscuits began to decline to half the height of fresh at the 10-month mark. For best results, replace your baking powder (and soda) every 6 months.
![]() WHY THIS RECIPE WORKS
WHY THIS RECIPE WORKS
Truly flaky biscuits have become scarce, while their down-market imitators (think supermarket “tube” biscuits) are alarmingly common. We wanted to achieve a really flaky—not fluffy—biscuit, with a golden, crisp crust surrounding striated layers of tender, buttery dough. While ingredients (lard versus butter, buttermilk versus milk, and so on) influence texture and flavor, we discovered that the secret to the fluffy/flaky distinction is how the ingredients are handled: flaky butter equals flaky biscuits. To get “flaky” butter, we abandoned the food processor and worked thin slices into the flour by hand. Next, we rolled and folded the dough to flatten the butter into thin sheets sandwiched between equally thin layers of flour (as with puff pastry). In the oven, the butter melted and steam filled the thin spaces left behind, creating the flaky layers. Once we further tenderized the recipe by swapping a little shortening for some of the butter and softened the impact of the buttermilk with a little baking soda, we had an ultra-flaky biscuit with rich flavor.
See “GIVING FLAKY BISCUITS THE LAYERED LOOK” illustrations that follow recipe.
MAKES 12 BISCUITS
The dough is a bit sticky when it comes together and during the first set of turns. Note that you will use up to 1 cup of flour for dusting the work surface, dough, and rolling pin to prevent sticking. Be careful not to incorporate large pockets of flour into the dough when folding it over. When cutting the biscuits, press down with firm, even pressure; do not twist the cutter.
2¹⁄ | cups (12¹⁄ |
1 | tablespoon baking powder |
¹⁄ | teaspoon baking soda |
1 | teaspoon salt |
2 | tablespoons vegetable shortening, cut into ¹⁄ |
8 | tablespoons unsalted butter, chilled, lightly floured, and cut into ¹⁄ |
1¹⁄ | cups buttermilk, chilled |
1.
Adjust oven rack to lower-middle position and heat oven to 450 degrees. Whisk the flour, baking powder, baking soda, and salt in large bowl.
2.
Add shortening to flour mixture; break up chunks with fingertips until only small, pea-size pieces remain. Working with a few butter slices at a time, drop butter slices into flour mixture and toss to coat. Pick up each slice of butter and press between well-floured fingertips into flat, nickel-size pieces. Repeat until all butter is incorporated, then toss to combine. Freeze mixture (in bowl) until chilled, about 15 minutes, or refrigerate for about 30 minutes.
3.
Spray 24-inch-square area of counter with vegetable oil spray; spread spray evenly across surface with clean kitchen towel or paper towel. Sprinkle ¹⁄
3
cup flour across sprayed area, then gently spread flour across work surface with palm to form thin, even coating. Add 1 cup plus 2 tablespoons buttermilk to flour mixture. Stir briskly with fork until ball forms and no dry bits of flour are visible, adding remaining 2 tablespoons buttermilk as needed (dough will be sticky and shaggy but should clear sides of bowl). With rubber spatula, transfer dough onto center of prepared counter, dust surface lightly with flour, and, with floured hands, bring dough together into cohesive ball.
4.
Pat dough into approximate 10-inch square, then roll into 18 by 14-inch rectangle about ¹⁄
4
inch thick, dusting dough and rolling pin with flour as needed. Use bench scraper or thin metal spatula to fold dough into thirds, brushing any excess flour from surface of dough. Lift short end of dough and fold in thirds again to form approximate 6 by 4-inch rectangle. Rotate dough 90 degrees, dusting counter underneath with flour, then roll and fold dough again, dusting with flour as needed.
5.
Roll dough into 10-inch square about ¹⁄
2
inch thick. Flip dough over and cut nine 3-inch rounds with floured 3-inch biscuit cutter, dipping cutter back into flour after each cut. Carefully invert and transfer rounds to ungreased baking sheet, spacing them 1 inch apart. Gather dough scraps into ball and roll and fold once or twice until scraps form smooth dough. Roll dough into ¹⁄
2
-inch-thick round and cut 3 more 3-inch rounds and transfer to baking sheet. Discard excess dough.
6.
Brush biscuit tops with melted butter. Bake, without opening oven door, until tops are golden brown and crisp, 15 to 17 minutes. Let cool on baking sheet for 5 to 10 minutes before serving.
Add ¹⁄
4
cup finely grated Parmesan cheese, ¹⁄
4
teaspoon pepper, and ¹⁄
8
teaspoon cayenne pepper to flour mixture in step 1. Sprinkle dough rounds with another ¹⁄
4
cup finely grated Parmesan after brushing with melted butter in step 6.

MAKING THIN PIECES OF BUTTER
1.
After coating butter with flour to prevent sticking, cut butter into ¹⁄
8
-inch-thick slices.

2.
Pinch butter between floured fingertips into flat, nickel-size pieces.

FOLDING AND TURNING THE DOUGH
1.
After mixing, patting, and rolling dough, use bench scraper to fold dough into thirds.
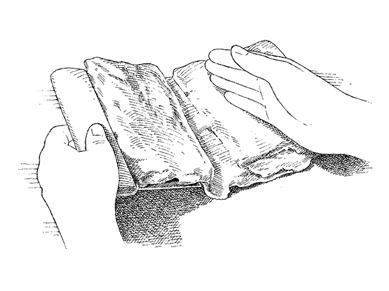
2.
Fold dough into thirds again, rotate it 90 degrees, roll out and repeat folding and turning.
![]() WHY THIS RECIPE WORKS
WHY THIS RECIPE WORKS
More often berries weigh down scones and impart little flavor. Starting with traditional scone recipes, we increased the amounts of sugar and butter to add sweetness and richness; a combination of whole milk and sour cream lent more richness as well as tang. To lighten our scones, we borrowed a technique from puff pastry, where the dough is turned, rolled, and folded multiple times to create layers that are forced apart by steam when baked. To ensure that the butter would stay as cold and solid as possible while baking, we froze it and grated it into the dry ingredients using a box grater. Adding the blueberries to the dry ingredients meant they got mashed when we mixed the dough, but when we added them to the already-mixed dough, we ruined our pockets of butter. The solution was pressing the berries into the dough, rolling the dough into a log, then pressing the log into a rectangle and cutting the scones.
See “FOLDING AND SHAPING BLUEBERRY SCONES” illustrations that follow recipe.
MAKES 8 SCONES
It is important to work the dough as little as possible—work quickly and knead and fold the dough only the number of times called for or else the scones will turn out tough, rather than tender. The butter should be frozen solid before grating. In hot or humid environments, chill the flour mixture and mixing bowls before use. While this recipe calls for 2 whole sticks of butter, only 10 tablespoons are actually used (see step 1). If fresh berries are unavailable, an equal amount of frozen berries, not thawed, can be substituted. An equal amount of raspberries, blackberries, or strawberries can be used in place of the blueberries. Cut larger berries into ¹⁄
4
- to ¹⁄
2
-inch pieces before incorporating. Serve with Homemade Clotted Cream (recipe follows), if desired.
16 | tablespoons unsalted butter (2 sticks), each stick frozen |
7¹⁄ | ounces (1¹⁄ |
¹⁄ | cup whole milk |
¹⁄ | cup sour cream |
2 | cups (10 ounces) all-purpose flour |
¹⁄ | cup (3¹⁄ |
2 | teaspoons baking powder |
¹⁄ | teaspoon baking soda |
¹⁄ | teaspoon salt |
1 | teaspoon grated lemon zest |
1.
Adjust oven rack to middle position and heat oven to 425 degrees. Line baking sheet with parchment paper. Remove half of wrapper from each stick of frozen butter. Grate unwrapped ends (half of each stick) on large holes of box grater (you should grate total of 8 tablespoons). Place grated butter in freezer until needed. Melt 2 tablespoons of remaining ungrated butter and set aside. Save remaining 6 tablespoons butter for another use. Place blueberries in freezer until needed.
2.
Whisk milk and sour cream together in medium bowl; refrigerate until needed. Whisk flour, ¹⁄
2
cup sugar, baking powder, baking soda, salt, and lemon zest in medium bowl. Add frozen grated butter to flour mixture and toss with fingers until butter is thoroughly coated.
3.
Add milk mixture to flour mixture and fold with rubber spatula until just combined. Using spatula, transfer dough to liberally floured counter. Dust surface of dough with flour and with floured hands, knead dough 6 to 8 times, until it just holds together in ragged ball, adding flour as needed to prevent sticking.
4.
Roll dough into approximate 12-inch square. Fold dough into thirds like a business letter, using bench scraper or metal spatula to release dough if it sticks to counter. Lift short ends of dough and fold into thirds again to form approximate 4-inch square. Transfer dough to plate lightly dusted with flour and chill in freezer 5 minutes.
5.
Transfer dough to floured counter and roll into approximate 12-inch square again. Sprinkle blueberries evenly over surface of dough, then press down so they are slightly embedded in dough. Using bench scraper or thin metal spatula, loosen dough from counter. Roll dough into cylinder, pressing to form tight log. Arrange log seam side down and press into 12 by 4-inch rectangle. Using sharp, floured knife, cut rectangle crosswise into 4 equal rectangles. Cut each rectangle diagonally to form 2 triangles and transfer to prepared baking sheet.
6.
Brush tops with melted butter and sprinkle with remaining 1 tablespoon sugar. Bake until tops and bottoms are golden brown, 18 to 25 minutes. Transfer to wire rack and let cool for at least 10 minutes before serving.
TO MAKE AHEAD:
After placing scones on baking sheet in step 5, either refrigerate them overnight or freeze for up to 1 month. When ready to bake, for refrigerated scones, heat oven to 425 degrees and follow directions in step 6. For frozen scones, do not thaw, heat oven to 375 degrees and follow directions in step 6, extending cooking time to 25 to 30 minutes.