The Café Spice Cookbook: 84 Quick and Easy Indian Recipes for Everyday Meals (3 page)
Read The Café Spice Cookbook: 84 Quick and Easy Indian Recipes for Everyday Meals Online
Authors: Hari Nayak
Tags: #Cookbooks; Food & Wine, #Cooking by Ingredient, #Herbs; Spices & Condiments, #Quick & Easy, #Regional & International, #Asian, #Indian

SAUTÉING (
BHUNAO
)
Unlike classic French sautéing, Indian sautéing, or
bhunao
, is a combination of sautéing, stir-frying, and light stewing. It is the process of cooking over medium to high heat, adding small quantities of liquid, such as water or tomato purée, and stirring constantly to prevent the ingredients from sticking. Almost every Indian recipe needs bhunao at some stage, and some at more than one stage. Generally, ingredients like onions, ginger, garlic, tomatoes, and spices require bhunao. The purpose of this technique is to extract the flavor of each of the ingredients in combination with spices, as well as to ensure that the
masala
(spice mix) is fully cooked before adding the main ingredient. Sometimes a main ingredient such as poultry, meats, or vegetables may also require bhunao. The process of making masala is complete only when the fat leaves the masala—very critical step in Indian cooking. Traditionally a kadhai is used for this technique. I find that a heavy-bottomed saucepan or another deep-sided pan, such as a braiser or Dutch oven, works just as well. Recipes such as Curried Chicken Meatball (page
100
), Easy Lamb Curry (page
101
) and Chicken Tikka Masala (page
97
) are good examples of this technique.
STEAMING (
DUM
)
Dum
cooking has been described as the “maturing of a dish.” In this technique, food is very slowly cooked in its own steam. Traditionally, the lid was sealed to the cooking vessel with a flour-and-water paste to make sure moisture was trapped within. The vessel was slightly buried in hot coals and, to ensure the food was evenly surrounded by heat, some hot coals were placed on the lid. Today, the modern oven provides even heat. The dish is first cooked on a stove top and then well-sealed and placed in the oven to continue to cook in its own steam. The advantage of dum cooking is that since the vapors cannot escape, the food retains all its delicate flavor and aroma. One of the most common and popular dishes prepared using this technique is the famous rice dish, called
biriyani
.
TEMPERING (
TARHKA
)
This technique is unique to Indian cooking. Oil is heated until very hot and a mixture of whole spices with or without chopped garlic and ginger is added. Hot oil has an extraordinary ability to extract and retain the essence, aroma, and the flavor of spices and herbs. This process is performed either at the beginning of cooking or after the dish is finished. If done after a dish is cooked, the prepared tempering is poured sizzling hot over the dish to add a burst of flavor (this technique is sometimes done when preparing dals). The seasonings that are most commonly used for tempering include cumin seeds, black mustard seeds, fennel seeds, dried red chilies, cloves, cinnamon, cardamom, and bay leaves as well as chopped up ginger, garlic, and fresh or dried curry leaves. The ingredients are usually added in rapid succession, rarely together. The purpose of adding tempering ingredients sequentially is to ensure that each ingredient is fully cooked, and thus its flavor fully extracted into the oil before the next ingredient is added. This method also allows for longer-cooking ingredients or spices to be added first, and shorter-cooking ingredients or spices last, to prevent their burning. The crackling of the spices or a change in their color indicates that the process is complete, unless fresh herbs and vegetables are also being used. A few of the many recipes in this book that use this technique of tempering are South Indian Cabbage Slaw (page
33
), Green Pea Relish (page
30
), South Indian Lentils and Vegetables (page
56
), Coconut Rice (page
112
) and Lemon Rice with Peanuts (page
114
).
Some Helpful Tools and Tips
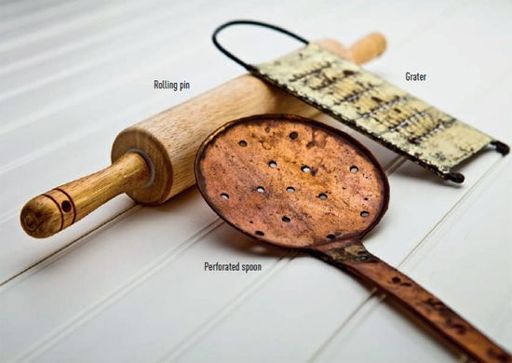
You do not need special kitchen tools or cookware to cook authentic Indian food at home. All you need is a well-equipped kitchen with sturdy skillets, pots and pans with lids, tongs, good knives, graters, mixing bowls, a rolling pin, a perforated spoon, a sieve, a strainer, and a citrus squeezer. I like to use an Indian spice box to hold my most frequently used spices and spice blends: Café Spice Garam Masala (page
22
), cumin seeds, mustard seeds, Asian red chili powder, or cayenne pepper, and turmeric. The box sits on my kitchen counter where I can quickly grab a pinch of spice when needed. I generally use nonstick pots, saucepans, and skillets when cooking Indian food at home because of the relatively long cooking time. Some ingredients, such as spices, onions, ginger, garlic, and tomatoes—which are typically cooked in small quantities of liquid or fat—tend to stick to conventional pans. To prevent sticking if you have regular pots and pans, make sure they are heavy-bottomed and sturdy, stir the food frequently, and add more cooking oil as needed. The following additional tools are not crucial, but they will make cooking Indian food a lot simpler and quicker.

BLENDER
When it comes to combining liquids with fresh herbs or spices for sauces, pastes, or purées, there is nothing more effective than a blender. Unlike a blender with a broad base that is ideal for blended drinks, one with a narrow, tapered base (or basically straight sides) works well to purée thick sauces and pastes. I also use it to grind large amount of whole spices. I discovered how surprisingly well a blender works when I made large quantities of my Café Spice Garam Masala (page
22
) to give as gifts for family and friends. I prefer a glass blender, because plastic absorbs aromas from the spices and herbs. I also have a hand-held blender, also known as an immersion blender or “smart stick,” that I use to purée vegetables, lentils, or beans. It is ideal for preparing puréed soups or dals, such as Green Pea Soup (page
50
) or Cauliflower and Curry Soup (page
54
), because you can purée the food directly in the pan. You need not wait for the liquid to cool, which is advisable when transferring hot liquid to a blender, and it saves you the task of cleaning up a messy blender.

ELECTRIC FOOD PROCESSOR
The traditional grinding stone of Indian kitchens, which is heavy and labor intensive, is now replaced with the modern food processor—a time-saving tool par excellence for busy cooks. Essential ingredients like onion, chili peppers, garlic, and ginger can be made into pastes very quickly in these electrically powered machines. The food processor can be used to chop or mince vegetables and fresh herbs, cutting down considerably on prep time. I recommend a food processor that has a capacity of 7 to 10 cups. To pulverize small quantities of ingredients, make sure the blades sit close to the bottom. However, when chopping very small amounts of fresh garlic, onions, chili peppers, or ginger, a chef’s knife is more practical.
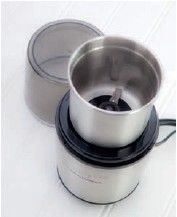
ELECTRIC SPICE GRINDER OR COFFEE GRINDER
I highly recommend investing in a spice or coffee grinder. It is one of the most important tools that you will use in Indian cooking. I use it to coarsely or finely grind dry whole spices. It works in seconds, and cleanup—not always necessary after each spice—is very simple. I personally use the Cuisinart Spice and Nut Grinder, which is available for under $40. The ability of electric coffee grinders to grind coffee beans also makes them ideally suited for a wide range of spices, such as cumin seeds, cinnamon sticks (broken up), cardamom, and bay leaves. They can grind as little as a teaspoon to as much as half a cup. For larger volumes of whole spices, a blender works surprisingly well. I strongly recommend that you invest in a spice grinder or coffee grinder as it will make your cooking process very simple and the results very flavorful. If do you use a coffee grinder, reserve it for spices only; otherwise, you will end up with cumin-flavored coffee.
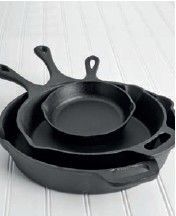
CAST-IRON SKILLETS AND GRIDDLES
Small cast-iron skillets are ideal for dry roasting spices because they brown them evenly without the need to add any cooking fat or liquid. Always preheat your cast-iron pan before frying in it. A large cast-iron skillet or griddle is excellent for making Indian flatbreads such as Whole Wheat Griddle Bread (page
122
). Traditionally, these breads are cooked in a
tava
, a round, concave, cast-iron griddle that is available in South Asian grocery stores. New cast-iron pans should be seasoned before use. To season a cast-iron pan, rub a relatively thin coat of neutral oil all around the inside of the pan. Place the cast-iron pan upside-down in a cold oven with a sheet of aluminum foil on the bottom to catch any drips. Set the oven to 300°–400°F (150°–200°C) and let the pan heat for 30–60 minutes. Once done, let the pan cool to room temperature. Repeating this process several times is recommended. Never put cold liquid into a very hot cast-iron pan; doing so might crack and damage the pan. Cast iron is a great alternative to nonstick cooking surfaces. Cast iron can be pre-heated to temperatures that will brown meat and will withstand oven temperatures well above what is considered safe for nonstick pans. You can cook almost any food in cast-iron cookware. It is a natural nonstick surface, and if your pan is seasoned correctly, food will not stick to it.