Read Oxford Handbook of Midwifery Online
Authors: Janet Medforth,Sue Battersby,Maggie Evans,Beverley Marsh,Angela Walker
Oxford Handbook of Midwifery (70 page)

- Ensure the woman is in a comfortable position. To minimize the risk of deep vein thrombosis, do not put the woman into the lithotomy
position for suturing until all preparations are in hand to commence the procedure.
- Make the environment as comfortable as possible. The mother may like to cuddle and hold her baby throughout the procedure or even breastfeed. Ensure that she is not alone—ideally she should have her partner close by to comfort and distract her.
- Give a full explanation of the trauma, what her options may be and what the procedure involves. Reassure and relieve any anxieties she may have.
- Assess the woman’s general and obstetric condition. Ensure that the uterus is well contracted, her lochia is not excessive, and her vital signs are stable.
- Gather requirements for the procedure—a perineal sterile pack, local anaesthesia, suture materials, syringes and needles, sanitary towel, incontinence pad, and sterile gloves.
Procedure
- Ideally the wound should be sutured as soon as possible following birth. A good directional light over the perineum is essential,
but dimmed lights otherwise may help to create a more relaxed environment.
- Assist the woman into the lithotomy position to ensure a clear view of the perineum. Other positions of comfort may need to be explored if the woman finds this uncomfortable.
- Prepare the trolley and sterile field.
- The midwife then scrubs to prepare for aseptic technique.
- The wound is cleaned with warm antiseptic solution.
- The woman is draped with sterile towels to ensure a clean sterile field.
- Inspect the perineum to assess damage and whether you can carry out the repair. If there is any doubt an obstetrician or doctor experienced in perineal repair should be called for.
- Analgesia: prior to the procedure adequate analgesia is crucial:
- Infiltration of the wound with 1% lidocaine—up to 20mL maximum dose within an hour and inclusive of the amount used for infiltration prior to episiotomy.
- Epidural if
in situ
can be topped up to provide analgesia for theprocedure.

- Additionally the woman may like to use inhalational analgesia to
assist if she is anxious.
- Infiltration of the wound with 1% lidocaine—up to 20mL maximum dose within an hour and inclusive of the amount used for infiltration prior to episiotomy.
- Infiltration: the whole of the area to be sutured should be infiltrated.
- The needle should be inserted into the wound at the fourchette, passing superficially up the vagina; withdraw the plunger to ensure
CHAPTER 15
Normal labour: third stage296
the needle is not in a blood vessel, then infiltrate as the needle is slowly withdrawn.
- Using the same site of entry pass the needle into the perineal body and infiltrate. The perineal skin is then infiltrated in the same way.
- While waiting for the anaesthesia to take effect, you can check that you have everything ready for the repair and ensure the woman is comfortable and warm.
- Suturing: repair is usually undertaken in three layers, this ensures that the repair is performed in a logical way and nothing is missed (Fig. 15.1). The layers are the vaginal epithelium, the perineal muscle, and the perineal skin. Care should be taken to align the edges of the
tissues as accurately as possible throughout the repair, to ensure a neat symmetrical result. Sutures should not be pulled too tight as oedema and bruising to the site will cause pain and slow healing.
- A taped vaginal tampon should be inserted into the vault of the vagina prior to the procedure to prevent blood oozing from the uterus obscuring the operator’s view. The tape of the tampon should be secured to the draped towels with a pair of forceps, so that it is removed following the procedure. On no account should loose cotton wool or gauze be used.
- A taped vaginal tampon should be inserted into the vault of the vagina prior to the procedure to prevent blood oozing from the uterus obscuring the operator’s view. The tape of the tampon should be secured to the draped towels with a pair of forceps, so that it is removed following the procedure. On no account should loose cotton wool or gauze be used.
- Suturing: repair is usually undertaken in three layers, this ensures that the repair is performed in a logical way and nothing is missed (Fig. 15.1). The layers are the vaginal epithelium, the perineal muscle, and the perineal skin. Care should be taken to align the edges of the
- Using the same site of entry pass the needle into the perineal body and infiltrate. The perineal skin is then infiltrated in the same way.
- The needle should be inserted into the wound at the fourchette, passing superficially up the vagina; withdraw the plunger to ensure
- Absorbable suture material usually recommended is polyglycolic acid (Dexon), polyglactin 910 (Vicryl) or Vicryl Rapide, dependent on local provision.
- Vaginal epithelium: identify the apex of the tear/episiotomy and secure the first suture, not going too deep as the rectum is in close proximity. Proceed using a continuous locking stitch, becoming a little deeper nearing the fourchette. Ensure good approximation of the edges and secure with a knot at the fourchette.
- Perineal muscle: interrupted sutures (Fig. 15.1b) are used to achieve haemostasis and reduce dead space, thus helping to prevent haematoma formation. Identify the torn edges of the muscles and feel with the fingertips to judge the depth of suturing required. The first sutures are put into the deep tissues to bring the perineal body together, more sutures may be placed more superficially to bring the skin edges together (Fig. 15.1c).
- Perineal skin: the perineal skin edges should be almost together at this stage. Various techniques may be used to aid healing; interrupted transcutaneous sutures, apposing the superficial
edges and allowing natural healing and more commonly the use of continuous subcuticular sutures (Fig. 15.1d).
- There is some debate regarding non-suturing of perineal skin—a large trial found no significant differences between sutured and non- sutured groups of women with regard to short-term pain.
1 • Alternatively, a continuous method of suturing may be used for all layers (Fig. 15.1a).
 - On completion of the suturing the tampon should be removed and the vagina inspected to ensure there are no bleeding points. The vagina and introitus should admit two fingers.
- Absorbable suture material usually recommended is polyglycolic acid (Dexon), polyglactin 910 (Vicryl) or Vicryl Rapide, dependent on local provision.
ASSESSING AND REPAIRING THE PERINEUM
297
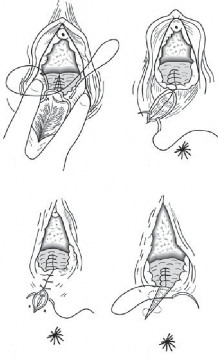
- Continuous suture to vaginal wall
- 3-4 interrupted sutures to fascia and muscle of perineum
- Interrupted sutures to the skin (d) Subcuticular skin suture
Fig. 15.1
Repairing an episiotomy.
- Cleanse and dry the perineal area. A rectal examination should be performed to exclude the presence of sutures. If sutures are found, medical aid should be sought as the sutures will need to be removed and re-suturing performed as soon as possible.
- Place a sanitary towel over the area, remove the drapes and assist the woman into a more comfortable position.
- Offer analgesia.
- Make sure that all needles and swabs are accounted for.
- Explain to the woman that the sutures will dissolve and not require
 removal. She may find pieces of suture coming from the vagina.
 - Record and sign the perineal repair section in the patient notes.
1
Gordon B, Mackrodt C, Fern E,
et al
. (1998). The Ipswich Childbirth Study: 1. A randomized evaluation of two stage postpartum perineal repair leaving the skin unsutured.
British Journal of Obstetrics and Gynaecology
105
, 435–40.CHAPTER 15
Normal labour: third stage298
Examining the placenta and membranes
Appearance of full-term placenta
The placenta is approximately 18–20cm in diameter, about 2.5cm thick in the centre and progressively thinner towards the outer edges. It is round or oval in shape and weighs approximately one-sixth of the weight of the fetus. It has two surfaces—the fetal and the maternal.
The maternal surface is deep red in colour and attached to the uterine decidua, it is indented with deep grooves, or sulci, into 15–20 lobes, known as cotyledons. The fetal surface lies to one side of the fetus and is attached by the umbilical cord. From the insertion of the cord at the placental site, blood vessels radiate to the periphery, forming subdivisions of the blood vessels that burrow into the substance of the placenta. Each cotyledon has its own branch of the umbilical artery and vein. The surface is covered with the amnion.
Examination
- Examine the placenta and membranes as soon as possible after birth to detect any abnormalities that may have a direct influence on the neonate or provide information about intrapartum events.
- Wear protective clothing and gloves.
- Wash the placenta in running water to remove any clots. Retain the clots to estimate maternal blood loss.
- Hold the placenta firmly by the cord to check that the membranes are complete—there should just be one hole through which the fetus has passed.
- Separate the amnion from the chorion to ensure that both membranes are present.
- Turn the placenta over with the fetal surface resting on the hand, and with the membranes hanging down. Carefully examine the maternal surface to see whether all the lobes are complete, there should be no spaces or ragged areas.
- Note any areas of infarction on the lobes, recognized as firm, fibrous whitish patches. Gritty areas may also be seen.
- Check the edge of the placenta for signs of the blood vessels permeating the membranes, which may be indicative of a succenturiate lobe.
- Occasionally one vessel is seen that tracks its way back into the placenta—this is known as an erratic vessel.
- Examine the umbilical cord carefully, noting its insertion into the placenta; the length, the number of vessels, and any abnormalities.
 •
•
Usually the cord is inserted centrally into the placenta and is about 50cm long and 2cm thick, covered in a jelly-like substance known asWharton’s jelly. There should be one large umbilical vein and two umbilical arteries. Occasionally only one artery may be detected, this may be indicative of fetal abnormality and the baby should be examined thoroughly by a paediatrician.
EXAMINING THE PLACENTA AND MEMBRANES
299
- Examine the placenta and membranes as soon as possible after birth to detect any abnormalities that may have a direct influence on the neonate or provide information about intrapartum events.
- Measure blood loss as accurately as possible, including the loss that may have soaked into bed linen and pads.
- Record all findings in the maternal notes.
Abnormalities of the placenta and umbilical cord
- Succenturiate lobe
: a small accessory placenta that has developed away from the main body of the placenta and is attached by blood vessels permeating the membranes. If blood vessels are detected leading toa tear in the membranes at the distal end, this would indicate that the missing cotyledon has been retained in the uterus. Consequently, cautions regarding blood loss and the passage of the products of conception need to be recorded in the woman’s notes and explained to the mother. A doctor also needs to be informed of these findings.
- Bipartite placenta
: the placenta is divided into two distinct lobes. - Circumvallate placenta
: the chorion, instead of being attached to the edge of the placenta, forms on the fetal surface, some distance from the edge of the placenta. - Placenta accreta
: the placenta is abnormally adherent to the uterine muscle surface, either partially or totally. Although extremely rare, there appears to be increased risk associated with repeated surgical procedures involving the uterus, such as myomectomy, caesarean section, and termination of pregnancy. - Infarctions
: these are red, or more commonly white, patches detected on the maternal surface, due to localized death of placental tissue. They may be seen occasionally in most placenta, but when found in substantial amounts they are often associated with pre-eclampsia. - Calcification
: small, whitish-grey areas that have a gritty feeling are lime salt deposits. They may be more noticeable in the postmature placenta. - The umbilical cord may be either too short (causing delay in delivery) or too long, predisposing to prolapse of the cord. Occasionally it may be excessively thin or thick, in either case extra vigilance is required when clamping the cord and observing for haemorrhage.
- Knots in the umbilical cord are caused by fetal movements prior to birth, whereby the fetus is able to slip through a loop of cord. These ‘true’ knots may cause tightening of the cord during labour, depending on the location of the knot along the length of the cord. ‘False’ knots are formed by the blood vessels being longer than the cord itself, thus doubling back in the Wharton’s jelly, or a similar appearance may occur due to the formation of irregularities and nodes.
Other books
Condoned (Beauty And The Billionaire Geek Book 3) by Griffin, E.E.
Recovery (Doctor Dom Volume 5) (A BDSM & Medical Play Novella) by Tara Crescent
The Dark Pearl Chronicles 1.1: Battle of the Half-Brothers by Donaldson, Levi
Madness Under the Royal Palms by Laurence Leamer
Just Friends by Robyn Sisman
Brotherhood of the Wolf by David Farland
cosas por las que llorar cien veces by Kou Nakamura
Small Town Girl by Brooks, Gemma
The Last Queen of Lemuria by Gloria Mur
The Collected Stories by Grace Paley
