OS X Mountain Lion Pocket Guide (25 page)
Read OS X Mountain Lion Pocket Guide Online
Authors: Chris Seibold
Tags: #COMPUTERS / Operating Systems / Macintosh

When you first boot a new Mac and set up a user, the system is
configured to automatically log in that user. That’s probably fine if you’re
the only person who uses that computer, but not so great if your Mac is
sitting out where a lot of people have access to it. You’ll want to
customize your security settings to fit the environment where you’ll be
using your Mac. If it’s a desktop machine and you’ll be using it only at
home, for example, you probably don’t have much to worry about. But if it’s
a MacBook that you plan on hauling everywhere you go, you’ll want a little
more security.
See
Logging In
to find out how to disable
automatic login, and see
Logging Out, Sleeping, and Shutting Down
to customize your
logout options.
Security in OS X usually comes down to passwords: passwords for
services, accounts, websites, and email. Once you’ve created all those pesky
but necessary passwords, you’ll want to turn your attention to managing
them.
To manage all your passwords, Mountain Lion uses keychains;
they’re where it stores your passwords and certificates to keep them safe
from prying eyes. These keychains save you a lot of time, because your Mac
can use the stored passwords to do a variety of useful things, like
joining your wireless network without any help from you.
The more you do online, the more passwords you need. Ideally, you
want different passwords for everything; using the same password for your
bank’s website and for posting to a third-rate message board isn’t the
best idea. However, with so many passwords running around, it is easy to
forget them. We’ve all been faced with the situation where we were
sure
we typed in the right password, only to be
repeatedly denied access. Fortunately, OS X can help.
So you’ve forgotten the password to some rarely visited
yet essential server or some network you join only every six months.
Turns out Mountain Lion probably remembered the password
for
you because chances are good that when you
first entered the password, Mountain Lion asked if you wanted it to save
the password, you chose Yes. (The three options are Yes, Never, and Not
Now; since Yes is the default, that’s the option most people choose.) To
recover the password, open Keychain Access (Applications
→
Utilities
→
Keychain Access) and then type the name of the
site or application, or something else relevant into the program’s
search box. Keychain Access will find entries that match your search
criteria and present you with a list like the one in
Figure 7-1
.
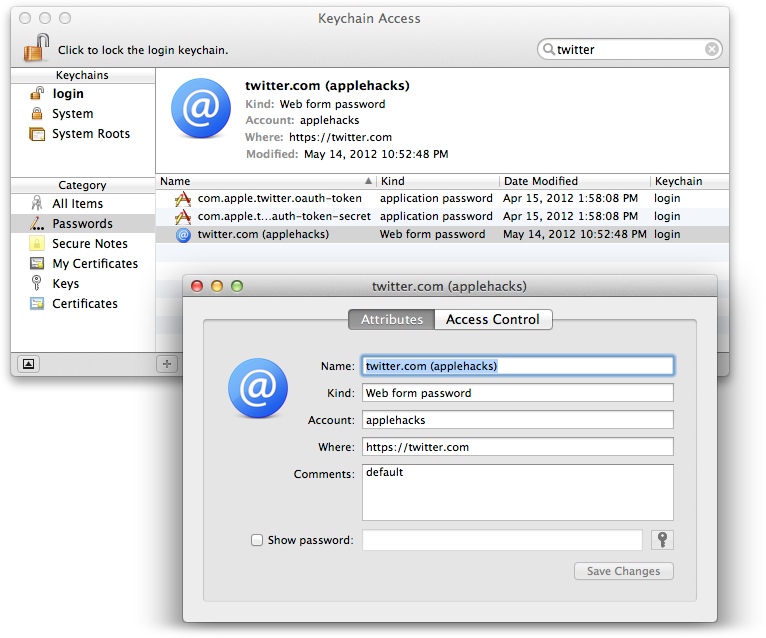
Figure 7-1. Recovering a Twitter password
When whatever you’re looking for appears in the list in the middle
of the Keychain Access window, double-click that item and a window will
pop up that includes a “Show password” checkbox. Check the box, enter
your keychain password (usually, but not necessarily, the same as your
OS X password), and you’ll see the password.
For an added level of security, you can configure OS X to
lock your keychain after a period of inactivity. Open Keychain Access,
click “login” in the Keychains list on the left side of the window, and
then select Edit
→
“Change Settings for
Keychain ‘login.’” You’ll then be able to lock the keychain after a
period of inactivity or when the computer sleeps. Once a keychain is
locked, Mountain Lion won’t let your Mac give out passwords until you
unlock the keychain by typing in your password.
If you work on a Mac managed by someone other than
yourself, you probably don’t want your keychain password to be the
same as your OS X password. Why? Because, if the administrator set
your OS X password for you, that person will also be able to access
the information that’s on your keychain. To change your keychain
password, open Keychain Access, click “login” in the Keychains list on
the left side of the window, and then select Edit
→
“Change Password for Keychain ‘login.’” Enter
a new password and your data will be safe from everyone but
you.
The following passwords are not acceptable:
letmein
,
password
,
123
, and
qwerty
. Using one of
those for anything you care about is like leaving the door to your house
wide open—but removing the welcome mat. Sure, a miscreant
might
pause momentarily when he notices the mat is
missing, but that won’t stop him from coming into your house. You need a
better password.
Mountain Lion can help you in your quest. You can find out
whether your chosen password is strong with Password Assistant, which
tests password strength. For whatever reason, you can’t access Password
Assistant directly—you have to use Keychain Access to get to it.
(Actually, any prompt that displays the little key icon will give you
access to Password Assistant, but Keychain Access is one of the easiest
ways to get there.) Open Keychain Access (Applications
→
Utilities
→
Keychain Access), and then select Edit
→
“Change Password for Keychain ‘[keychain
name].’”
In the dialog box that pops up, type a prospective password in the
New Password field. As you type, you’ll see a colored bar appear that
indicates how good your password is (red for weak, yellow for fair, and
green for good or excellent). Under that is a Password Strength rating
(Weak, Fair, Good, or Excellent). When you’re done typing, click the key
icon and the Password Assistant window appears (
Figure 7-2
).

Figure 7-2. Know your password’s strength
If your password isn’t the digital equivalent of Fort Knox, try
out some new passwords in the Password Assistant window to see how they
rate. If you can’t come up with a good one on your own, Mountain Lion is
happy to pitch in and help. The Password Assistant window’s Tips field
gives you pointers on how to build a better password, and the Type
drop-down menu lets you choose the kinds of passwords Mountain Lion
suggests: “memorable” ones, ones with letters and numbers, purely
numeric ones, random ones, or FIPS 181–compliant ones (the kind used by
government agencies).
Once you’ve found a good, strong password, close the Password
Assistant window and then click Cancel in the “Enter a new password
for...” window (unless you actually want to change the password for that
keychain). Now you can type that password into whatever program or
website needs it and know that your info should be pretty
secure.
Keychain is great at storing passwords, but you can also
use it to store notes. To write a note that no one else can see (well,
except for people who know your OS X username and password), open
Keychain Access, click “login” in the Keychains list, select Secure
Notes in the Category section, and then click the + button at the bottom
of the window. Give your secret note a name, and then start typing away
(
Figure 7-3
). When you’re done, click Add
and your note will be safely stored in that Keychain.
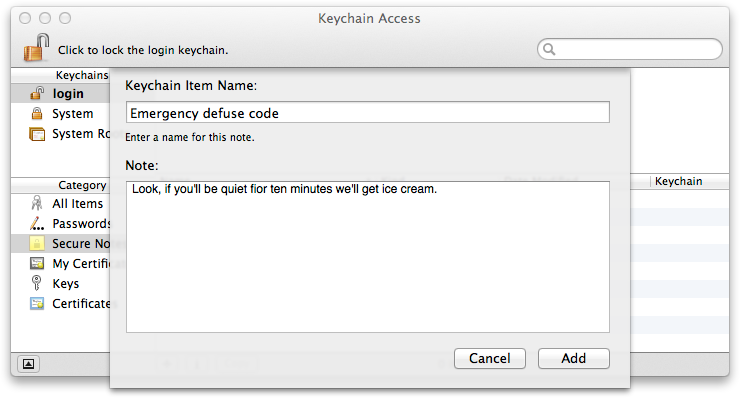
Figure 7-3. They must never know
With all the goodness Keychain Access offers, you might
want easy access to it. You can add it to your Dock, but that might be
getting a little crowded, and the Keychain icon isn’t the best-looking
one Apple has churned out. Luckily, you can add a menu extra for
Keychain Access (see
Menu extras
for a refresher). To
do that, the next time you’re using Keychain Access, go to Preferences
(⌘-,) and, on the General tab, check the box next to “Show keychain
status in menu bar.”
Carefully choosing passwords is a great start when it
comes to security, but it’s not a perfect solution. If someone has
physical access to your Mac, there are things she can do to get at your
data. If this prospect seems particularly loathsome to you, consider
making the extra effort to enable FileVault, a feature of Mountain Lion
that makes your data impossible to access unless you want it accessed.
For information on setting up FileVault, see
FileVault tab
.
When you’re using the keyboard, you want to keep your hands on the
keys. A trip to the trackpad, reaching for the mouse, or hunting for a
special character can really slow you down. The good news is that Mountain
Lion has a lot of key commands and special characters built right in. The
bad news is that, unless you’re one of those people who memorize the digits
of pi to a thousand places for fun, you won’t remember them all.
The most important key commands and special characters vary from user
to user. For example, if you’re writing about Exposé, knowing how to type é
really helps, but knowing how to type ¬ isn’t of much use. Everyone uses his
or her Mac a little differently, so this chapter features a wide selection
of keyboard commands and ways to type different characters. Memorize the
ones for the functions you use most, and you’ll save a lot of time and
effort.
When your hands are on the keyboard, it’s much quicker to
keep them there to perform some mundane task than it is to dig through the
menus and find the option that lets you type a special character or create
a new folder.
In general, the less time you spend using the mouse (or trackpad),
the more productive you’ll be. While you’ll want to learn the keyboard
commands for all your favorite programs, some commands are so common that
it’s worth reserving a special spot for them in your brain:
- ⌘-S
Save. This saves the document you’re working on. The
more often you use this command, the happier you’ll be (at least
until OS X’s Auto Save feature is part of every program). Nothing is
more frustrating than having all your hard work disappear when the
power flickers or an application crashes.NoteIf you’re using a keyboard designed for Windows
systems, you won’t see the ⌘ key. Instead, use the Windows key,
which is usually in the same spot you’d find the ⌘ key. Some
keyboards use a different symbol, however; for example, the Happy
Hacking Keyboard uses the “lozenge” symbol (◊).- ⌘-C
Copy. This command copies the current selection for
later pasting.- ⌘-X
Cut. This command deletes the current selection but
copies it to your Mac’s memory. After you’ve cut something, you can
paste it elsewhere (until you copy or cut something else, that
is).- ⌘-V
Paste. Once you’ve copied or cut something, you’ll
want to paste it.- ⌘-,
Opens the preferences for the active
application.- ⌘-] and ⌘-[
Moves forward (]) or backward ([) in the Finder,
Safari, and some other applications. For example, when navigating to
various directories in the Finder, you can use these keys instead of
clicking the arrows in the upper-right corner of the window.- ⌘-Shift-?
Opens the current application’s Help dialog box so you
can get quick answers to your vexing questions.- ⌘-Q
Quits the current application.
NoteYou can’t easily quit the Finder, so this command doesn’t
work when you’re using it. To find out how to quit the Finder (or
more accurately, relaunch it), see
The Finder stops responding
.- ⌘-Tab
Brings up the Application Switcher, which lets you
cycle through running applications by pressing Tab repeatedly as you
hold down ⌘. When you get to the application you’re after, let go of
both keys. If your hands are on the keyboard, this is a
much
faster way to switch applications than the
Dock.- Option-⌘-Esc
Force quits the current program.
Once you’ve mastered those commands, your appetite for keyboard
shortcuts is likely to become insatiable. Fortunately, there’s plenty more
of that keyboard-shortcut, time-saving goodness, much of which is shown in
Table 8-1
.
Unfortunately, some of these commands don’t work the same
way in all programs. For example, in the Finder and many other
applications, ⌘-I displays the Get Info window for the currently
selected file or object, but in most word-processing applications, ⌘-I
italicizes the selected text.
Also, on some keyboards, you may need to hold down the key labeled
Fn to use keyboard shortcuts that require a function key (F1, F2,
etc.).
Table 8-1. Common keyboard shortcuts
Key | Most common | Finder |
|---|---|---|
⌘-A | Selects all | Selects all items in |
⌘-B | Makes selected text bold | None |
⌘-C | Copies current | Copies selected files and |
⌘-D | Duplicates selected object | Duplicates selected file or |
⌘-E | Searches for highlighted | Ejects disk |
⌘-F | Finds text | Opens a new Finder window |
⌘-H | Hides current | Hides Finder |
⌘-I | Italicizes selected | Opens Get Info window for |
⌘-J | Jumps to currently selected | Shows View |
⌘-K | Clears screen (Terminal) or | Opens “Connect to Server” |
⌘-L | Opens dialog box that lets | Creates an |
⌘-M | Minimizes | Minimizes |
⌘-N | Creates new | Opens new Finder |
⌘-O | Displays Open File dialog | Opens selected |
⌘-P | Prints | None |
⌘-Q | Quits current | None |
⌘-R | Varies | Shows original file when an |
⌘-S | Saves current | None |
⌘-T | Displays Font | Adds selected item to |
⌘-V | Pastes copied | Pastes copied file(s) or |
⌘-W | Closes | Closes |
⌘-X | Cuts | None |
⌘-Z | Undoes most recent | Undoes most recent |
⌘-1 | Varies | Displays Finder items as |
⌘-2 | Varies | Displays Finder items as |
⌘-3 | Varies | Displays Finder items as |
⌘-4 | Varies | Displays Finder items in |
⌘-Delete | Varies | Moves selected item to |
⌘-Tab | Opens Application | Opens Application |
⌘-[ | Goes back one page (in web | Goes back one |
⌘-] | Goes forward one page (in | Goes forward one |
⌘-? | Activates Help | Activates Help |
⌘-space bar | Activates Spotlight | Activates Spotlight |
⌘-' | Cycles through application | Cycles through Finder |
Tab | Moves focus to next item or | Moves focus to next |
Shift-⌘-3 | Takes a picture of your | Takes a picture of your |
Shift-⌘-4 | Displays a cursor for | Displays a cursor for |
Shift-Control-⌘-3 | Works like ⌘-Shift-3, but | Works like ⌘-Shift-3, but |
Shift-Control-⌘-4 | Works like ⌘-Shift-4, but | Works like ⌘-Shift-4, but |
Shift-⌘-A | Varies | Opens Applications |
Shift-⌘-C | Varies | Opens Computer |
Shift-⌘-D | Varies | Opens Desktop |
Shift-⌘-O | Varies | Opens Documents |
Shift-⌘-G | Varies | Opens “Go to the folder” |
Shift-⌘-H | Varies | Opens Home |
Shift-⌘-K | Varies | Opens Network |
Shift-⌘-N | Varies | Creates a new |
Shift-⌘-Q | Displays logout dialog box, | Displays logout dialog box, |
Shift-⌘-S | Opens “Save As...” dialog | None |
Shift-⌘-U | Varies | Opens Utilities |
Shift-⌘-Delete | Varies | Opens Empty Trash dialog |
Shift-Option-⌘-Delete | Varies | Empties |
Option (while dragging) | Copies item to new | Copies file/folder to new |
⌘-Option (while dragging) | Varies | Creates an alias to a |
Option-⌘-D | Shows/hides the | Shows/hides the |
Option-⌘-M | Varies | Minimizes all |
Option-⌘-Esc | Opens a dialog box that | Opens a dialog box that |
Option-⌘-Eject | Puts computer to | Puts computer to |
Control-Eject | Displays the | Displays the |
Control-⌘-Eject | Quits all applications and | Quits all applications and |
You’re probably not going to remember
all
those
shortcuts, but you’ll likely remember the ones you use frequently. And
more time at the keyboard means less time wasted mousing and searching for
commands.
If you don’t like the key commands built into OS X, you
don’t have to put up with them. You can change them or add your own by
taking a trip to the Keyboard preference pane. For details, see
Keyboard
.
If you’re banging away on the keyboard and find yourself
wanting to type special characters (like the é in Exposé, for example),
there are convoluted methods of getting the character you want (pasting
them from the Web, say). But you might be wondering if there’s a
trackpadless or mouse-free way to do it. Fortunately, there is.
In OS X Lion, Apple added an easy way to get at those pesky
diacritical symbols. Simply type the letter you’re interested in and
hold the key down
; a window will pop up with all your
options (as in
Figure 8-1
). You can then
use the arrow keys to select the diacritic, click the one you want, or
press the number key that corresponds to the number below your
pick.
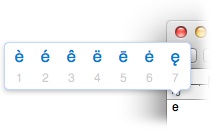
Figure 8-1. All your options for e
This feature is universal, so you can use it anywhere you can type a
character. It does have a couple of drawbacks, though: depending on how
your key repeat rate is set (see
Keyboard
), you might
find yourself typing
sss
before the diacritic menu
shows up; and if you type a special character often, it’s faster to commit
its keyboard shortcut to memory instead.
Table 8-2
shows how to easily type
diacritical symbols.
Table 8-2. Diacritical accent mark shortcuts
Symbol | Name | Keystroke |
|---|---|---|
´ | Acute | Option-E, then type the |
^ | Circumflex | Option-I, then type the |
` | Grave | Option-`, then type the |
˜ | Tilde | Option-N, then type the |
¨ | Umlaut | Option-U, then type the |
That takes care of only a few characters you may not be able to find
on your keyboard. But what about other characters, such as the euro symbol
or the Apple logo? You might try looking through the Font Book utility,
but with the number of fonts included in a standard OS X install, that
task can require more luck than skill.
The Character Palette is a bit easier to use. You enable it by
heading to →
→
System
Preferences
→
Language & Text. Click the
Input Sources tab, and then check the box labeled Keyboard & Character
Viewer. Your Mac adds a new icon to the menu bar that lets you launch
either Character Viewer or Keyboard Viewer. Character Viewer lets you
browse a wide variety of special characters and insert them into documents
by clicking them (the characters appear in the most recently used
application). With Keyboard Viewer (
Figure 8-2
), you can hold down
Shift, Option, or Shift
and
Option simultaneously to
see how the keyboard is modified when you’re depressing those modifier
keys. As with Character Viewer, simply click a letter or a symbol to
insert it into a text field.
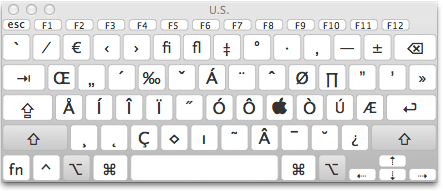
Figure 8-2. Wonder what Option-Shift does to the characters on your keyboard?
Wonder no more!
You can also check out
Table 8-3
for a quick
reference to U.S. English keyboard modifiers.
Table 8-3. Special character shortcuts for U.S. English keyboards
No | Shift | Option | Shift-Option |
|---|---|---|---|
` | ˜ | ` | ` |
1 | ! | ¡ | ∕ (fraction slash |
2 | @ | ™ | ₠ |
3 | # | £ | ‹ |
4 | $ | ¢ | › |
5 | % | ∞ | fi (ligature) |
6 | ^ | § | fl (ligature) |
7 | & | ¶ | ‡ |
8 | * | • | ° |
9 | ( | ª | · |
0 | ) | º | ¸ |
- | _ | – | — |
= | + | ≠ | ± |
q | Q | Π| Π|
w | W | Σ | „ |
e | E | ´ (above next vowel | ´ |
r | R | ® | ‰ |
t | T | † | ˇ |
y | Y | ¥ | Á |
u | U | ¨ (above next vowel | ¨ |
i | I | ^ (above next vowel | ^ |
o | O | Ø | Ø |
p | P | Π | ∏ |
[ | { | “ | “ |
] | } | ‘ | ‘ |
\ | | | « | » |
a | A | Å | Å |
s | S | ß | Í |
d | D | ∂ | Î |
f | F | ƒ | Ï |
g | G | © | ″ |
h | H | ˙ | Ó |
j | J | Δ | Ô |
k | K | ˚ |
|
l | L | ¬ | Ò |
; | : | ... | Ú |
‘ | “ | Æ | Æ |
z | Z | Ω | ¸ |
x | X | ≈ | ˛ |
c | C | Ç | Ç |
v | V | √ | ◊ |
b | B | ∫ | I |
n | N | ~ | ˜ |
m | M | µ | Â |
‚ | < | ≤ | ¯ |
. | > | ≥ | ˘ |
/ | ? | ÷ | ¿ |