Oracle RMAN 11g Backup and Recovery (68 page)
Read Oracle RMAN 11g Backup and Recovery Online
Authors: Robert Freeman

IDB
The Internal Database, where all the information about Data Protector sessions, including session messages, objects, data, used devices, and media, is written.
RMAN
The Oracle Recovery Manager.
RMAN WORKSHOP:
Integration Configuration
Workshop Notes
To run a successful RMAN backup of an Oracle Database using Data Protector Integration, you should have the Oracle target database mounted or opened, the recovery catalog database configured and opened if being used, Oracle Net Services properly configured, and Data Protector Disk Agent, Media Agent, and Oracle Integration installed on the server the target database resides on.
In this workshop, it is assumed that devices and media are ready for use, and that Data Protector Cell Manager is installed and properly configured. HP OpenView Storage Data Protector Manager software, which may reside in a PC, will be used to configure the integration.
Step 1.
First you must install the Data Protector agent to target server.
a.
Run HP OpenView Storage Data Protector Manager software and connect the Cell Manager.
b.
In the Context List, select Clients, and in the Scoping Pane, right-click Clients and click Add Clients.
c.
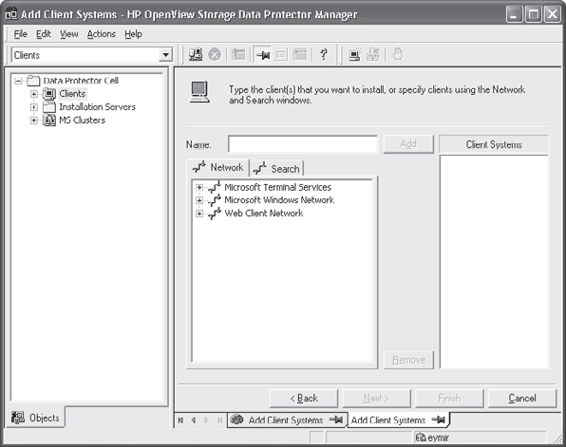
In the Add Client Systems window, select the platform of the target server (Windows or Unix), and choose the installation server, which can be the Cell Manager. Click Next.
d.
Type the IP or host name (if it can be resolved) of the target server in the Name box and click Add. Click Next (see Figure 8-2).
e.
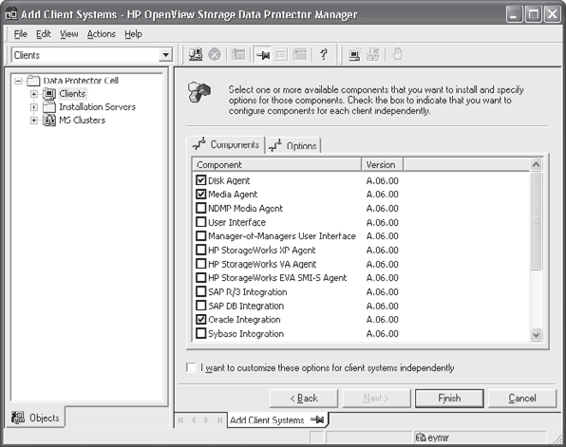
Select the components you want to install. For Oracle Database backups, Disk Agent, Media Agent, and Oracle Integration must be installed on the target server. Select the components and click Finish (see Figure 8-3). After the installation completes, continue the configuration with Step 2.
Chapter 8: Configuring HP Data Protector for Oracle
177
FIGURE 8-2
Defining client IP/host name
FIGURE 8-3
Component selection
178
Part II: Setup Principles and Practices
Step 2.
MML is invoked by the Oracle server when it needs to write to or read from devices using Data Protector. For this integration to work properly, a manual link needs to be created between Oracle server software and the Media Management Library on the target system. MML
is located in the following directory:
HP-UX and Solaris
/opt/omni/lib
Other
Unix
/usr/omni/lib
The filename for the MML also differs depending on the platform, as shown in the following table:
Platforms 32-bit
64-bit
HP-UX libob2oracle8.sl
libob2oracle8_64bit.sl
HP-UX on IA-64
libob2oracle8.so
libob2oracle8_64bit.so
Solaris
libob2oracle8.so
libob2oracle8_64bit.so
AIX
libob2oracle8.a
libob2oracle8_64bit.a
Other Unix
libob2oracle8.so
libob2oracle8_64bit.so
Now, proceed as follows:
a.
Change to the
b.
Run:
HP-UX
mv libobk.sl libobk.sl.orig
Other
Unix
mv libobk.so libobk.so.orig
NOTE
Perform the preceding step only if the libobk.sl (HP-UX) or libobk
.so (other Unix) file is already created in the
c.
Run:
HP-UX
■
32-bit
ln -s /opt/omni/lib/libob2oracle8.sl libobk.sl
■
64-bit
ln -s /opt/omni/lib/libob2oracle8_64bit.sl libobk.sl
Solaris
■
32-bit
ln -s /optS/omni/lib/libob2oracle8.so libobk.so
■
64-bit
ln -s /opt/omni/lib/libob2oracle8_64bit.so libobk.so
Chapter 8: Configuring HP Data Protector for Oracle
179
Other Unix
■
32-bit
ln -s /opt/omni/lib/libob2oracle8.so libobk.so
■
64-bit
ln -s /opt/omni/lib/libob2oracle8_64bit.so libobk.so
If you start a backup without manually linking Oracle server software and MML as just shown, you will probably see this error message:
RMAN 00571:
RMAN 00569:
ERROR MESSAGE STACK FOLLOWS
RMAN 00571:
RMAN 03009: failure of allocate command on DP TEST channel at 01/22/2010 08:54:22
ORA 19554: error allocating device, device type: SBT TAPE, device name:
ORA 27211: Failed to load Media Management Library
Recovery Manager complete.
RMAN Backup Configuration on Data Protector
To configure an Oracle RMAN backup configuration on Data Protector, decide which devices, media pool, and media will be used for that backup operation. Then you can create the Data Protector Oracle backup specification.
Data Protector offers database backup templates that can be used when creating the backup specification. You can also create templates tailored to your needs.
RMAN WORKSHOP:
Backup Configuration
Workshop Notes
Now that you have added the target host to Data Protector successfully, you can define a backup specification. Using this specification, you will be able to start the backup immediately or to schedule it to run within a specific period.
Step 1.
Run HP OpenView Storage Data Protector Manager and connect the Cell Manager.
Step 2.
In the Context List, select Backup; in the Scoping Pane, expand Backup Specifications; then, right-click Oracle Server and click Add Backup.
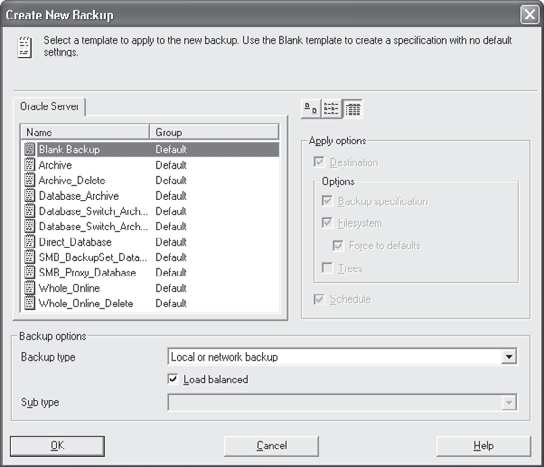
Step 3.
In the Create New Backup window, you can select one of the predefined backup templates, or select Blank Backup to specify backup operation details later (see Figure 8-4). Click OK.
Step 4.
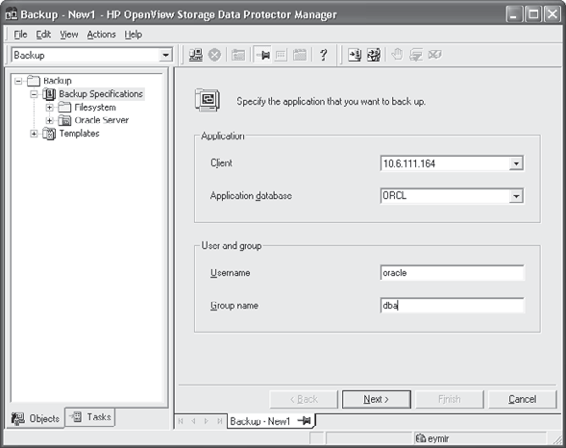
In the next window, Data Protector asks for Client, Application Database, Username, and Group Name information. Specify the client the target database resides in, the SID of the target database, the username, and the name of the group that owns the Oracle instance (see Figure 8-5). Click Next.
180
Part II: Setup Principles and Practices
FIGURE 8-4
Template selection
FIGURE 8-5
Target selection
Chapter 8: Configuring HP Data Protector for Oracle
181
Step 5.
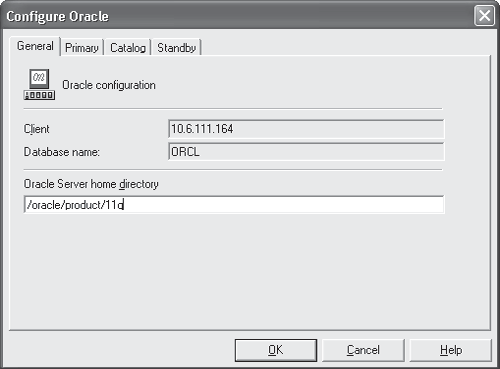
In the Configure Oracle window, specify information about the target database. On the General tab, specify the Oracle Server Home Directory (see Figure 8-6). On the Primary tab, specify username, password, and service information. Don’t forget that this user must have been granted Oracle SYSDBA or SYSOPER rights. Service is the name used to identify an SQL*Net server process for the target database. The Catalog tab requires the username, password, and service information for the Catalog database if it’s being used. The last tab, Standby, is necessary to fill if the Oracle Data Guard environment is in use and will be backed up. Click OK.
Step 6.
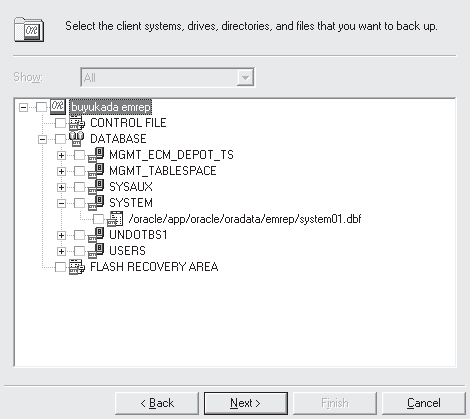
This step asks you to specify which components of the database you want to back up.
If you selected Blank Backup in Step 3, you will see all components unchecked (see Figure 8-7).
Select the components you want to back up and then click Next.
Step 7.
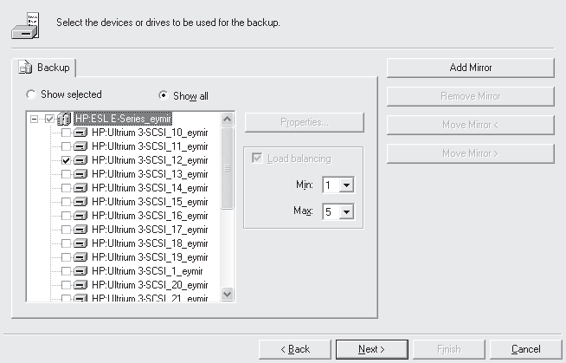
Now, Data Protector asks you which hardware will be used for this backup. Select the drive that you want to use (see Figure 8-8). If you defined it earlier, you can also specify the Media Pool that will be used for the backup. Select the drive and click Properties. You’ll see a drop-down menu to select a Media Pool. Make your choice and click Next.
FIGURE 8-6
Oracle configuration