Maximum Flavor: Recipes That Will Change the Way You Cook (22 page)
Read Maximum Flavor: Recipes That Will Change the Way You Cook Online
Authors: Aki Kamozawa,H. Alexander Talbot
Tags: #Cooking, #Reference, #Courses & Dishes, #General, #Methods

Preheat the oven to 400°F (205°C).
MAKE THE FILLING:
Put 2 inches (5 cm) of water into a large steamer set over high heat. When the water is boiling, steam the potatoes until they are just tender and cooked through, 10 to 12 minutes. Remove them from the steamer and let cool slightly.
Put the 1 cup reserved cold chicken broth in a medium saucepan. Add the cornstarch and whisk to combine. Bring to a boil over medium-high heat and cook, stirring constantly, until the broth has thickened. Set the pot in an ice water bath to cool the broth, stirring occasionally.
Meanwhile, set a large sauté pan over medium-high heat and add 1 tablespoon (14 grams) of the olive oil. Once the oil has begun to shimmer, add the onion and sauté until golden brown, 4 to 5 minutes. Transfer the onion to a medium bowl and return the sauté pan to the heat. Add the remaining 1 tablespoon (14 grams) oil and when it begins to shimmer, add the carrots and celery and sauté until translucent and just tender, 3 to 4 minutes. Add to the onions.
While the vegetables cool, use a paring knife to peel the potatoes and cut them into 1-inch (2.5 cm) pieces. Add the potatoes and the peas to the bowl and season the vegetables lightly with salt. Add the starch-coated chicken pieces to the bowl, discarding any excess starch left behind. Add the cooled broth and fold everything together.
Fill the bottom crust of the pie with the chicken mixture and then cover with the top crust, pressing the edges together and tucking them underneath the edge of the pie pan. Gently crimp the edges together. Brush the pie with the milk. Sprinkle fleur de sel and cracked black pepper over the top. Cut a vent in the center of the pie.
Bake for 30 minutes, reduce the temperature to 350°F (175°C), and bake until the crust is a deep golden brown, about 1 more hour. Remove from the oven and let rest for 10 minutes before serving.
BAKING SODA
This unassuming ingredient is in every kitchen and has an astonishing number of uses. Baking soda, or pure sodium bicarbonate, is a naturally occurring alkaline ingredient that is ground to a fine powder for household use. You can keep boxes of it in the refrigerator to absorb odors and add it to the washing machine to soften water and remove odors from clothes. We like to use it to scrub pots and pans, as it does an effective job of breaking down cooked-on food and is gentle on our cookware.
Baking soda is most commonly thought of as a baking ingredient, because when you combine it with heat or a weak acid it forms carbon dioxide, which helps aerate batters and quick breads. This leavening action is also employed when making nut and seed brittles to create a fine network of holes in the finished candy that results in its brittle texture. Baking soda is used in larger quantities in some cookie doughs to weaken gluten, which means that more moisture can escape during the baking process and the cookies will collapse after rising to create a thin, crisp cookie with a fine, brittle texture that is easy to bite through.
Baking soda blended with an acid makes baking powder. Commercial baking powders are designed to be double acting so that leavening occurs twice, once upon the addition of liquids and again in the presence of heat. Combining 1 part baking soda with 2 parts cream of tartar makes homemade single-action baking powder.
Baking soda is used to add alkalinity to bread and pasta dough. Baking soda or baking powder is kneaded into steamed bun dough after the initial rise in order to neutralize the acids created through fermentation. This step helps soften the texture of the dough, which in turn allows it to rise more smoothly in the steamer. It’s an interesting sensation to knead baking soda into dough and feel it stiffen under your hands—and then to steam it and bite into the tender, yet firm, bun.
A similar thing happens when we add baking soda to our noodle dough to firm up the texture. Gluten formation is maximized at a slightly acidic pH, ranging from 5 to 6. Anything above or below that pH will reduce gluten strength. This neutralization of the dough is what gives ramen noodles their bouncy, yet tender, texture. Adding baking soda inhibits the noodles’ ability to absorb water by stiffening the cell walls and making them less permeable, which is beneficial because it makes it harder to overcook noodles.
Traditionally baking soda was added to vegetables to help them retain their bright colors during long boiling periods. While long-cooked vegetables are no longer in fashion, baking soda is still used in the savory kitchen to tenderize meat before stir-frying. It works by raising the pH of the surface layer of the meat and activating enzymes, called calpains, which begin to break down the muscle fibers. This process softens the texture of the cooked meat and allows it to retain moisture. We also use a small amount of baking soda in our roasted chicken wings to promote deep, even browning and a thin, crisp skin. The alkaline effect of the baking soda helps speed up the Maillard reaction, or browning, when the wings cook. The trick is to use just enough, because too much baking soda can add a slightly bitter, mineral taste to your food. When used judiciously, it disappears into the natural flavor of your food.

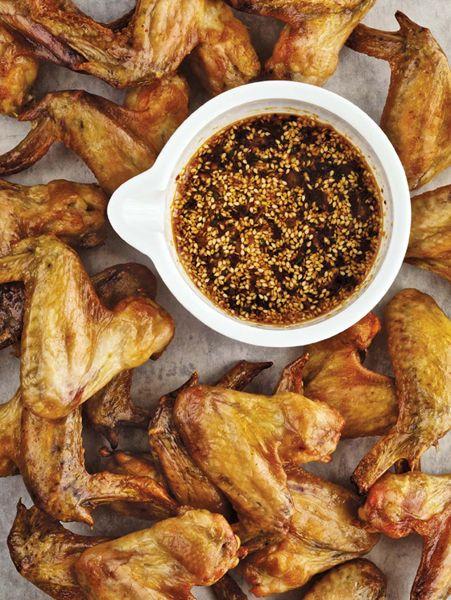
KOREAN-STYLE CHICKEN WINGS
OUR SIMPLE TRICK FOR THE BEST KOREAN-STYLE WINGS IS TO
marinate the wings in a mixture of egg whites, salt, and baking soda. This forms an even coating that clings to the wings and seasons them. The mixture also helps to break down the outer layer of proteins on the skin, allowing the chicken to render and brown in the oven and resulting in juicy wings with a thin, crackling skin. (You can also brush the marinade on a whole chicken before roasting.) We’ve paired the wings with yangnyeomjang, a spicy Korean dipping sauce, to accent the sweet flavor of the chicken.
SERVES 4 TO 6
3 large
egg whites
2 teaspoons 10 grams
baking soda
1¾ teaspoons 10.5 grams
fine sea salt
4 pounds 1.8 kilograms whole
chicken wings
¼ cup 65 grams
tamari soy sauce
3 tablespoons 42 grams
apple juice
1 tablespoon 16 grams
honey
1 tablespoon 14 grams
rice vinegar
1 tablespoon 14 grams
toasted sesame oil
1 teaspoons 2 grams
Korean red chile flakes
1 tablespoon 3.75 grams
toasted sesame seeds,
chopped
1
garlic
clove, grated
½ teaspoon 2.5 grams grated
fresh ginger
1
scallion,
finely sliced
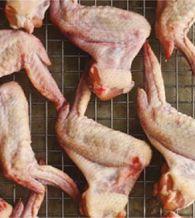
Put the egg whites, baking soda, and salt in a bowl and stir to dissolve the salt and baking soda. Add the chicken wings and stir to coat evenly. Remove the wings from the bowl and lay them out on 2 wire racks, each set over a baking sheet. Refrigerate the wings uncovered overnight for them to dry out.
Preheat the oven to 450°F (235°C).
Put the wings, still on the racks on the baking sheets, into the oven and cook for 15 minutes. Flip the wings over and bake for 10 minutes. Flip the wings over again and bake until a deep golden brown with a crackling skin, about 10 more minutes. Take the pans out of the oven and let cool for 5 minutes.
Meanwhile, in a small bowl, combine the soy sauce, apple juice, honey, rice vinegar, sesame oil, chile flakes, sesame seeds, garlic, ginger, and scallion.
Pile the wings on a serving platter and serve the sauce alongside.


OVEN-FRIED LEMON CHICKEN
THOUGH IT REQUIRES A LITTLE ADVANCE PLANNING, BECAUSE
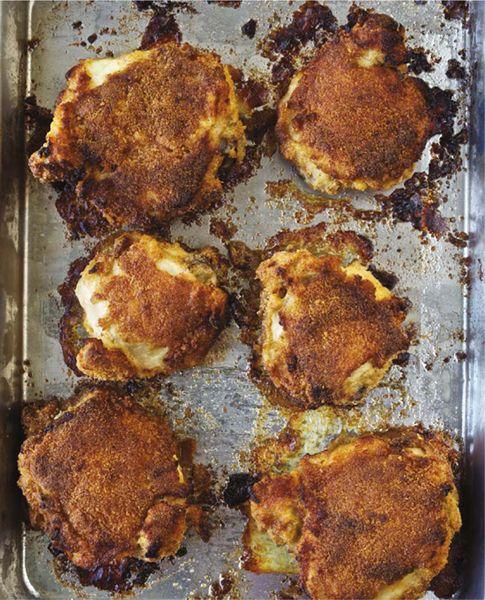
the chicken needs to brine overnight, this recipe makes a great go- to weeknight dinner. The lemony brine has a blend of spices to create a tart, spicy seasoning. The thighs are pulled out of the brine, rolled in seasoned bread crumbs (which can also be made in advance), and put into the oven. They get rotated once during cooking, leaving you plenty of time to sauté some vegetables or toss a salad to serve alongside. The chicken emerges from the oven crisp and juicy; it’s almost impossible to eat just one piece.
SERVES 4 TO 6
CHICKEN
2 cups 480 grams
whey
or
cultured buttermilk
, homemade or store-bought
2 tablespoons 33 grams
tamari soy sauce
1 teaspoon 6 grams
fine sea salt
½ teaspoon 1 gram
garlic powder
½ teaspoon 1 gram
onion powder
¼ teaspoon 1 gram
Boyajian lemon oil
or lemon essential oil or grated zest from 2 lemons
¼ teaspoon 0.5 gram
ground cumin
⅛ teaspoon 0.25 gram
cayenne pepper
4 pounds 1.8 kilograms bone-in, skin-on
chicken thighs
(10 to 12 large)
BREAD CRUMBS
About 2 cups 250 grams
dried
bread crumbs
2 tablespoons 10 grams freshly grated
Parmigiano Reggiano cheese
½ teaspoon 1 gram
garlic powder
½ teaspoon 1 gram
onion powder
½ teaspoon 1 gram
sweet Spanish paprika
¼ teaspoon 0.5 gram
cayenne pepper
¼ teaspoon 1.5 grams
fine sea salt
4 tablespoons 56 grams
unsalted butter,
diced
BRINE THE CHICKEN:
In a large bowl, whisk together the whey, soy sauce, salt, garlic powder, onion powder, lemon oil, cumin, and cayenne. Add the chicken thighs and stir gently to coat them. Cover with plastic wrap or transfer to a lidded container and refrigerate for at least 8 hours and up to 24 hours.
Preheat the oven to 450°F (235°C). Put a large rimmed baking sheet—big enough to hold all of the chicken in a single layer—in the oven to preheat.
MAKE THE BREAD CRUMBS:
In a medium bowl, combine the bread crumbs, Parmigiano, garlic powder, onion powder, paprika, cayenne, and salt and whisk to blend.
Drain the chicken, discarding the brine. Set the chicken next to the bowl of bread crumbs and a large baking sheet on the other side. Take one piece of chicken, still damp from the brine, and put it in the bowl of crumbs. Turn it over a few times to coat it thoroughly, then gently shake off any excess crumbs, and transfer it to the baking sheet. Repeat with the remaining chicken.
Once all of the chicken has been coated and the oven is hot, remove the baking sheet from the oven. Add the butter to the baking sheet and swirl the pan so the butter coats the bottom. Immediately add the chicken thighs, setting them skin side down, and put the pan in the oven. Lower the oven temperature to 400°F (205°C) and cook for 20 minutes. Flip over the chicken pieces and bake until golden brown and the meat is starting to pull back from the tips of the bones, about 20 more minutes. Remove the pan from the oven and let the chicken rest on the baking pan for 10 minutes before serving.
