Maximum Flavor: Recipes That Will Change the Way You Cook (14 page)
Read Maximum Flavor: Recipes That Will Change the Way You Cook Online
Authors: Aki Kamozawa,H. Alexander Talbot
Tags: #Cooking, #Reference, #Courses & Dishes, #General, #Methods

THAI BEEF SALAD
THE SIRLOIN CAP STEAK IS A TRIANGULAR PIECE OF MEAT THAT
lies right above the top sirloin. It is an increasingly popular cut because it is relatively tender, flavorful, and economical. We employ a Japanese technique of crosshatching the steak to help keep the muscle fibers from contracting and toughening up the meat during the cooking process while still leaving it as one large piece for searing. Flipping the meat regularly as you sear it promotes rapid, even cooking of the meat. A salad of grapefruit, papaya, and watercress creates a sweet, peppery side for the beef.
SERVES 4 AS A LIGHT MAIN COURSE
BEEF
1
sirloin cap steak
or coulotte steak (17.6 ounces
/
500 grams)
1
garlic
clove, thinly sliced
½
jalapeño,
thinly sliced
0.35 ounce
/
10 grams
pickled ginger
2 tablespoons
/
30 grams
sweet vermouth
2 tablespoons
/
33 grams
tamari soy sauce
1 tablespoon
/
14 grams
fish sauce
¼ teaspoon
/
1.5 grams
fine sea salt
Rice bran oil
or peanut oil, for frying
Leaves from 1 bunch
cilantro
SALAD
2
grapefruits
5 teaspoons
/
15 grams
palm sugar,
grated on a box grater, or packed dark brown sugar
1 tablespoon
/
14 grams
rice vinegar
2 teaspoons
/
10 grams
fish sauce
½ teaspoon
/
3 grams
fine sea salt
1 unripe
papaya
1 bunch
watercress,
chopped into bite-size pieces
PREPARE THE BEEF:
Put the beef on a cutting board and remove any silver skin or large pieces of external fat. Cut a crosshatch grid into the top of the meat, cutting about ½ inch (13 mm) deep and leaving about ½ inch (13 mm) between the lines. Flip the meat over and repeat on the bottom, being careful not to cut all the way through the meat.
In a small bowl, combine the garlic, jalapeño, pickled ginger, sweet vermouth, soy sauce, and fish sauce. Put the meat into a gallon-size zip-top bag and add the marinade. Squeeze out the excess air and seal the bag. Turn the bag over a few times so that the meat is evenly coated. Refrigerate the meat in its bag on a baking dish or large plate for at least 24 hours and preferably 48, flipping the meat over twice a day, to allow the flavors to be absorbed.
MAKE THE SALAD:
The day you are planning to cook the meat, grate the zest from the grapefruits. Transfer the zest to a small container, cover, and reserve in the refrigerator. Use a knife to cut the top and bottom off each grapefruit, exposing the inner segments. Stand the grapefruit up on a cutting board and pare off the skin, slicing it away from the top to the bottom, following the curve of the fruit. Once all of the pith has been removed, hold the grapefruit over a small bowl and use a paring knife to cut between the membranes and free the segments, letting them drop into the bowl. Squeeze the remaining membranes over the segments, catching the juice in the bowl. Remove the grapefruit segments from the bowl, cut them into thirds, transfer to another bowl, and set aside separately.
Add the palm sugar, rice vinegar, fish sauce, grapefruit zest, and salt to the bowl of grapefruit juice. Stir to dissolve the salt and sugar. Return the grapefruit segments to the bowl. Peel the papaya and cut it in half lengthwise, and remove the seeds. Use a mandoline to thinly slice the fruit. Add the papaya to the grapefruit vinaigrette and stir to blend with the grapefruit segments. Cover the salad and reserve at room temperature.
Heat a large cast-iron skillet over medium-high heat. Remove the beef from the marinade and remove any garlic or jalapeño slices that may be stuck to it. Season the meat with the salt. Add ¼ inch (6 mm) of oil to the bottom of the hot pan and when the oil shimmers, slide the meat into the pan. Turn the heat down to medium. Cook the meat for 30 seconds and gently flip it. Cook for 30 seconds on the second side and flip the meat again. Repeat this process until the meat has cooked for a total of 6 minutes.
While the meat is cooking, put half of the cilantro leaves on a platter large enough to hold the meat. When the meat has finished cooking, transfer it from the pan onto the bed of cilantro leaves. Cover the top of the meat with the remaining cilantro leaves and then invert a large platter over the meat to hold in heat while it rests. Let the meat rest for at least 5 minutes; the heat will release the oils in the herbs and they will permeate the meat while it rests.
Remove the top plate and transfer the meat, still covered in cilantro leaves, to a cutting board. Carve the meat into slices, cutting against the grain. Put the meat on a serving platter and add any juices and leftover cilantro from the cutting board or the resting plate. Add the watercress to the marinated fruit salad and mix gently to combine. Taste and add a pinch of salt if needed. Arrange the salad over the meat and serve immediately.
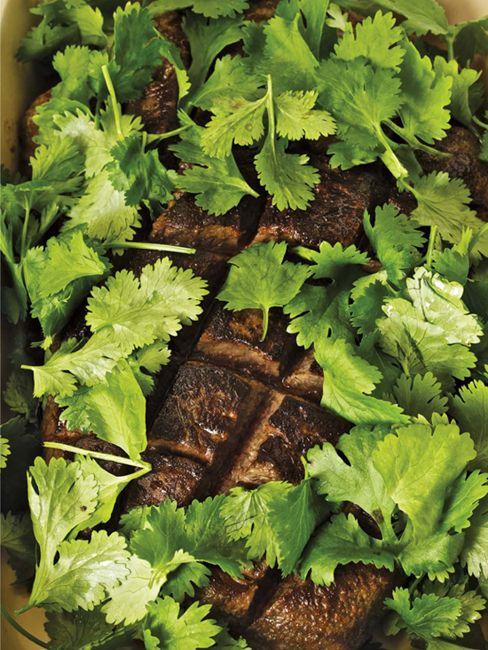
SEARED BEEF RESTING IN A BED OF CILANTRO
SWEET CORN & HERB SALAD PESTO
ZUCCHINI PICKLES
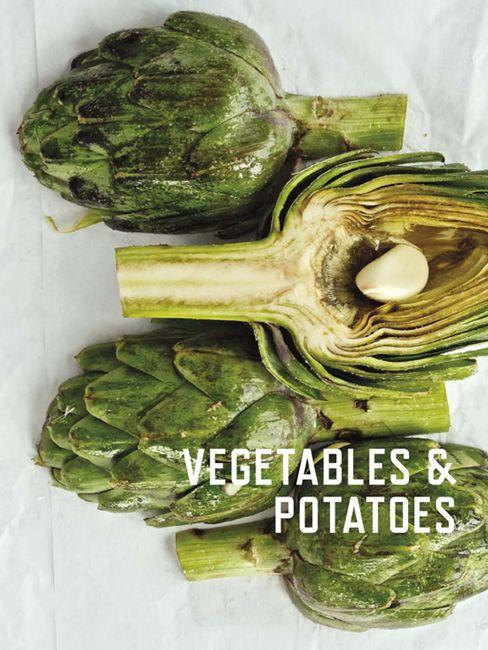
GRILLED ARTICHOKES WITH BROWN BUTTER MAYONNAISE
CREAMED SPINACH WITH CITRUS KOSHO
BUTTERNUT SQUASH CAPONATA
SMOKED EGGPLANT PARMIGIANA
POTATO GRATIN
FRENCH FRIES
LEMON ROASTED POTATOES
BARBECUE POTATO GNOCCHI
JAPANESE YAM & CHEESE
SWEET CORN & HERB SALAD PESTO
CREAMED CORN IS ONE OF THE BEST DISHES YOU CAN MAKE
with fresh corn. Use the large holes of a four-sided box grater to cut the kernels from the cob; this leaves you with a great mixture of cut kernels, scrapings, and juice. Stirring these up in a pot with butter and seasonings activates the natural starches in the corn, and you end up with a creamy bowl of sweet corn goodness.
We finish things off with an herb salad pesto. All that means is we go through our garden and pick a few leaves of whatever we have (usually somewhere between 8 and 12 different herbs) and then blend them together in a pesto. Each time, it’s a little different and somehow all of the herbs come together into a cohesive blend that is unfailingly delicious. Stir in the pesto at the last minute to add depth and aroma to the flavor of the fresh creamed corn.
SERVES 8 AS A SIDE DISH
HERB SALAD PESTO
3 cups 45 grams assorted fresh
herb leaves
¼ cup 28 grams
cashews,
roasted
1
garlic
clove
½ teaspoon 3 grams
fine sea salt
¾ cup 170 grams
extra-virgin olive oil
½ cup 50 grams freshly grated
Parmigiano Reggiano cheese
CORN
8 ears
corn,
husked
¾ teaspoon 4.5 grams
fine sea salt
⅛ teaspoon 0.25 gram
cayenne pepper
2 tablespoons 28 grams
unsalted butter
MAKE THE PESTO:
Put the herbs, cashews, garlic, and salt in a food processor and pulse a few times to blend. Turn the machine on and slowly drizzle in the olive oil. Turn the machine off and scrape down the sides. Add the cheese and pulse to blend. Set aside.
MAKE THE CORN:
Set a large box grater on a baking sheet and grate the corncobs to remove the kernels and milk from the corn. In a medium saucepan, combine the scraped corn, salt, and cayenne. Bring the mixture to a simmer over medium heat and cook, stirring, until the mixture thickens, 3 to 5 minutes. Turn the heat down to low and stir in the butter.
Spoon the creamed corn into 8 serving bowls and put a dollop of pesto in the center of each portion. Serve immediately. Extra pesto may be stored in an airtight container in the refrigerator for up to 3 days, or frozen until needed.
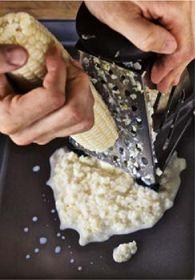
GRATING THE CORN
ZUCCHINI PICKLES
CULTURED WHEY—YES, THE BY-PRODUCT OF CHEESEMAKING AND
cultured dairy products—is an excellent ingredient for making pickles. It is a natural source for lactobacilli, which start fermentation. By adding them to the pickling brine via the whey you jump-start the process by increasing the number of bacteria in your liquid, speeding things up, so you can reach the desired flavor level more quickly, before the texture of the vegetables has softened too much. This means you end up with crunchier pickles with fully developed flavors. A pH meter is a useful and relatively inexpensive piece of equipment, because it lets you know without a doubt if your pickles are ready by measuring their acidity level. The abundance of zucchini in the summertime makes them a perfect choice for pickling. You can add spices and seasonings to your taste, but try the basic version first. You may be surprised by how much flavor the zucchini provide all by themselves. These simple pickles go anywhere you would normally use a dill pickle.
MAKES ABOUT 2 QUARTS
1¾ cups 400 grams
whey
2⅔ cups 600 grams
water
8⅓ teaspoons 50 grams
fine sea salt
6 small
zucchini
(each about 6 inches 15 cm long)
In a bowl, combine the whey, water, and salt and stir until the salt is dissolved. Wash the zucchini and cut crosswise into ¼-inch (6 mm) rounds. Add the zucchini to the bowl of brine and stir well. Divide the zucchini and brine evenly between 2 sterilized quart Mason jars. Put in pickle weights or take pieces of plastic wrap, scrunch them up into flattened balls, and put one in each jar to make sure the zucchini stay submerged in the pickling liquid. Cover the top of each jar with two layers of cheesecloth and use a rubber band to secure the cheesecloth to the jar. Put the Mason jars in a cool dark place to ferment. The fermentation will begin to show in about 4 days, with small bubbles forming in the jars. Continue to ferment until the pH is below 4.0, another 4 to 5 days, depending on the temperature of your storage area. Once the pickles are done fermenting, discard the cheesecloth, cover the jars with their lids, and store them in the refrigerator for up to 4 weeks.