Mac Hacks (4 page)

. Get to Know Your User Account
Permissions are crucial to the functioning of OS X, and a basic
understanding of them will make your hacking forays not only more fruitful
but also less fearful.
You likely know that OS X is based on Unix, an operating system
invented in Bell Labs that has been around since 1969. In 1969 the idea of
a personal computer was pretty far fetched—computers were hugely expensive
and computer time was very valuable. Because of that, Unix was designed to
be a multiuser system. As such, it needed a method for deciding just what
each user can do with the machine. (It would be bad if one student could
erase another student’s work or, the other extreme, a setup where only one
superuser could make any changes at all.) Permissions allow users to
change what they need to change while protecting others who use the same
machine from accidental data deletion.
When
you first set up OS X, you provided a name, OS X suggested
a short name which you may or may not have chosen to use, and you were off
to the races. “No big deal,” you might think, “this is just routine
housekeeping when setting up a new machine.” Actually, this step
is
kind of a big deal—the first account you set up in
OS X is, by default, an administrator account.
OS
offers three main types of accounts: Administrator,
Standard, and Managed with Parental Controls. (There are other types
listed in the Users & Groups preference pane, but the ones listed
above are your best bets for everyday use.) Administrators have a lot of
power in OS X—they can make global changes that impact
everyone
who uses that computer—so logging in as an
administrator for day-to-day use isn’t the best idea; with that much power
over the entire system, you can cause serious harm to your account and
others’. It’s much better to log in as a standard user for day-to-day
tasks while reserving the administrator account for those times you need
to, well, administrate. Standard
users can make changes that impact their own accounts, and
Managed users can only do what the administrator
specifically allows. The Standard account is the sweet spot because you
get to control the stuff you need to control, but you can’t mess up anyone
else’s work or the machine.
The most obvious objection to switching to a standard user account
is that you’re already using one account and you don’t want to re-create
everything for your new account. That’s a valid objection—but one we can
work around.
A
standard user on OS X has plenty of control over their
information and preferences. Preferences for each user are stored in
each user’s Home folder’s Library. The Library is what makes your Mac
feel like it’s yours. You might want to directly tweak the files in your
Library, but if you go poking around in your Home folder, you won’t see
anything that looks like it might be storing your preferences and the
like. That’s because those things are stored in the Library folder and,
starting in OS X Lion, Apple made that folder invisible.
This can be frustrating for longtime Mac users who are used to
messing around in that folder. For example, an app is giving you a ton
of problems, you might want to jump to the Library folder and delete
your preferences for that program, which can sometimes make the app more
responsive (the preferences will be regenerated).
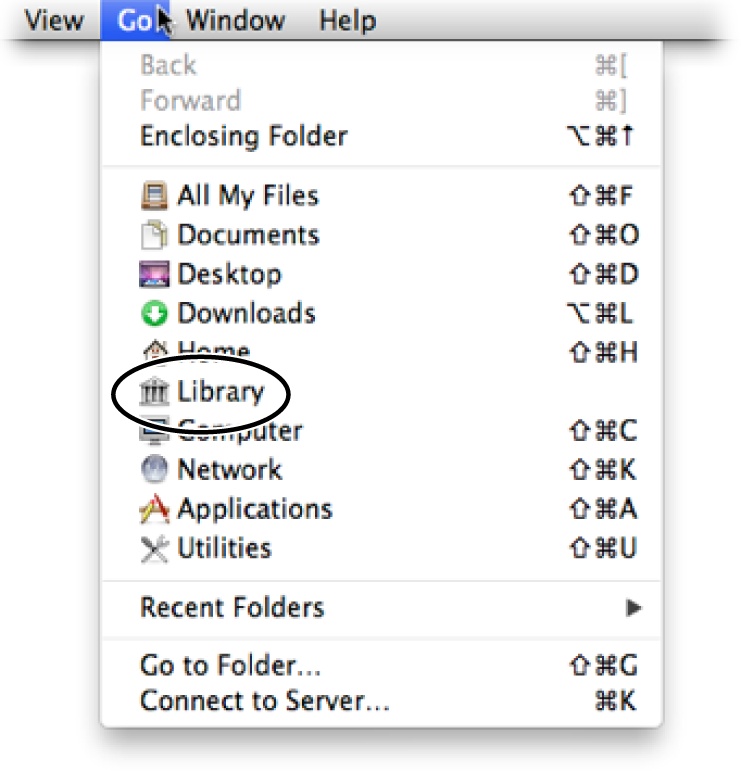
Fortunately, Apple gives you a simple way to access your Library
folder. In the Finder’s menu bar, open the Go menu and then press the
Option key. Voilà—a Library option appears in the menu (
Figure 1-8
)!

way to find your Library folder, but it’s probably the easiest.
Account
Fire
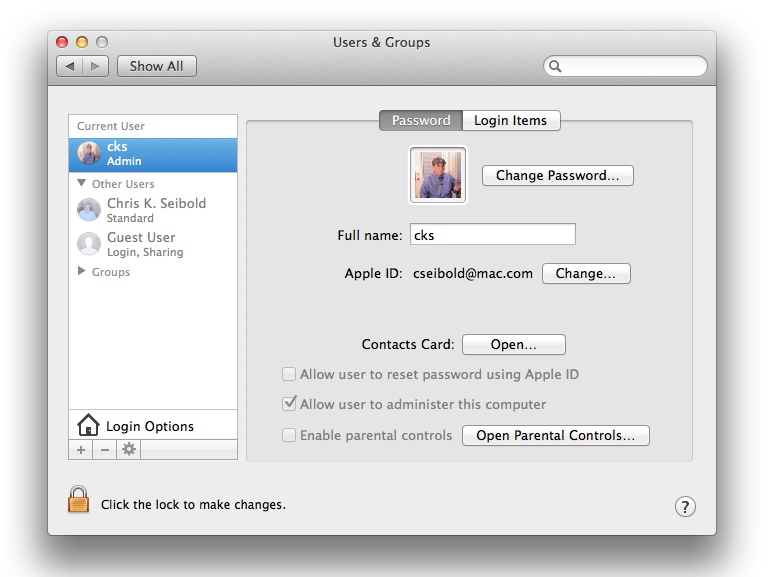
up System Preferences and head to Users & Groups.
You’ll see a list of users on the left side of the pane with the current
user at the very top. Immediately under each user’s name is a label that
indicates what kind of user they are (
Figure 1-9
).

the Login Items tab if you want programs to start automatically when
you log in.
If you only have one administrator account, you can’t really
change your account status because your Mac has to have at least one
admin-level user. In that case, the first step is to add another
administrator user. Click the lock icon in the pane’s lower-left corner
and then type in your administrator password in the window that appears.
Once the pane is unlocked, you can add a new account. Click the + button
above the lock icon and a new window will appear (
Figure 1-10
).
Fill
out the fields and pick a good password (click the key
icon if you want Password Assistant to help you pick a secure one);
write yourself a meaningful hint and click Create User. You now have
two
administrator accounts. Now you’re ready to
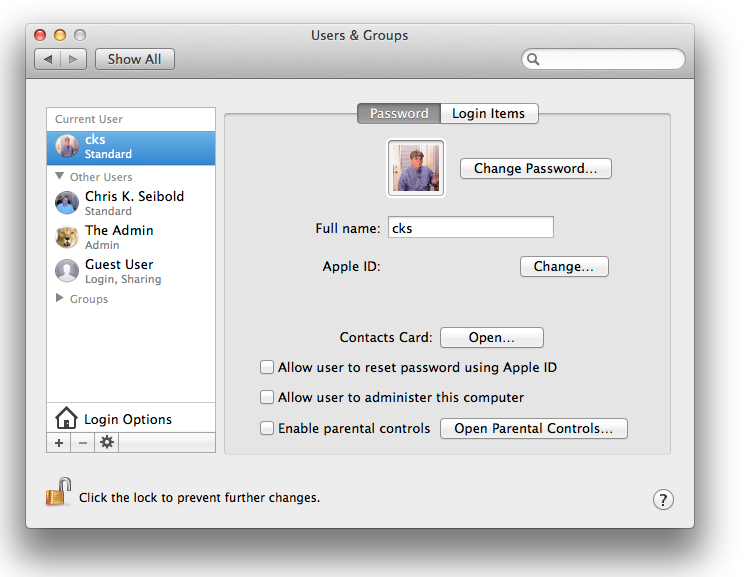
make your original admin account into a standard account: click your
original account in the list on the right side of the preference pane,
and then uncheck the box that says “Allow user to administer this
computer” (
Figure 1-11
).
That’s it—you’ve turned your overly powerful administrator account into
a safe-to-use-daily standard account! (Well, after you restart your
machine, anyway.) In
Figure 1-11
, a former
administrator account has become a standard account.
You might be experiencing some regret at this point. What about
all the power you gave up? How will you get things done when you need to
be an administrator to accomplish something? Will you have to log out
and log back in? Don’t fret: everything will be almost exactly the same.
You’ll still have all the same powers, you’ll just have to occasionally
enter the admin username and password you just created instead of the
password associated with your now-standard account—a small price to pay
for increased
security.

day-to-day use; instead, you’ll use it on those special occasions when
you want to boss your computer around for a bit.

sleep soundly at night.
Now
you know the safe way to do things when it comes to user
accounts, but that method might not be to your liking. You might be one
of those folks who wants to control
everything
—you’re so certain of your abilities that
you don’t want to stumble along using a standard account to safeguard
other users’ data or the integrity of your machine. If you’re one of
those people, the root account may be for you.
Warning: Enabling a root account is a bad idea—a
really
bad idea.
Don’t do
it
. You can accomplish anything you want to by just being
an administrator user or authenticating when you’re trying to do
something potentially damaging. But if you
still
insist on being lord of the realm, this section explains what to
do.
You’ve been warned, but if you want to go ahead and enable the
root account anyway, the process is simple. Open the Users & Groups
preference pane, click the lock icon and enter your admin credentials,
and then click Login Options. In the pane’s list of settings, click the
Join button. Doing so will display a pane where you can enter a server
for your Mac to look at. You don’t need to worry about which server to
choose. Just click the Open Directory Utility button and marvel at the
Directory Utility window (
Figure 1-12
).

for bad acronyms? Nope. Even though this window might not make any
sense at all in light of what you’re trying to do, this is exactly
where you want to be.
You are about to become the supreme overlord of your Mac. First,
unlock the pane by clicking the lock icon and authenticating. Next, head
to the top of your screen, click Edit, and then select Enable Root User,
You’ll see some fields you can use to create a password for the newly
enabled root user. Enter the password and bang—you’ve got a root user
for your Mac!
To log in as the root user, log out or switch users. You’ll see an
option on the Login screen named Others. Choose this option and then
type inrootfor the login name
and the password you created for that account.
Once you’re logged in as the root user, you can do anything you
want. You can look at any file on your machine (even other people’s)
delete any directory, delete any file, or completely ruin the system on
a whim. Logging in as root isn’t
necessarily
dangerous if you’re very careful with what you do while you’re logged
in, but a moment’s lapse of attention and you can do serious
damage.
Note: If
you don’t administer the Mac you use, you might be
worried that the administrator could log in as root and see all your
personal files. That’s certainly possible. The way to prevent that is
to move your home directory to a portable media you can physically
control (see
[Hack #35]
) or
encrypt the data using FileVault 2 (
[Hack #34]
).
