I'm Just Here for the Food (31 page)
Read I'm Just Here for the Food Online
Authors: Alton Brown
Tags: #General, #Courses & Dishes, #Cooking, #Cookery

So we know what we’re looking for: flavorful meat containing a good bit of connective tissue and a moderate level of fat. Take a beef round roast. It has moisture and some connective tissue, but very little fat, which is why it makes for a really crummy pot roast.
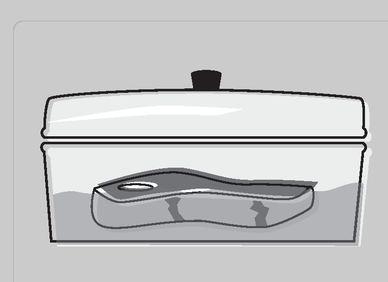
Now the vessel is providing a snugger fit, but there’s still not much in the way of food/liquid contact.

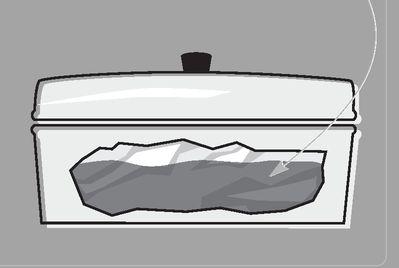
meat and juices inside foil pouch

Because it’s tightly sealed in foil, the meat is completely surrounded by the liquid (remember, the smaller the amount of concentrated liquid the better). The vessel is still necessary because no matter how good you are at metallurgical origami, the packet is going to leak.
Tenderloin and sirloin are even worse when cooked long, low, and wet. Besides, both are relatively tender, so are better suited to a dry method of cooking. Now consider beef short ribs. They’ve got it all: flavor, connective tissue, and enough fat to make up for the moisture lost during long cooking. They’ve also got bones, which bring flavor and even more connective tissue to the party. Short ribs are ideal for braising because they are durable enough to stand up to multiple-stage cooking.
Master Profile: Braising
Heat type:
moist
Mode of transmission:
15:85 percent sear to sub-simmer ratio
Rate of transmission:
One of the slowest methods around
Common transmitters:
heavy pans (sear part) and flavorful liquids (simmer part)
Temperature range:
140° to 210° F
Target food characteristics:
large cuts of meat that are high in connective tissue
Non-culinary use:
tempering steel
Lamb “Pot Roast”
Pot roast is the poster child for braising. I know of no other dish that goes through such a spectacular metamorphosis during cooking, or that comforts so completely after. (I’m getting all teary-eyed just thinking about it.) Although I have nothing against beef pot roast, lamb brings more meat for less cash.
Application: Searing, then Braising
Preheat the oven to 300° F. Season the flour with salt and pepper. Lightly season the chops with salt and pepper and dredge them in the flour. Shake off any excess. Heat the braising pan over medium heat and add the oil. Sear the chops on all sides until browned; you may need to work in 2 batches to avoid overcrowding the pan (overcrowding eliminates the space needed for steam to escape—that sizzling noise you hear—and your food is then steamed and no crust forms). As the chops brown remove them to a plate. Add the garlic and shallots to the pan. Sauté until fragrant, then add the onions, carrots, celery, and fennel. Stir the vegetables around, then add the wine to deglaze the pan, scraping with a wooden spoon. All those browned pieces from the bottom of the pan will “leap” up and cling to the vegetables. Add the tomato paste, then pour in the stock and add the tomatoes and a few sprigs of rosemary (I leave it whole so I can remove it later; I don’t like to eat the rosemary). Sprinkle an even layer of the dredging flour, about ⅓ cup, over the vegetables; this will help to thicken the sauce. Lay the chops on top, put the lid on the pan, and cook in the oven for 2 hours. Chill the meat, in the pan, overnight in the refrigerator, then cook for 1 hour in a 300° F oven. (Any collagen left will come leaping out.) Once finished, allow the chops to rest in the covered pan for 15 to 20 minutes. Remove the chops to a plate and loosely cover with foil. Use a ladle to de-fat the sauce; it should be thinner than gravy but thicker than
jus
. If you like a thicker sauce, purée it together with the vegetables.
Yield: 4 servings
Software:
2 cups flour
Kosher salt
Freshly ground black pepper
4 lamb shoulder chops
¼ cup olive oil
2 heaping tablespoons chopped
garlic
¼ cup chopped shallots
2 cups diced onions
1 cup diced carrots
1 cup diced celery
1 cup diced fennel (optional, but it
gives it a Mediterranean flavor)
1 cup red wine (remember: if you
wouldn’t drink it, why eat it?)
2 tablespoons tomato paste
3 cups beef stock
4 plum tomatoes, seeded and diced
Fresh rosemary sprigs
Hardware:
Large braising pan with lid
Wooden spoon
Tongs
Ladle
Stick blender if you want to purée
the sauce
Smoked and Braised Beef Short Ribs
I start this cooking procedure with smoke. Since the connective tissue of the ribs doesn’t really start dissolving until it reaches 120-130° F, there’s no reason to cook these ribs in liquid the entire time. Short ribs are great simply seared and simmered, but the addition of smoke results in a dish that is far more than the sum of its parts.
Application: Braising
Make a brine.
Bring three cups of the beer, the sugar, and the cup of salt to a boil in a heavy pot. Cook until all the solids are dissolved and then pour into the 2-gallon container. Add the remaining beer and the ice water to cool the brine below 40° F (this should be immediate if the beer and water were chilled). Liberally coat the ribs with salt and submerge them in the brine. Store, refrigerated, for at least 24 hours or up to 3 days.
Smoke the ribs.
Remove the ribs from the brine, rinse thoroughly, and pat dry. Spread a handful of charcoal on the far side of your grill grate and light. When the coals are white and ashy, place the hickory chips in the pie pan and set this on top of the coals. Replace the cooking grate and place the ribs on the opposite side of the grill. Close the lid and allow the ribs to smoke for 20 to 30 minutes. Remove from grill and proceed to the braising.
Braise the ribs.
Preheat the oven to 300° F. Set the roasting pan on the cook top over a medium high flame and add just enough oil to lightly coat the vegetables. Add the carrots, onion, and celery and allow them to caramelize. Deglaze the pan with the wine; using the wooden spoon to scrape up any delicious bits from the bottom of the pan. Set the ribs on top the vegetables and add enough stock to come three-quarters up the side of the roasting pan. Bring the liquid to a boil and very carefully seal the pan with foil. Place in the oven for 1 hour and 15 minutes.
Remove from the oven to the cook top and let rest, covered, for 30 minutes. Remove the foil and carefully pull the bones out of the meat—they are tapered, so just grab the wider end and gently pull. Trim away the tissue that used to surround the bones. Set the meat aside and strain the stock into a sauce pan; discard the vegetables. Bring the stock to a boil and let it reduce in volume by half. Taste and adjust seasoning with salt and pepper (it probably won’t need salt due to the brine). Plate the beef and serve with the sauce.
Yield: 4 servings
Software:
For the brine:
½ gallon dark beer, chilled
(choose your favorite)
1 pound brown sugar
1 cup kosher salt plus enough to
rub on the ribs
1 quart ice water
2 whole short ribs (about
5 pounds)
2 cups hickory wood chips, soaked
in water
Canola oil
1¼ cup diced carrots
1 ⅔ cup diced onion
1¼ cup diced celery
½ cup red wine
2 quarts beef stock
Hardware:
2-gallon container
Heavy pot
Paper towels
Pie pan
Roasting pan
Wooden spoon
Aluminum foil
Strainer
Sauce pan
WHEN RESTING MEAT SORTA BECOMES BRAISING
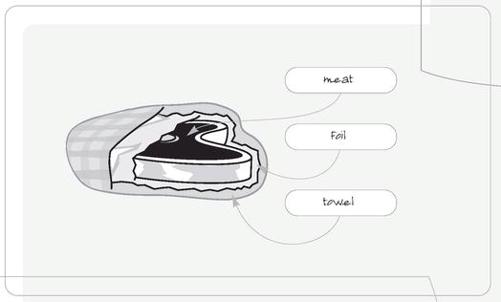
Sear a piece of relatively flat meat, say a nice juicy sirloin, over really high heat, quickly remove it from the heat, and wrap it tightly in two layers of heavy-duty aluminum foil. Then wrap that in an insulator, like a kitchen towel, and set the whole package aside for half an hour on the kitchen counter. Since the foil traps in moisture, and the foil/towel combo traps heat, you have actually added a very effective braising step.
The residual heat may not be enough to actually cook the meat, but pulling it off the heat early and allowing it to finish in this manner can result in a much more tender piece of meat. And the foil catches any and all juices that might leak out of the meat. Au jus, anyone?

No-Backyard Baby Back Ribs
I love baby back ribs because they deliver flavor and finger-lickin’ goodness with little fuss and even less time. I have friends who smoke their ’back ribs for hours and hours and then wonder why they’re tough. The reason is connective tissue, lots of it, and no amount of dry heat is going to dissolve that. If you can’t imagine baby back ribs without smoke, however, go ahead and smoke them for an hour or so before the braising step (see
Smoked and Braised Short Ribs
). Personally I don’t bother. I often wear rubber gloves at the table and eat these ribs over a large mixing bowl. It isn’t pretty.
Application: Braising, then Broiling
Rinse the ribs and pat dry with paper towels. Place on a sheet of extra-wide, heavy-duty aluminum foil. (The foil should be 4 inches longer than the ribs on either end.) Season liberally on both sides with the salt and Rub Number 9.
Turn the ribs meat-side-down and tightly seal according to the illustrations at right.
Place the packet in the roasting pan and refrigerate for 6 to 12 hours, turning the sealed packet over once.
Preheat oven to 350° F.
Remove the packet from the refrigerator and unroll one end, shaping the foil upward like a funnel. Pour in the orange juice and the Margarita mix. Reseal the foil packet and see-saw it back and forth a couple of times to evenly distribute the liquid inside.
Return the packet to the pan and place the pan in the middle of the oven. After 1 hour, reduce temperature to 250° F and cook until tender, approximately 2 hours.
