How to Find and Download Free eBooks Survival Guide (6 page)

Power Switch
- Turns the Nook Color on and off. Also puts the Nook Color in sleep mode.
 Figure 3: Right-Side View
Volume Control -
Increases and decreases the volume of the audio output.
To turn the Nook Color
ON
, push and hold the power switch for three seconds. The device turns on. It takes about 30 seconds for the Nook Color to load at startup.
To turn the Nook Color
OFF
, push and hold the power switch until the message "Turn off Nook Color" appears. Touch
Power off
. The Nook Color turns off.
Using sleep mode will increase the Nook Color's battery life considerably. To lock the Nook Color and put it in Sleep mode, push the power switch once without holding it while the Nook Color is turned on. The touch screen goes black and the Nook Color goes to sleep. To unlock and wake up the device, touch the Nook button once and then touch and slide the green Nook icon to the right.
Before using the Nook Color for the first time, make sure to charge it for at least two hours. Plug the provided power adapter into the USB/Power port at the bottom of your Nook Color. When the charge indicator light on the USB cable turns green, the Nook Color is fully charged. It is important to keep the Nook Color charged to at least 20% to keep the battery from dying completely. Other factors, such as use of wireless and storage temperature affect battery life.
Before first use, the Nook Color must be set up. To set up the Nook Color:
1. For those who are more tech savvy, skip the optional introductory video and proceed to step 2, the agreement. Touch
Agree
at any time to proceed to the next step.
2. Touch the time zone in which you reside. Step four appears.
3. Unlike the original Nook, the Nook Color does not have 3G access. Therefore, before registering the Nook Color or buying media, Wi-Fi needs to be turned on and set up. If you have access to a Wi-Fi hotspot, connect to a network using the Nook Color's built-in wireless chip by following steps 4-5.
4. A list of all available networks appears, as shown in
Figure 4
. Touch the network to which you would like to connect. The connection window appears.
5. Enter the password for the network. Touch
Connect
. The Wi-Fi network connects after a few moments. If it takes too long, the most common problem is an incorrect password.
6. In step 5, the registration screen appears. Enter your Barnes and Noble account information by touching each field and entering your email and password. Touch
Create an Account
if you do not have a Barnes and Noble account. Fill out the fields that appear and touch Submit to create a new account.
The Nook Color is now registered and ready for use.
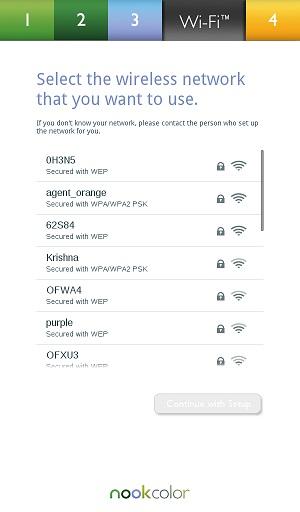 Figure 4: Available Networks
To transfer files to and from the Nook Color, connect it to a PC with the provided USB cable. To connect your Nook Color to your computer and transfer files:
1. Unplug the USB cable from the power adapter that came with the Nook Color.
2. Plug the small end of the USB cable into the bottom of the Nook Color. Plug the other end into a USB port on your computer. Make sure the Nook Color is unlocked.
3. Go to
My Computer
. Double-click the Nook Color removable drive entitled
MyNOOKcolor
or
media
, as shown in
Figure 5
. The Nook Color folders appear.
4. Double-click a folder. The folder opens.
5. Drag and drop a file to the folder. The file is sent to the Nook Color.
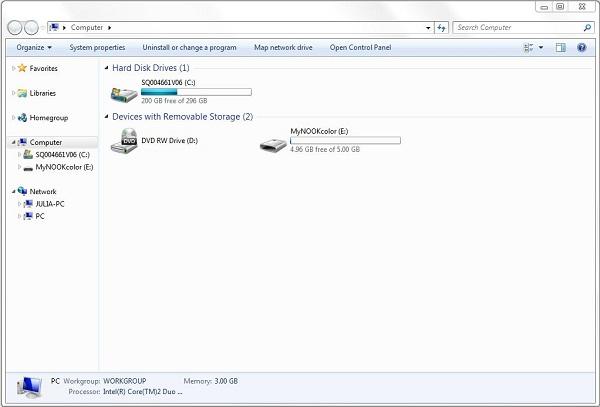 Figure 5: Nook Color Connected to a PC
To transfer files to and from the Nook Color, connect it to a Mac with the provided USB cable. To connect your Nook Color to your Mac and transfer files:
1. Unplug the USB cable from the power adapter that came with the Nook Color.
2. Plug the small end of the USB cable into the bottom of the Nook Color. Plug the other end into a USB port on your Mac. Make sure the Nook Color is unlocked.
3. The Mac instantly detects the Nook Color and the icon appears on the desktop. Double-click the icon.
4. The Nook Color contents appear, as shown in
Figure 6
.
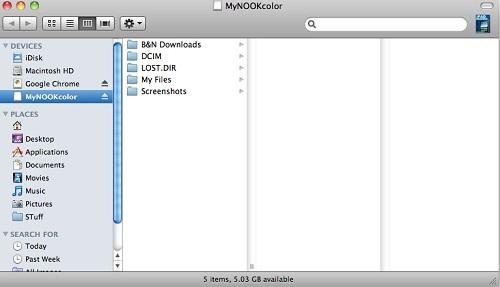 Figure 6: Nook Color Connected to a Mac
To prevent others from using your Nook Color, set a passcode lock that is required every time the device is woken up. To set a passcode lock:
1. Touch the icon. The main menu appears.
2. Touch the icon. The Settings Screen appears, as shown in
Figure 7
.
3. Touch
Security
. The Security Settings screen appears.
4. Touch
Set unlock passcode
. A keypad appears, as shown in
Figure 8
.
5. Type in a passcode. "Confirm passcode" appears at the top of the window.
6. Type the passcode again. The passcode is set.
7. To turn off the passcode feature, touch
Require passcode
and enter the current passcode. The feature is turned off.
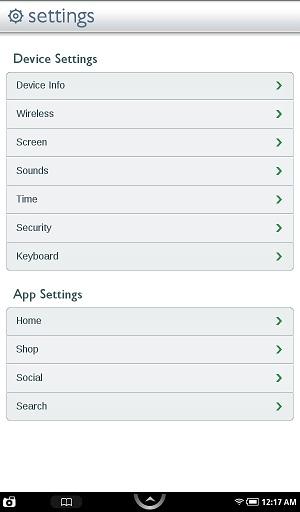 Figure 7: Settings Screen
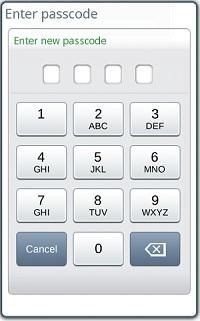 Figure 8: Setting a Passcode
