DIY Projects for the Self-Sufficient Homeowner: 25 Ways to Build a Self-Reliant Lifestyle (5 page)
Authors: Betsy Matheson
Tags: #Non-Fiction

1 Cut a large opening
in the barrel top or lid. Mark the size and shape of your opening—if using a bulk food barrel, mark a large semi-circle in the top of the barrel. If using a plastic garbage can with a lid, mark a 12"-dia. circle in the center of the lid. Drill a starter hole, and then cut out the shape with a jigsaw.

2 Install the overflow hose.
Drill a hole near the top of the barrel for the overflow fitting. Thread the barb fitting into the hole and secure it to the barrel on the inside with the retainer nut and rubber washer (if provided). Slide the overflow hose into the barbed end of the barb elbow until the end of the hose seats against the elbow flange.

3 Drill the access hole
for the spigot (either a hose bibb or sillcock brass or PVC). Tighten the stem of the sillcock onto a threaded coupling inserted into the access hole. Inside the barrel a rubber washer is slipped onto the coupling end and then a threaded bushing is tightened over the coupling to create a seal. Apply a strip of Teflon tape to all threaded parts before making each connection. Caulk around the spigot with clear silicone caulk.

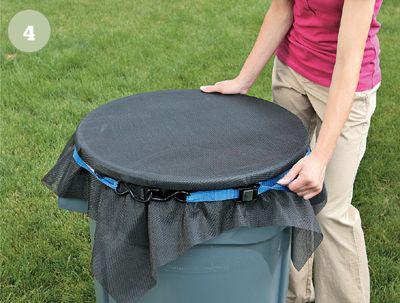
4 Screen over the opening
in the top of the barrel. Lay a piece of fiberglass insect mesh over the top of the trash can and secure it around the rim with a cargo strap or bungee cord that can be drawn drum-tight. Snap the trash can lid over the top. Once you have installed the rain barrel periodically remove and clean the mesh.
How to Install a Rain Barrel

Whether you purchase a rain barrel or make your own from scratch or a kit, how well it meets your needs will depend on where you put it and how it is set up. Some rain barrels are temporary holding tanks that store water runoff just long enough to direct it into your yard through a hose and drip irrigation head. Other rain barrels are more of a reservoir that supplies water on-demand by filling up watering cans or buckets. If you plan to use the spigot as the primary means for dispensing water, you’ll want to position the rain barrel well off the ground for easy access (raising your rain barrel has no effect on water pressure).
In addition to height, other issues surrounding the placement of your rain barrel (or rain barrels) include the need to provide a good base, orientation of the spigot and overflow, the position relative to your downspouts, and how to link more than one rain barrel together.
TIP
: Wherever possible, locate your rain barrel in a shaded area. Sunlight encourages algae growth, especially in barrels that are partially translucent.
TOOLS & MATERIALS
Drill/driver
Screwdriver
Hack saw
Rainbarrel
Hose & fittings
Base material (pavers)
Downspout adapter and extension
Teflon tape

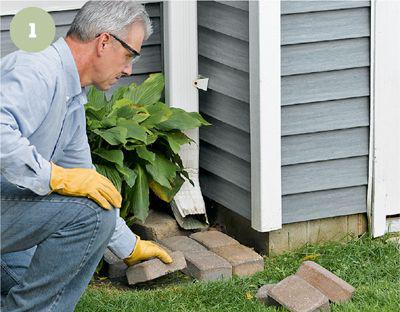
1 Select a location
for the barrel under a downspout. Locate your barrel as close to the area you want to irrigate as possible. Make sure the barrel has a stable, level base.

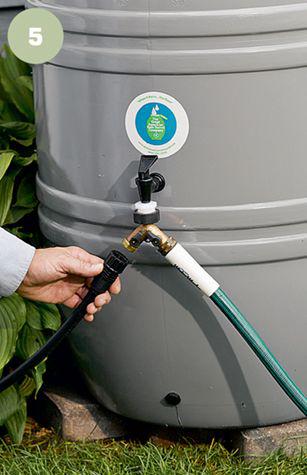
2 Install the spigot
. Some kits may include a second spigot for filling watering cans. Use Teflon tape at all threaded fittings to ensure a tight seal. Connect the overflow tube, and make sure it is pointed away from the foundation.

3 Cut the downspout
to length with a hacksaw. Reconnect the elbow fitting to the downspout using sheet-metal screws. Attach the cover to the top of the rain barrel. Some systems include a cover with porous wire mesh, to which the downspout delivers water. Others include a cover with a sealed connection (next step).

4 Link the downspout
elbow to the rain barrel with a length of flexible downspout extension attached to the elbow and the barrel cover.

Variation:
If your barrel comes with a downspout adapter, cut away a segment of downspout and insert the adapter so it diverts water into the barrel.

