DIY Projects for the Self-Sufficient Homeowner: 25 Ways to Build a Self-Reliant Lifestyle (29 page)
Authors: Betsy Matheson
Tags: #Non-Fiction

Utilitarian by design,
yet pleasing to the eye, the post and board fence evokes the uncomplicated beauty and peacefulness of rolling countryside. The same effect holds true in suburban settings.
 Post & Board Fences
Post and board fences include an endless variety of simple designs in which widely spaced square or round posts support several horizontal boards. This type of fence has been around since the early 1700s, when it began to be praised for its efficient use of lumber and land and its refined appearance. The post and board is still a great design today. Even in a contemporary suburban setting, a classic, white three- or four-board fence evokes the stately elegance of a horse farm or the welcoming, down-home feel of a farmhouse fence bordering a country lane.
Another desirable quality of post and board fencing is its ease in conforming to slopes and rolling ground. In fact, it often looks best when the fence rises and dips with ground contours. Of course, you can also build the fence so it’s level across the top by trimming the posts along a level line. Traditional agricultural versions of post and board fences typically include three to five boards spaced evenly apart or as needed to contain livestock. If you like the look of widely spaced boards but need a more complete barrier for pets, cover the back side of the fence with galvanized wire fencing, which is relatively unnoticeable behind the bold lines of the fence boards. You can also use the basic post and board structure to create any number of custom designs. The fence styles shown in the following pages are just a sampling of what you can build using the basic construction technique for post and board fences.
TOOLS & MATERIALS
Tools and materials for setting posts
Mason’s string
Line level
Circular saw
Speed square
Clamps
Drill
4 × 4 posts
Finishing materials
Bar clamps
Chisel
Primer paint or stain
3" stainless-steel screws
Post levels
Combination square
Eye and ear protection
Lumber (1 × 6, 1 × 4, 2 × 6, 1 × 3)
Deck screws (2", 2-1/2", 3-1/2")
8d galvanized nails
Scrap 2 × 4
Work gloves
Pencil
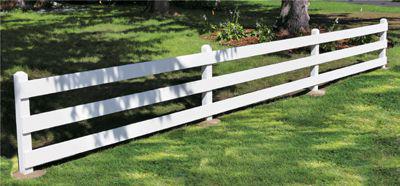
A low post and board fence
, like traditional picket fencing, is both decorative and functional, creating a modest enclosure without blocking views. The same basic fence made taller and with tighter board spacing becomes an attractive privacy screen or security fence.
How to Build a Post & Board Fence

1 Set the posts in concrete,
following the desired spacing. Laying out the posts at 96" on center allows for efficient use of lumber. For smaller boards, such as 1 × 4s and smaller, set posts closer together for better rigidity.

2 Trim and shape the posts
with a circular saw. For a contoured fence, measure up from the ground and mark the post height according to your plan (post height shown here is 36"). For a level fence, mark the post heights with a level string. If desired, cut a 45° chamfer on the post tops using a speed square to ensure straight cuts. Prime and paint (or stain and seal) the posts.

3 Mark the board locations
by measuring down from the top of each post and making a mark representing the top edge of each board. Use a speed square to draw a line across the front faces of the posts at each height mark. Mark the post centers on alternate posts using a combination square or speed square and pencil. For strength, it’s best to stagger the boards so that butted end joints occur at every other post. The centerlines represent the location of each butted joint.
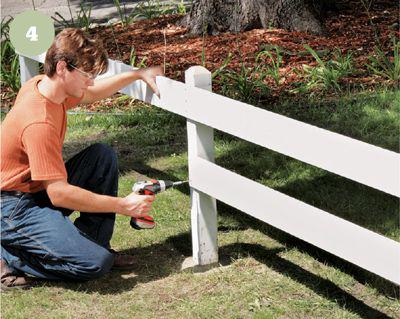
4 Install 1 × 6 boards.
Measure and mark each board for length, and then cut it to size. Clamp the board to the posts, following the height and center marks. Drill pilot holes and fasten each board end with three 2-1/2" deck screws or 8d galvanized box nails. Use three fasteners where long boards pass over posts as well.
Virginia Rail Fence
The Virginia rail fence—also called a worm, snake, or zigzag fence—was actually considered the national fence by the U.S. Department of Agriculture prior to the advent of wire fences in the late 1800s. All states with farmland cleared from forests had them in abundance.
The simplest fences were built with an extreme zigzag and didn’t require posts. To save on lumber and land, farmers began straightening the fences and burying pairs of posts at the rail junctures.
A variation in design that emerged with entirely straight lines is called a Kentucky rail fence.
Feel free to accommodate the overlapping rail fence we build here to suit your tastes and needs. Increase the zigzag to climb rolling ground, decrease it to stretch the fence out. All lapped rail fences should be made from rot-resistant wood like cedar, locust, or cyprus. For the most authentic-looking fence, try to find split rather than sawn logs. For longevity, raise the bottom rail off the ground with stones. Posts may eventually rot below ground, but the inherently stable zigzag form should keep the fence standing until you can replace them.
TOOLS & MATERIALS
Tools & materials for laying out the fence line
Tools & materials for setting posts
Chainsaw or reciprocating saw
Long-handled maul
Bolt cutters
Hatchet
Large screwdriver
Pliers
Clothesline rope
Work gloves
9-gauge galvanized wire

The Virginia Rail Fence
exhibits a very familiar style to anyone who has spent much time in countryside that was cleared and farmed in the 18th and 19th centuries. Since nails were scarce, these zigzagging post- and-rail fences were popular because they are held together with only wire or rope.
How to Build a Virginia Rail Fence
