Cook Like a Rock Star (19 page)
Read Cook Like a Rock Star Online
Authors: Anne Burrell

SERVES: 4 TO 6 • TIME: ABOUT 2 HOURS
Making fresh pasta doesn’t have to be a big to-do. Yes, it can be a lot of work, but the possibilities that await you are endlessly exciting. I love what can be done with just a few basic ingredients and a little bit of skill. Depending on the season, the amount of time you have, or the mood you’re in, you can make short pasta, long pasta, stuffed pasta, whatever you like. As your skill and confidence grow, you’ll realize that a whole new world is open to you with fresh pasta. What I offer here is a way for you to dip your toe in the pool of well-salted pasta water and see where the noodles take you!
MISE EN PLACE
1 pound all-purpose flour (about 3¾ cups), plus more for dusting
4 large eggs plus 1 yolk
¼ cup extra virgin olive oil
Kosher salt
1
Mound the flour on a clean, dry work surface. Make a big hole (called a well) in the center of the flour pile—bigger is definitely better here. Crack the eggs into the hole along with the extra yolk, olive oil, and 2 tablespoons water; season with salt. Using a fork, beat the eggs together with the olive oil, water, and salt and begin to incorporate the flour into the egg mixture. Be careful not to break the well or the egg mixture will run everywhere and you’ll have a big fat mess on your hands (and your board). When enough flour is incorporated that you can handle the dough, use your hands to combine everything really well. If the mixture is tight and dry, wet your hands a bit. When the mixture is homogeneous, start kneading…
2
To knead the dough, it’s VERY important to put your body weight into it, to get on top of the dough, and really stretch it. Be careful not to tear it—the idea is that you stretch the dough, not rip it. Use the heels of your palms and roll the mixture over itself. When it’s done it should be smooth, supple, and velvety and look like the head of a preemie Cabbage Patch doll. Kneading will take anywhere from 8 to 15 minutes, depending on how experienced you are. (Don’t hold back: This is where the perfect, toothsome texture of your pasta is formed. Get in there and work it!)
3
When the pasta is ready, wrap it in plastic and let it rest for at least an hour at room temperature before rolling. If you’re making the dough ahead of time, wrap, refrigerate, and bring to room temperature before using.
4
To roll out pasta, you need to run the dough through the pasta roller a bunch of times to get it long and thin. To start, cut off about a quarter of the dough (remember, the bigger the piece you start with, the longer your dough is going to
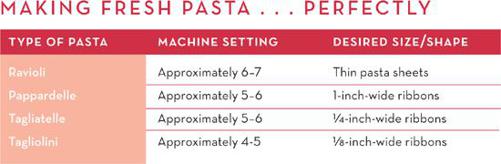
get), keeping the rest wrapped up so it doesn’t dry out. Squish the dough to flatten it—this will help it run through the pasta roller more easily. Where do we start? We start at the beginning! Run the dough through the pasta roller starting on the widest setting, number 1. Then dust the dough with flour, fold it into thirds, and put the dough through this setting two more times. If the dough ever feels sticky or tacky, give it a little dusting of flour. Now adjust the setting to number 2 and repeat the process again—changing the setting each time until your dough is the desired thickness. Once the dough is rolled out, be sure to keep the pasta sheets covered so they don’t dry out. Depending on what I want to use the pasta for, I usually stop around number 5 or 6. For long noodles I keep it thicker, and for ravioli or stuffed pasta, I keep it thinner. All pasta machines are different, so you need to judge how your pasta machine works and adjust your rolling accordingly. Once you get the thickness you want, repeat this process with the remaining pieces of dough.

For whole wheat pasta, substitute 2 cups of whole wheat flour for 2 cups of the all-purpose white. Whole wheat flour is really dry, so you’ll likely have to add some water. Start with ¼ cup water and see how it goes. You don’t want tight, nervous-feeling dough, but how much water you need to add depends on what the flour is telling you that day.
CHEF ANNE’S ALL-PURPOSE PASTA COOKING METHOD
Pasta needs to be cooked in lots of water that’s salty like the ocean. Every single time I cook pasta I taste the water to make sure it’s correctly seasoned. This step is imperative; if you don’t season your pasta water correctly, it doesn’t matter how good your sauce is, your pasta dish will never recover.
So here’s what you need to do: Season your pasta water abundantly (as I said, like the ocean—not the Dead Sea!), bring it to a boil, add the pasta, and give it a good swish to make sure the pasta doesn’t stick together. Don’t crowd your pasta; it needs plenty of room to swim around.
You want dried pasta cooked al dente, which means “on the tooth,” so cook it about one minute less than the package directions recommend (it’s going to cook more once you add it to the sauce). When you bite into any well-cooked dried pasta, you should see a little nugget of hard pasta on the inside. It shouldn’t be crunchy, but it should definitely have a toothsome bite.
Fresh pasta is a different story. It has not been dried so it’s impossible to get that dry white center, and a limp noodle is no fun. Fresh pasta cooks very quickly, so it’s essential to pay attention. What you’re looking for is a noodle that’s tender but also has that toothsome texture when you bite into it.
Once the pasta is cooked, whether fresh or dried, you need to perform the marriage of the pasta and sauce by draining the pasta and cooking it in the sauce for a couple minutes, until the sauce hugs the pasta. It’s a good idea to always reserve a little of your pasta cooking water; you never know when you’re going to need to loosen up your sauce, and this is the way to do it. As the pasta and sauce cook, give them a sprinkey-dink of grated Parm, a drizzle of big fat finishing oil, and stir or toss VIGOROUSLY. This is the glue that holds the marriage of the pasta and sauce together—they should cling to one another! Serve the pasta immediately, and know that proper etiquette is to start eating right away—don’t wait for everyone to be served.

SERVES: 10 TO 12 • TIME: ABOUT 3 HOURS, MOSTLY UNATTENDED
I’ve had a lot of bad gnocchi in my life. You know the kind I’m talking about: You eat three and suddenly your belly expands and you feel like balls of bread dough are rising in there. Gnocchi should be light and airy, like clouds! Over time I’ve perfected the secrets to great gnocchi and if you follow this recipe, even as a beginner, you will be successful EVERY time.
MISE EN PLACE
5 large Idaho potatoes
2 large eggs
¾ cup freshly grated Parmigiano, plus extra for garnish
Kosher salt
2 to 3 cups all-purpose flour (depending on humidity, this will range)
Big fat finishing oil
1
Preheat the oven to 375°F.
2
Put the potatoes on a baking sheet and cook until fork-tender, 45 minutes to 1 hour—check them along the way.
3
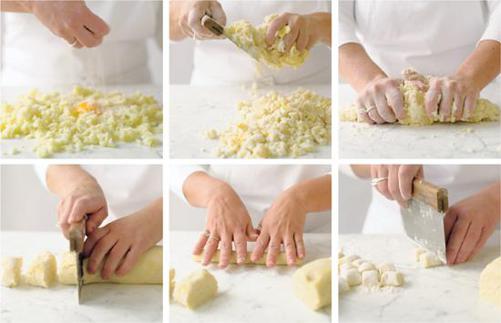
Line a rimmed baking sheet with parchment paper. While the potatoes are still hot, peel and pass them through a food mill or ricer, distributing them in a thin, even layer onto the baking sheet (personally I find that a food mill works better than a ricer because it’s easier to handle). Keep the layer as light and fluffy as possible as you do this to help keep the gnocchi light. When they’re thoroughly riced, put the baking sheet in the fridge and cool the potatoes completely. (If the potatoes are warm when you add the flour, they’ll absorb more flour, leading to heavier gnocchi.)
4
When the potatoes are totally cold, dump them out on a clean work surface. In a small bowl, beat the eggs and cheese together and pour this mixture over the potatoes; season with salt.
5
Cover everything generously with flour—it should look like snow on the mountains—and crumble the potato-flour mixture between your fingers, kneading the dough until it’s a homogeneous mixture. The dough should feel slightly moist, but not tacky. If it’s too tacky, repeat the snow-on-the-mountains stage.
6
Form the dough into a large log. Cut 1-inch slices off the log and roll them into long ropes about ¾ inch thick. Cut the ropes into ½-inch lengths and cover generously with flour. Dust a baking sheet with flour and place the gnocchi on it in a single layer. (Do not even THINK of piling them on top of each other!)
7
Use or freeze the gnocchi immediately. (If freezing, put the baking sheet directly in the freezer. Once frozen, the gnocchi can be put in plastic bags and stored indefinitely. Frozen gnocchi can go directly from the freezer into salted boiling water.) When ready to cook, bring a large pot of well-salted water to a boil. Add the gnocchi and cook until they float to the top of the pot and get nice and puffy. Scoop the gnocchi out of the water, toss with whatever sauce you like, and finish with a little big fat finishing oil and grated Parm.
Gnocchi-dokee!
To make great gnocchi, remember these two secrets: When passing the potatoes through the food mill, keep them as light and fluffy as possible; don’t let them get packed down. Also, it is a general practice to take gnocchi out of the water as soon as they float—BIG MISTAKE! Gnocchi need to be cooked in boiling water until they float
and
get nice and puffy. Don’t be fooled; undercooking will result in heavy gnocchi.
